

Athletics
It entails all track events taking place in the field.
They include:
- Long jump
- Javelin
- Sprint
- Middle distance
- hurdle
Long Jump
- approach
- take off
- flight
- landing
- sail
- hand
- hitch lack
Safety rules to observe.
- Attempt jump, one learner at a time
- Do not attempt jump unless the landing pit is clear
- Use the long jump pit filled with sand or any suitable material from your environment.
- Do not land outside the landing pit
- Ensure all raking of the sand pit or proper arrangement of the material being used on the landing pit.
The approach
- Mark a starting point
- Start your run from a standing position
- Begin the run with a marked forward lean to develop speed but before reaching the takeoff board , be upright
- Be on the ball of the feet when sprinting with a natural head position, eyes focused beyond the pit and not at the take –off board.
- Repeat several times.
The take off
- Prepare for takeoff in the latter phases of your approach run
- Lower the hips then raise them into the take – off phase
- Your hips should be slightly forward
- Place your take off foot slightly ahead of the hips and strike the take – off boards on the mid line
- Place your final two- foot contacts flat on the take – off board.
| Flight technique | Learning points |
| Sail |
|
| Hand |
|
| Hitch kick |
|
- During landing, the athlete should aim at getting the heels as far away and ahead from the takeoff board as possible
- Turn on one side and allow the forward momentum to carry the body past the landing position.
Rules of long jump for sportsmanship
- Do not step beyond the take-off board
- Take off should be on single foot
- Landing should be inside the landing pit
- Do not touch the ground outside the pit when landing
- Exit the pit from the front after jump
- Avoid use of illegal substances and practices the can enhance performance.
Drills In Long Jump.
- Line behind the runways
- Take turns on the runways
- Repeat several times ensuring maximum acceleration.
- In two groups line behind the takeoff board one meter apart.
- The learners in front make a standing jump, taking off on a single foot.
- Move behind the queue to enable other practice
- Repeat several times to identify your preferred take off foot
- Take turns and take off with your preferred foot.
- Repeat several times for skill masterly.
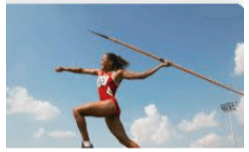
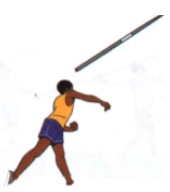
Javelin
- Always carry the javelin vertical with the pointed part down
- Never run to collect the javelin
- Take care when removing the javelin from the ground
- Ensure that the area is clear before throwing the javelin
- Take a few steps backwards continuously
- Continue for the desired time and distance.
Demonstrations For Javelin
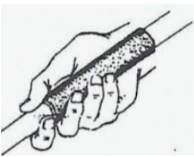
Grip in javelin
- Place the javelin along the length of your plan
- Hold the javelin at the back of the cord
- Keep the point of the javelin pointed in the direction you want to throw
- Keep the javelin lined up with your eyes
- Keep your grip relaxed
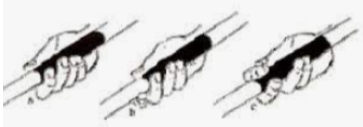
Types of grips in javelin
- The American grip
- The ‘V’ grip
- The finish grip
- The American grip
- Here you Place your thumb and the first two joints of you index finger behind the cord

- Here you Place your thumb and the first two joints of you index finger behind the cord
- The ‘V’ grip
- hold the javelin between your index and middle fingers, behind the cord.

- hold the javelin between your index and middle fingers, behind the cord.
- The finish grip:
- place your thumb and the first tow joints of your index finger behind the cord, while the index finger supports the shaft of the javelin. Extend the index finger further away.

- place your thumb and the first tow joints of your index finger behind the cord, while the index finger supports the shaft of the javelin. Extend the index finger further away.

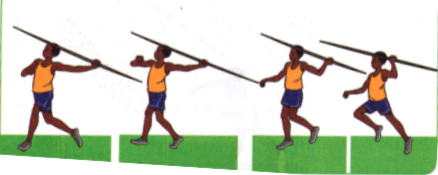
Leaning Points In Javelin
- Hold the javelin near your head above your shoulder
- The javelin should point down towards the ground slightly
- Ensure the javelin is parallel to the ground.
- Look at the direction of your through.
Approach run
- After you have the javelin in position, begin running towards your target with the javelin
- Keep your hips high and down on the balls of your feet
- Let your free arms swing across your body
- Extend the arm carrying the javelin fully behind you.
- Keep your head facing in the direction of your target
- Turn so that the left side of your body faces your target.
Cross over.
- Put your right ahead in a “lean – back “ positions
- Pull the javelin back a little further so that the tip is lined up with your eyebrows
- Keep the right foot close to the ground
- Let the right heel touch the ground
- As the right foot moves forward, move the left foot up and lean your trunk back at 115 degree angle.
- Place your right foot on the ground and you left leg forward and elevated
- Direct your shoulder and hips towards your left target.
- Wait for your left foot to touch the ground
- Straighten your torso
- Turn your face toward the direction of the throw with the javelin parallel to your shoulder
- Position your throwing and hand above shoulder level.


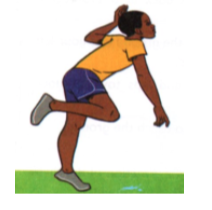
Release
- Through the javelin with your arms as high as possible
- Plant you left heels and thrust forward with your right foot
- Pull back with your left arm keeping it parallel to your right shoulder
- Move your throwing shoulder over your left leg
- Lift your left leg and move your throwing arm, with the elbow placed high and close to the midline.
- Release the javelin with your arm over your head in front of you.

Follow through
- Let your throwing arm travel diagonally across your body.
- For examples if you are throwing with your right arms, it should end up infront of your left side.
- Keep your left foot on the ground.
- Let the right leg pass the left foot and then stop you.
- Finish by standing on your right foot, with your left leg up behind you.
- Your right shoulder will turn left, with your chest facing to the left.

PUPILS ACTIVITIES
Learner to discuss various drills in javelin with the guidance of the teacher
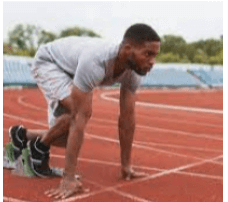
Sprint Start In Athletics
- Place the start of the block rail one step from the start line
- Position the front block two steps from the start line
- Position the back block three steps from the start line
- Place your feet so that the tip of your running shoes touch the track
- Your bodyweight should push into blocks
- Kneel on the back legs
- Place your hands wider hand shoulder – width apart behind the starting line.
- Keep your finger together and thumb in.

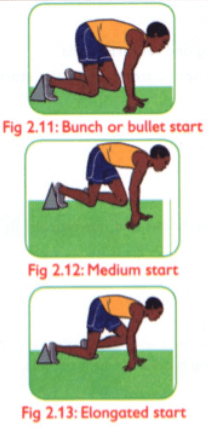
Types of sprint start in athletics
- Bunch or bullet start
- Medium start
- Elongated start
Bunch or bullet start – the toes of the rear foot are approximately leveled with the heel of the front foot. Both feet are placed well back from the starting line
Medium start – The knee of the rear leg is placed opposite at a point in the front half of the front foot.
- Perform the given warm up activities before participation
- Check the ground to ensure that it is not slippery and does not obstacles
- Use the lane assigned to your throughout
- Follow the sprint start commands when starting a race
- Ensure that the starting blocks being used is firmly fixed on the ground.
Pupils activity 6 pg 51
51-52
Running In Sprint Races
- Reaction time - is the time interval between an external signal and your response to it. An examples is hearing a starting gun or a whistle and taking off towards the finish line
- Acceleration - is the rate at which the body changes its speed. For examples, in the first 30m of a 100m sprint’s speed will be increasing.
| Phases in sprint | Characteristics |
| Reaction time |
|
| Acceleration |
|
| Maintaining |
|
- On a flat ground, stand on a free space in groups of four
- Mark a line on the ground
- Three of you to assume a sprint position of your choice
- The fourth learner will give the sprint commands
- On the command go, takeoff ensuring a quick take off
- Change roles ensuring that everyone performs and give commands
- Give honest feedback on the reaction of the go signal and be truthful.
Drill 2: acceleration
- On the flat ground , stand on a free space in groups of four
- Mark a starting line and a finishing line on the ground
- The learner will give the sprint commands
- On the command go , take off quickly after the go signal
- Apply force on the ground with feet pushing back against the track
- Keep your head in line with the body with eyes on the finish line.
- Cut the upward with your hands to help maintain positive acceleration
- Change roles ensuring that everyone performs and give commands
- Give honest feedback on the reaction on the reaction and acceleration and be truthful
Drill 3: maintaining
- On the flat ground, stand on a free space in group of four
- Make a starting line and a finishing line on the ground
- Three of your assume a sprint technique of our voice
- The fourth leaner should give sprint command
- Move your eyes slightly and fast
- Accelerate towards the finishing line
- Maintain the speed by keeping your knees high
- Drive your arms harder to push through the final meters of the race
- Change roles ensuring that everyone performs and give commands
- Give honest feedback on the reaction, accelerations and ensure you are truthful.

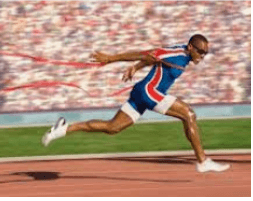
Finishing Technique In Sprint Races
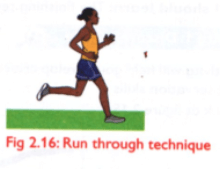
- The athlete crosses the finish line with full speed
- They stop several metres ahead of the finish line
- It is mainly used by beginners
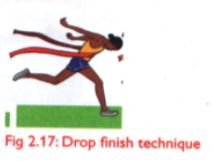
Drop finish
- Performed when an athlete is just one step to the finishing line
- An athlete bends both arms backwards and tries to touch the tape with the chest.
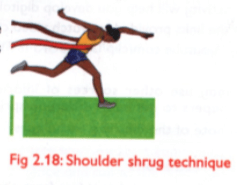
- It is performed at the last movement when an athlete reaches the finishing line
- An athlete shrugs the shoulder that is opposite the tape by turning the chest sideways into the tape.
Similarities
- They are sprint finish techniques
- They are used at the end of a sprint race
- The movement of the arms distinguishes one from another.
- They are applied a step to the finishing line or upon reaching the finishing line
Rules during sprint race
- Preform the warm up activities given before participation
- Use the lane located to your throughout when racing
- Ensure that the finishing area is clear before your start a race.
Baton Change Relay

- 4x100m - four athletes (either male or female) run 100m each
- 4 x 100 relay races - four athletes run 400m each
- The sprint medley relay -
- Mixed relay
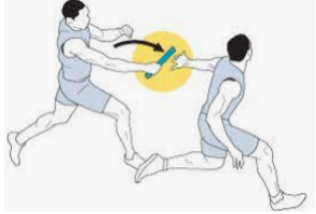
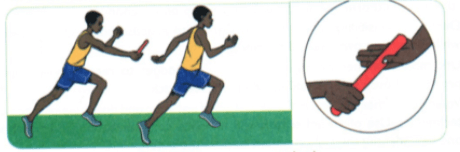
Upsweep Method Of Baton Change In Relay
- This involves the coming athlete passing the baton upwards into the receiving hands
- In this method, the hand is extended back at hip level. The hand is fully open forming a V between the thumb and forefinger.
- The baton is moved upward onto the extended hand of the outgoing runner.

Safety rules:
- Hand over the baton at the designated zone
- Do not through the baton
- Carry the baton throughout the race
- Do not exist your line until its clear and safe to do so without impeding athletes in the other lanes
Drill: Upsweep Drill
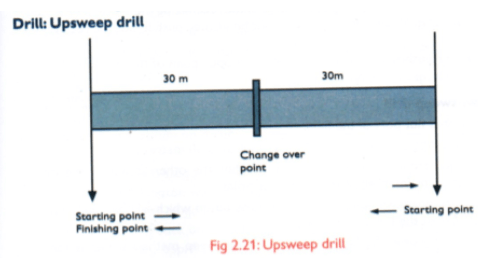
- In pairs, select a flat part of the field.
- Mark a starting point and a hand over point on a 60 metre stretch.
- One of you stands at the starting point while the other will be at the matrked handover point (marked at the 30 metres point).
- The athlete at the starting point to have the baton which will be handed over to the partner at the designated handover point.
- After handing over the baton using the upsweep method, at the designated zone he or she stands at the handover point.
- The receiver to run for 30metres and stop briefly for a rest.
- The point where he or she stops becomes the starting point when running back.
- He or she runs back up to the desgnated zone 30 metres mark where the partner is and hands over the baton using the upsweep method.
- The partner will run back 30 metres to the strating point.
- Repeat several times for skill masterly
- Continue using the method of change as you enhance self-efficacy and depict the value of love as you share the baton and care for each other.
Downsweep method of baton change
Download Athletics - Grade 7 Physical Education & Sports Revision Notes.
Tap Here to Download for 30/-
Get on WhatsApp for 30/-
Why download?
- ✔ To read offline at any time.
- ✔ To Print at your convenience
- ✔ Share Easily with Friends / Students