
- Laboratory safety
- Causes of accidents in the laboratory
- First Aid safety measures for common laboratory accidents
- General course of action
- First Aid: Eye Exposure to Hazardous Chemical
- First Aid: Skin Exposure
- First Aid: Inhalation of Chemical Vapors, Fumes or Smoke
- First Aid: Chemical Ingestion
- Importance of safety in the laboratory
- Basic Science Skills
- Importance of reading packing labels on products/quantities
- SI Units
- Laboratory apparatus
- Parts and functions of a microscope
- Common school laboratory safety rules

The Laboratory
Laboratory safety
A place equipped for experimental study in a science or for testing and analysis. a research laboratory. broadly: a place providing opportunity for experimentation, observation, or practice in a field of study.
Common hazards and their symbols
Hazard pictograms alert us to the presence of a hazardous chemical. The pictograms help us to know that the chemicals we are using might cause harm to people or the environment. Here are a few of them.
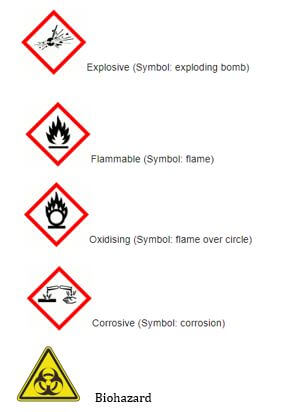
Biohazard – It provides warning on lab equipment that may contain biohazardous materials like blood samples.
Causes of accidents in the laboratory
- CHEMICALS
If you handle chemicals, you need to wear protective gloves. Treat chemicals with the necessary caution, measure chemicals carefully, contain potentially irritating or hazardous chemicals and use only approved containers when you’re transferring chemicals.
Chemical burns should be treated by flushing the affected area with a large amount of cool, running water for at least 15 minutes. If the burn area is large or if the affected person is dizzy or weak, call 911.
If you work in a chemistry lab, ensure you are taking the proper steps to be safe around the chemicals in your workplace. - HEAT
Exercise caution when handling hot items. Hastily or improperly handling these items without the correct tools can cause serious burns. Workers should be properly using water baths, tongs and cooling equipment. Be careful not to touch hot surfaces with your bare hand.
If you suffer a heat burn in the lab, run the burned area under cool water for five minutes. - CUTS AND SCRAPES
Using sharp tools in the laboratory setting can cause scrapes and cuts. Workers may also use sharp objects, such as needles and razor blades, or need to clean up broken glass. To avoid cutting yourself on these items, carefully wrap them so that you can safely carry and dispose of them. - CONTAMINATION
Avoiding contamination is key to ensuring safety in the lab setting. Though the advice to wash your hands may seem quite basic, it’s an important procedure to avoid contamination. After you interact with any foreign substance, you should wash your hands thoroughly.
Protect your skin and clothing with the proper equipment, such as gloves, glasses and a lab coat. You can contaminate areas outside of the lab if you carry bacteria or other substances on your clothing or skin, which can cause the spread of illnesses and other dangers. - INHALING SUBSTANCES
Another common type of lab accident is inhalation. If you inhale chemicals or gases in a space that isn’t properly ventilated, you may experience nausea, headaches or fainting. Ensure you follow proper procedures for ventilation, such as using ventilation fans and measuring the amount of gas emitted in a room. - FIRES
When working with hot surfaces and flammable materials, fires become a common danger. Review and practice the proper procedures to ensure you minimize the risk of fire in the laboratory. All flammable materials should be properly stored and sealed. Inspect burners for leaks to avoid sudden flares. - SPILLS AND BREAKS
In the lab, glass beakers may be dropped and break. Liquids may be spilled. Generally, these accidents are caused by rushing, being negligent and not properly following procedures. While you work, move carefully through every step. Moving slowly but more steadily will be much better for the safety of yourself and your colleagues.
Though students have a responsibility to themselves and their colleagues to exercise proper safety measures and follow protocol, the laboratory environment itself should also follow guidelines from the Occupational Safety and Health Administration (OSHA) to provide workers with safe working conditions.
- Lack of warning labels and signs
- Inadequate eye and face protection against chemical and environmental hazards
- Lack of protection against hazardous sources of energy, such as electric power
- Inadequate respiratory protection for working with gases, chemicals and smoke
First Aid safety measures for common laboratory accidents
General course of action
- RELOCATE everyone in the immediate work area to a safe location.
- ALERT-
- CONFINE- If it can be done safely, close doors to confine the area where the emergency occurred. Post an “Emergency Hangtag” on the door(s) to prevent reentry by other personnel.
- EVACUATE the building through the nearest exit. Do not run. Do not use elevators.
- REPORT to your designated meeting site.
- REENTER once the lab has been cleared by emergency personnel.
First Aid: Eye Exposure to Hazardous Chemical
- Forcibly hold both eyes open under an emergency eyewash to ensure an effective wash behind both eyelids.
- If contact lenses are being worn, remove the contacts while flushing.
- Continue flushing the eyes underneath the eyewash until emergency personnel arrive.
- Report the injury to your principal investigator and/or laboratory/facility manager.
First Aid: Skin Exposure
- Wash affected area(s) with tepid water from an emergency safety shower. Take care not to break skin.
- Remove or cut off contaminated clothing while rinsing. Do not pull contaminated clothing over the head.
- For chemical and thermal burns, flush affected area(s) with water from the safety shower, if indicated in safety data sheet.
- For blood, biological, or radiological exposures use soap and water.
- Keep flushing affected area(s) underneath the safety shower until emergency personnel arrive.
- Report the injury to your principal investigator and/or laboratory/facility manager.
First Aid: Inhalation of Chemical Vapors, Fumes or Smoke
- If exposed individual is unconscious, do NOT enter the lab if a possibility of oxygen depletion, toxic vapors, or an explosive atmosphere exists.
- If exposed individual is conscious, move the person to fresh, uncontaminated air.
- Report the injury to your principal investigator and/or laboratory/facility manager.
First Aid: Chemical Ingestion
- If safe to do so, move affected individual to an uncontaminated area.
- Do not induce vomiting or drink water or other liquids unless instructed to do so by emergency personnel.
- Report the injury to your principal investigator and/or laboratory/facility manager.
Importance of safety in the laboratory
Laboratory safety is an essential part of ensuring the health and safety of workers and researchers in laboratory settings. Laboratories can be hazardous environments with various potential risks, including chemical spills, fires, explosions, and exposure to hazardous substances.
Lab safety is important because it can prevent injury, keep us from making mistakes and save lives.
- Lab safety equipment can prevent injury.
- Lab safety equipment can help you avoid making mistakes.
- Lab safety equipment can save lives.
Safety is important when working in the lab because it helps you avoid injury, keep yourself from making mistakes and save lives of others who may be nearby when an accident happens, or if there is a fire or other emergency situation that needs to be handled quickly and safely by someone who knows what they're doing before the situation gets out of hand.
Following lab safety rules is part of being a good citizen.
Following lab safety rules is part of being a good citizen. When you follow lab safety rules, you are doing your part to keep everyone safe. You are protecting yourself, your peers and coworkers, and everyone around you. Lab safety rules help prevent accidents and injuries, which means they can also save lives.
We should follow the lab safety protocols to stay safe and healthy!
By following the lab safety protocols, you will stay safe and healthy.
- It is absolutely critical that you follow all the rules of your lab protocol when conducting experiments in the lab. This allows you to avoid accidents and contamination, which can cause injury or illness.
- You should always wear protective clothing (goggles, gloves and a face mask) to keep yourself safe from hazardous materials such as chemicals or glass shards if an accident occurs in the laboratory.
- You should never eat or drink anything in the laboratory because it could easily contaminate your food with chemicals or bacteria potentially harmful for consumption by humans!
Basic Science Skills
Basic skills in science
- Observing
This is the most basic skill in science. Observations are made by using the 5 senses. Good observations are essential in learning the other science process skills.
Examples:
The learner will be blind folded and make observations using the sense of touch.
The learner will create observations about a coin using the 5 senses.
The learner will mix primary colors to create more colors. - Communicating
It is important to be able to share our experiences. This can be done with graphs, diagrams, maps, and spoken word.
Examples:
The learner will create a line graph showing the relationship between speed and the mass of a marble.
The learner will discuss possible errors with other classmates. - Classifying
After making observations it is important to notice similarities, differences, and group objects according to a purpose. It is important to create order to help comprehend the number of objects, events, and living things in the world.
Examples:
The learner will use a magnet to classify objects as magnetic or nonmagnetic.
The learner will use a balance and sort objects according to mass.
The learner will combine different liquids with water to determine which is more or less dense. - Inferring
An inference is an explanation based on an observation. It is a link between what is observed and what is already known.
Examples:
The learner will write a conclusion at the end of each investigation.
The learner will create inferences about observations they made about a mystery object. I infer it is solid rather than hollow. - Measuring
Measuring is important in collecting, comparing, and interpreting data. It helps us classify and communicate with others. The metric system should be used to help understand the scientific world.
Examples:
The learner will find the mass of different liquids that have the same volume.
The learner will use technology to find the speed of a toy truck.
The learner will measure the distance a marble travels. - Predicting
What do you think will happen? It is an educated guess based on good observations and inferences about an observed event or prior knowledge.
Examples:
The learner will predict what is a box based on observations using the sense of touch.
The learner will write a hypothesis about the effect of increasing the salt on the buoyancy of an egg. - Manipulative skill
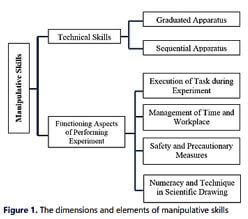
In science, manipulative skills emphasize the use and handling of scientific apparatus and chemical substances during scientific investigation in the laboratory.
Importance of reading packing labels on products/quantities
- It helps in knowing the quantity of the product
- It helps in knowing the product specifications like:
- Conditions for storage
- Date of expiry
- How to use the product
- Possible side effects
- What to do in case of emergencies
- How to dispose the product among others
SI Units
The International System Of Units (SI) is the metric system that is used universally as a standard for measurements. SI units play a vital role in scientific and technological research and development.
SI unit is an international system of measurements that are used universally in technical and scientific research to avoid the confusion with the units. Having a standard unit system is important because it helps the entire world to understand the measurements in one set of unit systems. Following is the table with base SI units:
| Sl. No. | Name of the Quantity | SI Unit | SI Unit Symbol |
| 1 | Length (l) | Meter | m |
| 2 | Mass (M) | Kilogram | kg |
| 3 | Time (T) | Second | s |
| 4 | Electric current (I) | Ampere | A |
| 5 | Thermodynamic temperature (Θ) | Kelvin | K |
| 6 | Amount of substance (N) | Mole | mol |
| 7 | Luminous intensity (J) | Candela | cd |
There are 7 SI base units. The seven units along with their SI unit and symbol are given below:
- Unit of length, meter (m): Meter is the SI unit of length and is defined by taking the fixed value of the speed of light in vacuum. It is expressed as m.s-1.
- Unit of mass, kilogram (kg): Kilogram is the SI unit of mass and is defined by taking the fixed value of the Planck constant. It is expressed as kg
- Unit of time, second (s): Second is the SI unit of time and is defined by taking the fixed value of Cesium frequency.
- Unit of electric current, ampere (A): Ampere is the SI unit of electric current and is defined by taking the fixed value of the elementary charge.
- Unit of thermodynamic temperature, Kelvin (K): Kelvin is the SI unit of thermodynamic temperature
- Unit of the amount of substance, mole (mol): Mole is the SI unit of the amount of substance and is defined by the fixed value of Avogadro constant NA.
- Unit of luminous intensity, candela (cd): Candela is the SI unit of luminous intensity and is defined by the fixed value of the luminous efficacy.
Laboratory apparatus
An apparator /apparatus are scientific tools/equipment used in performing scientific experiments. The conventional apparator used in performing scientific experiments is called standard apparator/apparatus. If the conventional standard apparator/apparatus is not available, an improvised apparator/apparatus may be used in performing scientific experiments. An improvised apparator/apparatus is one used in performing a scientific experiment for a standard apparator/apparatus. Most standard apparatus in a school chemistry laboratory are made of glass because:
- Glass is transparent and thus reactions /interactions inside are clearly visible from outside
- Glass is comparatively cheaper which reduces cost of equipping the school chemistry laboratory
- Glass is comparatively easy to clean/wash after use.
- Glass is comparatively unreactive to many chemicals.
Apparatus are designed for the purpose they are intended in a school chemistry laboratory:
- Apparatus for measuring volume
- Measuring cylinder
Measuring cylinders are apparatus used to measure volume of liquid/ solutions. They are calibrated/ graduated to measure any volume required to the maximum. Measuring cylinders are named according to the maximum calibrated/graduated volume e.g.- “10ml” measuring cylinder is can hold maximum calibrated/graduated volume of “10mililitres” /“10 cubic centimetres”
- “50ml” measuring cylinder is can hold maximum calibrated/graduated volume of “50mililitres” /“50 cubic centimetres”
- “250ml” measuring cylinder is can hold maximum calibrated/graduated volume of “250mililitres” /“250 cubic centimetres”
- “1000ml” measuring cylinder is can hold maximum calibrated/graduated volume of “1000mililitres” /“1000 cubic centimetres”
- Burette
Burette is a long and narrow/thin apparatus used to measure small accurate and exact volumes of a liquid solution. It must be clamped first on a stand before being used. It has a tap to run out the required amount out. They are calibrated/ graduated to run out small volume required to the maximum 50ml/50cm3.
The maximum 50ml/50cm3 calibration/ graduation reading is at the bottom .This ensure the amount run out from a tap below can be determined directly from burette reading before and after during volumetric analysis.
Burettes are expensive and care should be taken when using them. -
- Pipette
Pipette is a long and narrow/thin apparatus that widens at the middle used to measure and transfer small very accurate/exact volumes of a liquid solution.
It is open on either ends.
The maximum 25ml/25cm3 calibration/ graduation mark is a visible ring on one thin end.
To fill a pipette to this mark, the user must suck up a liquid solution upto a level above the mark then adjust to the mark using a finger.
This requires practice. - Pipette filler
Pipette filler is used to suck in a liquid solution into a pipette instead of using the mouth. It has a suck, adjust and eject button for ensuring the exact volume is attained. This requires practice.
- Pipette
- Volumetric flask.
A volumetric flask is thin /narrow but widens at the base/bottom. It is used to measure very accurate/exact volumes of a liquid solution.
The maximum calibration / graduation mark is a visible ring.
Volumetric flasks are named according to the maximum calibrated/graduated volume e.g.- “250ml” volumetric flask has a calibrated/graduated mark at exact volume of “250mililitres” /“250centimetres”
- “1l” volumetric flask has a calibrated/graduated mark at exact volume of “one litre” /“1000 cubic centimeters”
- “2l” volumetric flask has a calibrated/graduated mark at exact volume of “two litres” /“2000 cubic centimeters”
- Dropper/teat pipette
A dropper/teat pipette is a long thin/narrow glass/rubber apparatus that has a flexible rubber head.
A dropper/teat pipette is used to measure very small amount/ drops of liquid solution by pressing the flexible rubber head. The numbers of drops needed are counted by pressing the rubber gently at a time
- Measuring cylinder
- Apparatus for measuring mass
- Beam balance
A beam balance has a pan where a substance of unknown mass is placed. The scales on the opposite end are adjusted to “balance” with the mass of the unknown substance. The mass from a beam balance is in grams. - Electronic/electric balance.
An electronic/electric balance has a pan where a substance of unknown mass is placed. The mass of the unknown substance in grams is available immediately on the screen.
- Beam balance
- Apparatus for measuring temperature
A thermometer has alcohol or mercury trapped in a bulb with a thin enclosed outlet for the alcohol/mercury in the bulb.
If temperature rises in the bulb, the alcohol /mercury expand along the thin narrow enclosed outlet.
The higher the temperature, the more the expansion
Outside, a calibration /graduation correspond to this expansion and thus changes in temperature.
A thermometer therefore determines the temperature when the bulb is fully dipped in to the substance being tested. To determine the temperature of solid is thus very difficult. - Apparatus for measuring time
The stop watch/clock is the standard apparatus for measuring time. Time is measured using hours, minutes and second.
Common school stop watch/clock has start, stop and reset button for determining time for a chemical reaction. This requires practice. - Apparatus for scooping
- Spatula
A spatula is used to scoop solids which do not require accurate measurement. Both ends of the spatula can be used at a time.
A solid scooped to the brim is “one spatula end full” A solid scooped to half brim is “half spatula end full”. - Deflagrating spoon
A deflagrating spoon is used to scoop solids which do not require accurate measurement mainly for heating. Unlike a spatula, a deflagrating spoon is longer.
- Spatula
- Apparatus for putting liquids/solid for heating.
- Test tube.
A test tube is a narrow/thin glass apparatus open on one side. The end of the opening is commonly called the “the mouth of the test tube”. - Boiling/ignition tube.
A boiling/ignition tube is a wide glass apparatus than a test tube open on one side. The end of the opening is commonly called the “the mouth of the boiling/ignition tube”. - Beaker.
Beaker is a wide calibrated/graduated lipped glass/plastic apparatus used for transferring liquid solution which do not normally require very accurate measurements
Beakers are named according to the maximum calibrated/graduated volume they can hold e.g.- “250ml” beaker has a maximum calibrated/graduated volume of “250mililitres” /“250 cubic centimeters”
- “1l” beaker has a maximum calibrated/graduated volume of “one litre” /“1000 cubic centimeters”
- “5 l” beaker has a maximum calibrated/graduated volume of “two litres” /“2000 cubic centimeters”
- Conical flask.
A conical flask is a moderately narrow glass apparatus with a wide base and no calibration/graduation. Conical flasks thus carry/hold exact volumes of liquids that have been measured using other apparatus. It can also be put some solids. The narrow mouth ensures no spillage.
Conical flasks are named according to the maximum volume they can hold e.g.- “250ml” Conical flasks hold a maximum volume of “250mililitres” /“250 cubic centimeters”
- “500ml” Conical flasks hold a maximum volume of “500ml” /“1000 cubic centimeters”
- Round bottomed flask
A round bottomed flask is a moderately narrow glass apparatus with a wide round base and no calibration/graduation. Round bottomed flask thus carry/hold exact volumes of liquids that have been measured using other apparatus. The narrow/thin mouth prevents spillage. The flask can also hold (weighed) solids. A round bottomed flask must be held/ clamped when in use because of its wide narrow base. - Flat bottomed flask
A flat bottomed flask is a moderately narrow glass apparatus with a wide round base with a small flat bottom. It has no calibration/graduation.
Flat bottomed flasks thus carry/hold exact volumes of liquids that have been measured using other apparatus. The narrow/thin mouth prevents spirage. They can also hold (weighed) solids. A flat bottomed flask must be held/ clamped when in use because it’s flat narrow base is not stable.
- Test tube.
- Apparatus for holding unstable apparatus (during heating).
- Tripod stand
A tripod stand is a three legged metallic apparatus which unstable apparatus are placed on (during heating).Beakers. Conical flasks, round bottomed flask and flat bottomed flasks are placed on top of tripod stand (during heating). - Wire gauze/mesh
Wire gauze/mesh is a metallic/iron plate of wires crossings. It is placed on top of a tripod stand:- Ensure even distribution of heat to prevent cracking glass apparatus
- Hold smaller apparatus that cannot reach the edges of tripod stand
- Clamp stand
A clamp stand is a metallic apparatus which tightly hold apparatus at their “neck” firmly.
A clamp stand has a wide metallic base that ensures maximum stability. The height and position of clamping is variable. This require practice - Test tube holder
A test tube holder is a hand held metallic apparatus which tightly hold test/boiling/ignition tube at their “neck” firmly on the other end.
Some test tube holders have wooden handle that prevent heat conduction to the hand during heating. - Pair of tong.
A pair of tong is a scissor-like hand held metallic apparatus which tightly hold firmly a small solid sample on the other end. - Gas jar
A gas jar is a long wide glass apparatus with a wide base.
It is open on one end. It is used to collect/put gases.
This requires practice.
- Tripod stand
- Apparatus for holding/directing liquid solutions/funnels (to avoid spillage).
- Filter funnel
A filter funnel is a wide mouthed (mainly plastic) apparatus that narrow drastically at the bottom to a long extension.
When the long extension is placed on top of another apparatus, a liquid solution can safely be directed through the wide mouth of the filter funnel into the apparatus without spirage.
Filter funnel is also used to place a filter paper during filtration. - Thistle funnel
A thistle funnel is a wide mouthed glass apparatus that narrow drastically at the bottom to a very long extension.
The long extension is usually drilled through a stopper/cork.
A liquid solution can thus be directed into a stoppered container without spillage - Dropping funnel
A dropping funnel is a wide mouthed glass apparatus with a tap that narrow drastically at the bottom to a very long extension.
The long extension is usually drilled through a stopper/cork.
A liquid solution can thus be directed into a stoppered container without spillage at the rate determined by adjusting the tap. - Separating funnel
A separating funnel is a wide mouthed glass apparatus with a tap at the bottom narrow extension.
A liquid solution can thus be directed into a separating funnel without spillage. It can also safely be removed from the funnel by opening the tap.
It is used to separate two or more liquid solution mixtures that form layers/immiscible. This requires practice.
- Filter funnel
- Apparatus for heating/Burners
- Candle, spirit burner, kerosene stove, charcoal burner/jiko are some apparatus that can be used for heating.
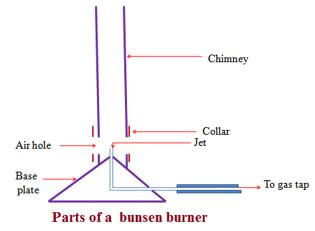
Any flammable fuel when put in a container and ignited can produce some heat. - Bunsen burner
The Bunsen burner is the standard apparatus for heating in a Chemistry school laboratory.
It was discovered by the German Scientist Robert Wilhelm Bunsen in1854.- Diagram of a Bunsen burner

A Bunsen burner uses butane/laboratory gas as the fuel. The butane/laboratory gas is highly flammable and thus usually stored safely in a secure chamber outside Chemistry school laboratory. It is tapped and distributed into the laboratory through gas pipes.
The gas pipes end at the gas tap on a chemistry laboratory bench .If opened the gas tap releases butane/laboratory gas. Butane/laboratory gas has a characteristic odor/smell that alerts leakages/open gas tap.
The Bunsen burner is fixed to the gas tap using a strong rubber tube.
The Bunsen burner is made up of the following parts:- Base plate –to ensure the burner can stand on its own
- Jet-a hole through which laboratory gas enters the burner
- Collar/sleeve-adjustable circular metal attached to the main chimney/burell with a side hole/entry. It controls the amount of air entering used during burning.
- Air hole- a hole/entry formed when the collar side hole is in line with chimney side hole. If the collar side hole is not in line with chimney side hole, the air hole is said to be “closed” If the collar side hole is in line with chimney side hole, the air hole is said to be “open”
- Chimney- tall round metallic rod attached to the base plate.
- Procedure for lighting/igniting a Bunsen burner
- Adjust the collar to ensure the air holes are closed.
- Connect the burner to the gas tap using a rubber tubing. Ensure the rubber tubing has no side leaks.
- Turn on the gas tap.
- Ignite the top of the chimney using a lighted match stick/gas lighter/wooden splint.
- Do not delay excessively procedure (iv) from (iii) to prevent highly flammable laboratory gas from escaping/leaking.
- Diagram of a Bunsen burner
- Candle, spirit burner, kerosene stove, charcoal burner/jiko are some apparatus that can be used for heating.
Parts and functions of a microscope
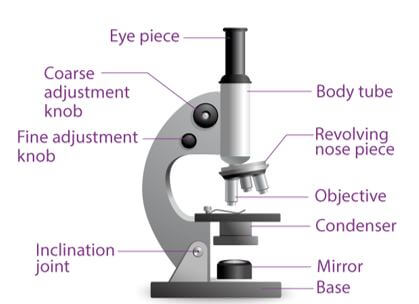
A compound microscope is a high-power microscope that has higher magnification levels than a low-power or dissection microscope. It is used to examine tiny specimens like cell structures that cannot be viewed at lower magnification levels. A compound microscope is made up of both structural and optical components. The 3 basic structural components are – the head, arm and base.
The body or head comprises the optical parts present in the upper part of the microscope
The arm connects and supports the base and head of the microscope. Also, it is used to carry the microscope.
Base of the microscope supports the microscope and comprises the illuminator
The optical part of the microscope includes:
- Eyepiece
- Eye tube
- Objective lenses
- Nosepiece
- Adjustment knobs
- Stage
- Illuminator
- Condenser and condenser focus knob
Diaphragm
The ocular or eyepiece is what an observer looks through and is present in the upper portion of the microscope. The eyepiece tube clasps the eyepieces which are positioned above the objective lens. The objective lenses are the main optical lenses. They range in various magnifications from 4x to 100x and generally include 3 to 5 lenses on a single microscope. Nosepiece houses the objective lenses.
The fine and coarse focus knobs are the adjustment knobs that are often used to focus the microscope. They are coaxial knobs. This means the focusing system of both fine and coarse focus are mounted on the same axis. There is also a condenser focus knob which moves the condenser up or down to control the lighting
The stage is where the specimen to be viewed is placed. A mechanical stage is often used when working on a specimen at a higher magnification. This is when delicate movement of the specimen is required. Stage clips are operated to hold the slide in place. To see different areas of the specimen, the observer must physically move the slide. A separate knob is present to move the slide in the mechanical stage. The aperture is a tiny hole in the stage via which the transmitted light enters the stage.
An illuminator acts as the light source and is typically located at the microscope’s base. Most light microscopes operate on halogen bulbs with low voltage and also have variable and continuous lighting control within the base. A condenser is typically used to gather and focus the illuminator’s light onto the specimen. It is found beneath the stage and is often observed in conjunction with a diaphragm or iris. Iris or Diaphragm regulates the amount of light that reaches the specimen. It is situated above the condenser but beneath the stage.
Functions of Microscope
The primary function of a microscope is to study biological specimens. A microscope solely functions on two concepts – magnification and resolution. Magnification is simply the ability of the microscope to enlarge the image. Whereas the ability to analyse minute details depends on the resolution.
Compound and dissection microscopes are the two types of microscopes that are mostly used in schools for educational purposes.
Functions of compound microscope
It simplifies the study of viruses and bacteria.
They are used in pathology labs to make an easy diagnosis of diseases.
They are also used in forensic laboratories to identify human fingerprints.
Common school laboratory safety rules
The following safety guideline rules should be followed by chemistry laboratory users:
- Enter the laboratory with permission in an orderly manner without rushing/pushing/scrabbling.
- Do not try unauthorized experiments. They may produce flammable, explosive or toxic substances that affect your health.
- Do not taste any chemical in the laboratory. They may be poisonous.
- Waft gas fumes to your nose with your palm. Do not inhale/smell gases directly. They may be highly poisonous/toxic.
- Boil substances with mouth of the test tube facing away from others and yourself. Boiling liquids spurt out portions of the hot liquid. Products of heating solids may be a highly poisonous/toxic gas.
- Wash with lots of water any skin contact with chemicals immediately. Report immediately to teacher/laboratory technician any irritation, cut, burn, bruise or feelings arising from laboratory work.
- Read and follow safety instruction. All experiments that evolve/produce poisonous gases should be done in the open or in a fume chamber.
- Clean your laboratory work station after use. Wash your hand before leaving the chemistry laboratory.
- In case of fire, remain calm, switch of the source of fuel-gas tap. Leave the laboratory through the emergency door. Use fire extinguishers near the chemistry laboratory to put of medium fires. Leave strong fires wholly to professional fire fighters.
- Do not carry unauthorized item from a laboratory.
Download The Laboratory - Grade 7 Integrated Science Revision Notes.
Tap Here to Download for 30/-
Get on WhatsApp for 30/-
Why download?
- ✔ To read offline at any time.
- ✔ To Print at your convenience
- ✔ Share Easily with Friends / Students