

Field Events
- Are categorised into
- Jumps – high jump, pole vault, long jump and triple jump
- throws – discuss, javelin, short put, and hammer.
High Jump
- It is a field event in which competitors must jump unaided over a horizontal bar placed at measured heights without dislodging it.
- 2 main consideration is Lift and clearance
Safety Instruction
- Ensure proper spacing during drills and practise
- Wear appropriate PHE attire during activity.
- Follow teacher’s instructions during practise
- Ensure the runway is free from obstacles
- Use a flat ground
- Jump one learner at a time.
- Perform warm up adequately before participating in an activity
Warm Up Activities
- Jumping jacks
- Stand with your legs shoulder width knees slightly bent and hands on the sides
- Jump and open the arms and legs out to the sides. Arms come above the head and legs wider than shoulder width.
- Close your arms and legs back to your sides, returning to the start.
- Repeat several times.
- Skip and skip
- Move while stepping from one foot to the other with a hop
- Raise your arm opposite the moving foot alternatively.
- Press ups
- Place hands on the ground face down
- Extend your legs back and balance on your hands and toes.
- Keep the body straight
- Bend your elbows and lower yourself until your elbows are at an angle of 90 degrees.
- Push backup through your hands to the start position.
- Place hands on the ground face down
- Extend your legs back and balance on your hands and toes
- Keep the body straight
- Bend over your elbows and lower yourself until your elbows are at an angle of 90 degrees
- Push backup through your hands to the start position.
- Wind Break
- Pretend to be in a windstorm, with wind blowing arms as branches..
- Start while the wind is strong and finish as the wind calms.
Facility And Equipment In High Jump
- facility used in high jump is a space where a runway is marked.
- There is a landing area where suitable material for landing is placed.
- For example, sah'ust, landing maaress
- Equipment include crossbar, uprights, tape measure
Rules Followed In High Jump As You Practise
- Do not touch the ground beyond the plane of the upright and the landing area before the cross bar.
- take off should be on one foot
- Do not dislodge the bar to master the take off points.
Styles Of High Jump
- The scissors
- straddle
- Fosbury flop
- Western roll
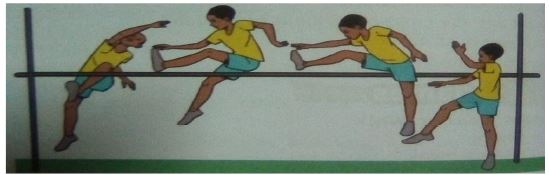
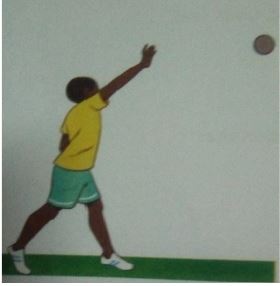
Scissor Technique In High Jump
- This is a method of clearing the bar in high jump.
- It involves the legs making a crossing action over the crossbar during fight.
- The crisscrossing is what gives the technique its name scissors
Safety Instruction
- Ensure proper spacing during drills and practise
- Wear appropriate PHE attire during activity.
- Follow teacher’s instructions during practise
- Ensure the runway is free from obstacles
- Use a flat ground
- Jump one learner at a time.
- Perform warm up adequately before participating in an activity
Warm Up Activities
- Jumping jacks
- Stand with your legs shoulder width knees slightly bent and hands on the sides
- Jump and open the arms and legs out to the sides. Arms come above the head and legs wider than shoulder width.
- Close your arms and legs back to your sides, returning to the start.
- Repeat several times
- Side shuffle
- Stand with your feet hip distance apart.
- Bend forward at the hips, knees bent, looking forward and chest Liftted.
- Hold your hands in loose fists in front of your chest.
- Move right using small quick shufe steps for 15 minutes
- Repeat movement to the left side. continue shuffling right and left.
- Lunges
- Start by standing up tall.
- Step forward with one foot until your leg reaches a 90 degree angle
- Lift your front lunging leg to return to the starting position.
- Repeat 5 times on one leg then change to the other.
Cool Down Activity
- Stretch and spell
- Use body stretch to spell the word scissor one letter at a time
- Wait for seconds before spelling a different letter.
- learning points on the scissor technique
- the approach – approach the bar at a comfortable speed.
- the take off - hold your shoulders high and fex the take off leg to launch you into the air
- the fight – hold the leg nearer the bar straight and Swing it into the air to clear the bar
- Once your lead leg is over the bar, kick the other foot to clear the bar.
- Landing- land on your feet to complete the jump
Safety Measures To Observe When Participating In High Jump
- Perform warm up actvites before participation
- Attempt jumps, one learner at a time.
- Use the run way when it is clear
- Ensure the material used on the landing area is in place before Attemptng a jump.
- When the bar is dislodged, pick and place it on the upright before an Attempt is made.
Standing javelin
Equipment And Sector In Standing Javelin
- Javelin throw is a field event where the javelin, a spear about 2.5min length is thrown.
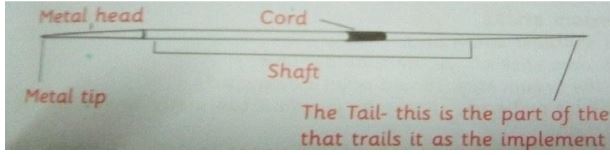
- A javelin is a spear shape implement.
- The javelin has several parts
- Metal head – it is the part that has metal tip
- Metal tip – it is made of metal and determines the outcome of the exact measurement once the javelin has landed
- chord grip – this covers a section of the shaft and it is the part that is held by the thrower.
- The tail – this is the part of the javelin that trails it as the implement is thrown.
- The shaft – it makes the largest part of javelin. The chord grip is within the shaft.
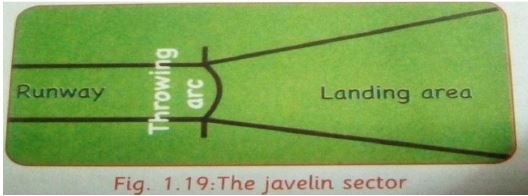
Javelin Sector
- The javelin throw facility includes a runway, a throwing arc and a landing sector.
Safety Instruction
- Ensure proper spacing during drills and practise
- Wear appropriate PHE attire during activity.
- Follow teacher’s instructions during practise
- Do not stand in the way of javelin or where it is landing
- Carry the implements back after a throw.
- Perform warm up adequately before participating in an activity
Warm Up Activities
- Jumping jacks
- Stand with your legs shoulder width knees slightly bent and hands on the sides
- Jump and open the arms and legs out to the sides. Arms come above the head and legs wider than shoulder width.
- Close your arms and legs back to your sides, returning to the start.
- Repeat several times
- Ankle circles
- Stand with feet hip width apart and your arms to the sides.
- Shift your height to the right leg and point your toes down into the ground.
- Start rotating your left foot making small circles with your ankles.
- Repeat the exercise with your right foot
- Shoulder rotation
- Stand tall with your arms by your sides
- Swing your arms forward until they are high as you can go, do not raise your shoulders.
- Return your arms to the starting positions and repeat the action
Cool Down activity
- climb the stair case
- Pretend to be climbing a stair case. Stretch your knees and arms the
Throw In Standing Javelin
- Proper technique requires the athlete to hold the javelin with only one hand on the chord grip.
- The javelin must be thrown with an over the shoulder motion.
- The competitor can’t turn his back to the throwing area until the javelin is airborne
Skills In Standing Javelin
- The stance
- Grip
- Release
- Recovery technique
If Using The Real Implement
- Always carry the javelin vertically with the point down
- Be aware that the tail is as potentally dangerous as the tip.
- Never run to collect a javelin
- Take care when removing the javelin from the ground. Check that the area around is clear before doing so.
- When the javelins are not in use, they should be firmly stuck into the ground in a vertical position.
Warm Up Activities
- Body weight squats
- Stand with your hands on the back of your head and your feet shoulder width apart.
- Turn your feet out slightly to open the hip joint. Loher your body until your thighs are parallel to the foor
- Pause, then return to the starting position.
- Arm swings
- hold your arms straight out to the side
- Swing them and cross them in front of your chest
- Hip circles
- Stand tall with your feet at hip width
- Keeping your hands in front of your stomach, pull your right knee up until it is parallel with the foor, then pull the knee out, opening up the hip.
- Return to the start position and repea on the other side
Cool Down Activity
- Heel and toe
- Walk in circles on heels for 20 seconds
- Walk in circles on tip toes for 20 seconds
Phases In The Standing Javelin
(the learning points)
- The stance
- Stand with Feet fexed, the foot opposite the throwing hand slightly forward.
- Toes of the feet to point direction of the throw.
- The grip
- Grip the javelin such that it lies along the palm of the hand which is turned upwards.
- Old it firmly in a relaxed way without applying tension in the forearm.
- Grip the javelin by bringing thumb and the frst tho joints of the index finger are behind the chord
- The index finger supports the shaft
- The finish grip
- It is a methold of gripping the javelin where the middle finger rest closer to
the top of the chord and index finger hraps higher along the shaft.
- It is a methold of gripping the javelin where the middle finger rest closer to
- Recovery
- Athlete hill try to balance to avoi' falling.
Measuring The Distance
Measure The Distance By
- starting from where the tip of the javelin frst strikes the ground
- The zero tape measure goes out to where the javelin tip strikes the ground
Shot Put
- The shot put is a a field event. The action of throwing the shot is called putting
- It involves putting of a heighted ball for distance.
- The athlete compete for distance thrown
- The implement is made of solid iron or bass
- The short is put with one hand. It is held next to the neck.
- It may not drop below or behind shoulder level at any time
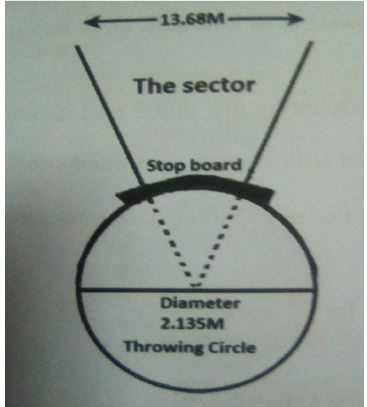
The Shot Put Sector
- A shot put sector features throwing circle, from which an athlete puts the shot and throwing sector which is triangle in shape.
- The circle has a diameter of 2.1 5 meters.
- The throwing sector measures 1 .68 at its hidest and 20 metres
Throwing style
- Standing style
- Obrien style
Standing Shot Put
Safety Instruction
- Do not throw the shot until the teacher gives you permission to do so
- Do not retrieve the shot until the teacher gives you permission to do so
- Wear appropriate attire
Warm Up Activity
- Mountain climbers
- Put both hands and knees on the foor
- Place your right foot near your right hand and extend your left leg behind you
- In one smooth motion, shitch your legs , keeping your arms in the same position
- Side reach
- Stand with feet wider than shoulder width apart
- Lean your body to the right side and bend your right knee slightly
- Stretch your left arm upwards in line with your body
- Repeat on the opposite
- Arm circles
- Stand with your fet shoulder width apart and extend your arms parallel to your foor
- Circle your arms forward using small controlled motions, gradually make the circles bigger
- Reverse the direction of the circles afer about 10 second
Cool Down Activity
- Heel and toe
- Walk in circles on heels for 20 seconds
- Walk in circles tip toes for 20 seconds
Obrien Shot Put
Safety Instruction
- Ensure proper spacing during drills and practise
- Wear appropriate PHE attire during activity.
- Follow teacher’s instructions during practise
- Putt the shot towards one end
- Do not stand on the side where the shot is landing
- Carry the implement back
- Perform warm up adequately before participating in an activity
Warm Up Activities
- Back pedalling
- Run backwards with short, quick pumping your arms and landing on the balls of your feet
- Keep your chest up and take as many steps as possible
- Plank walk out
- Start in a standing position
- Bend forward until you touch the ground with your hands
- Slowly walk your hands forward as far as you can
- Pause then walk your hands back towards your feet
- Repeat several times
- Arm swings
- Hold your arms out to the side
- Swing them and cross them in front of your chest
Cool Down Activity
- Slowly walk within the marked area
Learning Points
- Stance and grip
- Stance
- Stand with the feet shoulder width apart parallel to the target holding the shot

- Stand with the feet shoulder width apart parallel to the target holding the shot
- Grip
- Hold the shot with the base of the fingers
- Spread the fingers slightly apart and the thumb sed for support
- The hand be bent back in a cocked position holding the shot
- The elbow is held up to the side, away from the body
- The thumbs should be pointsng down the palms facing outwards and the fingers behind the shot( elbows up, thumbs down, palms out position)
- Release and recovery
- Stand with the feet parallel to the target
- Place the shot under the jaw and against the neck
- Extend the non putting arm towards the target
- Release the shot
- Recovery
- Extend the wrist to flick the shot off the fingers as it leaves the hand for recovery
- Stance
| IMPLEMENT | U13 | U15 | U17 | Junior men | Senior men | U13 | U15 | U17 | Junior women | Senior women |
| Shot put | 3kg | 4kg | 5kg | 6kg | 7.26 kg | 2.72 kg | 3kg | 3kg | 4kg | 4kg |
| Discuss | ||||||||||
| Hammer | ||||||||||
| Javelin | 400g | 600g | 700g | 800g | 800g | 400g | 500g | 500g | 600g | 600g |
Join our whatsapp group for latest updates
Tap Here to Download for 30/-
Get on WhatsApp for 30/-
Download Athletics: Field Events - Physical Health Education CBC Grade 6 Revision Notes.
Tap Here to Download for 30/-
Get on WhatsApp for 30/-
Why download?
- ✔ To read offline at any time.
- ✔ To Print at your convenience
- ✔ Share Easily with Friends / Students