Picture Making
- Picture making involves the application of various methods such as painting, drawing, collage and montage.

Drawing
- It is making pictures using lines and shades.
Smudge technique
Drawing using smudge technique
- In a picture, there are dark and light areas.
- The areas that appear dark are those that are hidden from light.
- The areas that appear light are the ones exposed to light.
- This means that colours on the side where light is coming from have a lighter tyone and colours in areas away from the light have a darker tone.
Drawing through smudge technique
- Smudging is smearing colour onto a surface.
- It is achieved when you smear or rub a pencil, crayon or charcoal onto a paper.
- When a pencil, crayon, charcoal or chalk is rubbed onto a surface, different tones are created.
- We create the different tones in a drawing by rubbing a pencil, crayon or charcoal much less on the paper.
- When rubbed much and hard, a dark tone is made and when less rubbing is done, there is a lighter tone
Materials need for smudge technique
- Ruler
- Paper or drawing book
- Sharpener
- Pencil
- Rubber
- Crayon
- Charcoal
- Chalk
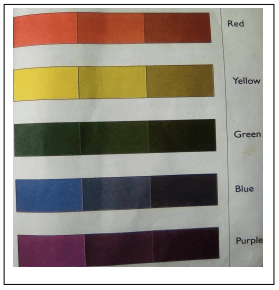
Tonal graduation strip
Pupil’s activity
Page 3-4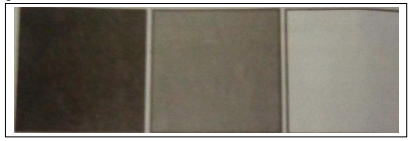
Creating value graduation
- Graduation is a change of tone from either dark to light of from light to dark.
- The change can either be blended or staggered.
- In blending the tone flows into one another smoothly from dark to light or from light t dark without any break.
- In staggered tone, there is clear break between each tone. In this way you are able to see the end of each tone.
- It can also be done by rubbing a pencil, charcoal, chalk and crayon onto paper.
- For dark tones, more pressure is applied and rubbing done for longer time.
- For light tones, less pressure is applied and rubbing done for longer time.
- For light tones, less pressure is applied for a shorter time.
- You can rub using circular, horizontal or vertical movements.
- In order to see how the tone changes, you need to draw a value graduation done.
Materials need for creating value graduation strip
- Ruler
- Pencil
- Sharpener
- Paper or drawing book
- Rubber
Drawing a value graduation strip
Pupil’s activity Page 5-6
Creating a smooth value graduation strip
Pupil’s activity
Page 5-6
Displaying of work
Pupil’s activity
Page 5-6
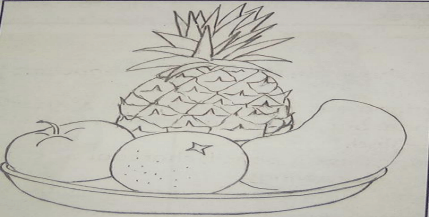
Drawing: still life drawing (smudging technique)
- A still life is a drawing of an arrangement of non-moving objects
Still life drawing using smudge technique Materials
- Still life objects
- Paper or drawing book
- Ruler
- Pencil
- Rubber
- Sharpener or razor blade
Procedure
- Set up a still life composition in a creative way. {place objects close to each other such that, some objects appear partly hidden by others. The ones in front cover part of or overlaps the ones behind]
- Observe the shapes of the objects in still life keenly before drawing.
- Draw the objects when looking at them. {this is known as drawing from observation}
- Shade the drawing you have made using smudging technique.
NB: make sure you note the ones placed in front of the others and their sizes.
Shading a composition using smudging technique
Pupil’s activity
Page 9-10
Drawing human forms (smudge technique)
Drawing human forms using smudge technique
- To draw a human form, look at the person keenly.
- First study how the features of the body relate to one another then draw the whole body.
- Shapes and parts of the body features should be done correctly.
- The parts of the body should compare well with the other parts.
For example, the head should not be too big or small when compare with the rest of the body. This is known as proportion.
Materials needed to draw human forms
- Pencil
- Ruler
- Rubber
- Paper or drawing book
Pupil’s activity
Page 11-13
Drawing a human form doing an activity
Pupil’s activity
Page 13-14
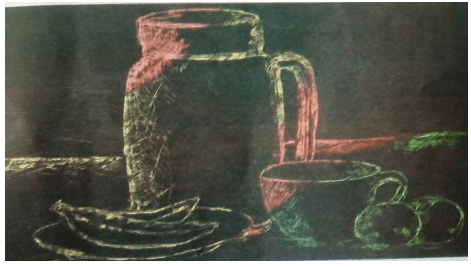
Drawing: pictorial composition in crayon etching
Pictorial composition using crayon etching
Crayon etching
- Crayon etching is a picture done on a specially prepared surface.
- The picture is done by scratching.
- The surface is prepared by thickly rubbing over it.
- A dark coat of ink is then applied over the paper.
- A little soap is used during the application to help the ink or point stick on the crayons.
- The surface is left to dry before drawing by scratching.
Materials needed for crayon etching
- Ruler.
- Pencil
- Drawing paper
- Wax crayons
- Painting brush
- Soap
- Sharp tools for etching such as sticks, pins or nails
- Black ink or black watercolour paint
- Containers for holding water, brushes and paint or ink
- A rag
Pupil’s activity
Page 16-17
Making a picture using crayon etching method
Displaying crayon etching work
Drawing pictorial composition using crayon etching
- A pictorial composition is a picture that tells a story.
Pupil’s activity
Page 18-19
- Think of a pictorial composition you would like to draw.
- Take a piece of paper and draw the pictorial composition.
- Prepare a surface for crayon etching. Plan the crayon rubbing carefully.
- Take the paper and draw the margins for the picture frame.
- Select the colour you want to use.
- Plan on how to colour the crayons you have selected. Rub them as you wish. You can rub horizontally, vertically, diagonally or in spirals. Rub the crayons thickly within the drawn margins.
- Apply a little soap on the work, then using a brush, apply black ink over the crayons
- Leave it to dry.
Pictorial composition using crayon etching
Materials need for crayon etching
- The sketch of a pictorial composition
- The prepared surface for crayon etching
- Sharp tools for etching such as sticks, pins, nails or table knives
- Rags
Creating crayon etching
- When the surface you have prepared has dried well, scratch out the pictorial composition on the surface.
- Do not work under the sun because it may melt the wax and spoil your picture. Take care to scratch too deep, the sharp tool may damage the crayon rubbed surface.
Procedure
- Look at your own sketch
- You may improve it a bit
- Use a sharp tool to scratch out your pictorial composition.
- Use a rag to brush off flakes of black etched pieces of crayon.
- Take care not tear your paper when etching.
Pupil’s activity
Page 20-21
Painting
Painting: tonal variation strip
- Painting is the art of creating pictures or images by applying colour on a surface
- Colour can be applied using a brush, fingers, sponge or any other paining tool.
Tonal variation
- Tone is the lightness or darkness of a colour.
- Every colour varies in darkness or lightness.
- In painting tonal variation is achieved by adding an amount of either black or white to a colour.
- Dark tone is created by adding black and light tone is created by adding white.
Materials needed to create tonal variation strip
- Paper or drawing books
- Ruler
- Pencil
- Brush
- Palette
- Black and white paint
- Container for holding water
- Rag
A three tone variation strip using black and white
Pupil’s activity
Page 23-24
A five tone variation strip using black and white
Pupil’s activity
Page 23-24

- A tonal variation strip can have more than 3 parts.
- White can be added to black continuously until the lightest grey is achieved
- You can also add a little black to the white continuously until the darkest grey is achieved.
Blended tonal variation
- Tonal variation strips can also be creted by blending tones one into another without creating any break.
- This means that the tones flow into another as you paint, it is done by mixing the colour on the palette little as you move from dark to light tone.
Creating blended tonal variation strips with black and white
Pupil’s activity
Page 25

Experimenting with black and white on other colours to make tonal variations strips
Pupil’s activity
Page25
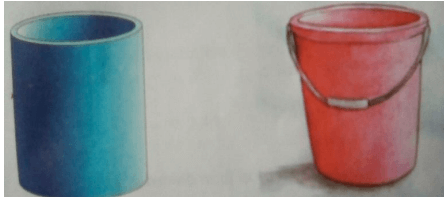
Painting: tonal value using white
Using white on cylindrical forms to create tonal variations
- When we add white to another colour, the colour becomes lighter.
- For example, when we add white to colour blue it becomes lighter. When we add white to colour green it becomes lighter
Materials needed to create tonal variation on cylindrical forms
- Papers or drawing book.
2. Rulers
3. Pencils
4. Paints
5. Brushes
6. Palettes
7. Rags
Creating tonal variation on cylindrical forms using white
Pupil’s activity
Page 30-31
Creating staggered tonal variations on cylindrical forms
Pupil’s activity
Page 31-32
Creating blended tonal variation on a cylindrical form
Pupil’s activity
Page 32-33
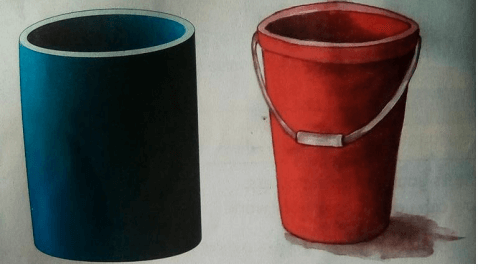
Painting; tonal value using black
Using black on cylindrical forms to create tonal variation
- When black is added to another colour, it becomes darker.
- This means when black is added, the colour losses its brightness.
- For example, when black is added to red it becomes darker and when black is added to yellow it becomes darker.
- The more black is added to a colour the darker it becomes.
Materials needed to create tonal value strip
- Paper or drawing book
- Brush
- Pencil
- Rag
- Ruler
- Palette
- Paint
- Container for holding brushes and water
Creating tonal variations strips on cylindrical forms using black
Pupil’s activity
Page 35-36
Creating staggered tonal variation on cylindrical forms using black
Pupil’s activity
Page 36-37
Creating blended tonal variations strips on a cylindrical form
Pupil’s activity
Page 38-39
Montage
Montage: cutting and pasting technique
- Montage is technique of selecting, editing and piecing together separate sections of pictures to form a continuous whole.
- Montage is another technique of picture making.
- It involves cutting different pictures together to make one pictorial composition.
Montage composition
- In montage, whole or part of pictures and photographs are cut, arraged and glued on a surface to form one composition.
- The picture and photographs should be related to topic or theme.
- Montage composition gives very interesting combinations.
- Explore different ways of combining pictures in order to enjoy creating montage.
Materials needed to create a montage
- Adhesives
- Printed photographs
- Sharp cutting tools such as scissors, blades
- Old newspaper and magazines with relevant pictures
- Mounting board/suitable for sticking the pictures such as cardboard or manila paper.
- You can also need pencils, rubber an d ruler to draw the picture frame and paint to make your composition more beautiful.
How to create a montage pictorial composition
- Choose an interesting theme.
- Collect pictures and photographs related to the theme.
- Cut the pictures and photographs.
- Prepare the sticking surface
- Try to fix the pictures in different ways on the prepared surface.
- Use an adhesive to stick the pictures and photographs on the surface.
Pupil’s activity
Page 41-42
Planning a montage composition on the theme of food
Pupil’s activity
Page 42-43
Identifying types of food in montage composition
Pupil’s activity
Page 43
Creating a montage composition
Pupil’s activity
Page 43-44
Displaying montage composition
Pupil’s activity
Page 44
Download Picture Making - Grade 4 Art and Craft Revision Notes.
Tap Here to Download for 30/-
Get on WhatsApp for 30/-
Why download?
- ✔ To read offline at any time.
- ✔ To Print at your convenience
- ✔ Share Easily with Friends / Students