
Basketry

Basketry: traditional twine technique
- Basketry is the making of baskets by weaving or braiding long slender pieces of material (as reed or sisals).
- Basketry is a traditional craft practised by many communities.
- It involves
- Weaving
- Twining
- Plaiting or sewing flexible fibres
Identifying basketry traditional items
- There are many items made using basketry technique
- They include
- Containers for storing grains and food
- Items for decorative purpose
- Household goods such as baskets, trays, furniture and baby cots.
- In some communities, basketry technique is used to make houses, barns, granaries, chicken coops, fish traps and winnowing trays.
Materials needed for basketry
- Materials can be natural or synthetic
- Natural materials include
- Thin flexible sticks
- Plant roots
- Vines
- Variety of grass such as elephant grass
- Banana fibres
- Cane
- Bamboo
- Stem
- Raffia
- Sisal
- Palm leaves
- Osier
- Reeds
- Rattan
- Wattle sticks
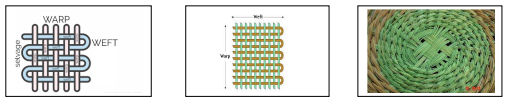
Weaving a circular mat using the twinning technique
- In twinning technique the wrap and two sets of wefts are used
- Warp are the threads that form the framework of a woven item
- The wefts are the threads which go over and under the wrap.
- The wefts are twinned around the warp.
How to weave a circular mat using the twining technique
- Collect the necessary materials need from your local environment e.g. banana fibres, knives, reeds, sisal fibre, palm leaves
- Prepare the fibres for weaving
- Set up the warp in order to start weaving.
Done by arranging several fibres into a star shape - Tie the fibres at the centre
Pupil’s activity
Page49-50
Weaving a circular mat
- Cut the warp to the required size.
- Set the warp in a tar shapes
- Pick the weft and start twinning around the warp
- Continue weaving until you achieve the size you required.
Finishing and neatening the edges of a woven circular mat
- To make the mat neat and prevent the weft and warp from coming off, you need to finish the edges neatly.
- This is done either by stitching or binding.
- First cut off the lose fibres and tuck in the warp then stitch or bind.
- Stitching is done by using a thread and needle to stitch along the edges.
- Binding is done by stitching a cloth around the edges of the circular mat.
- You can also tuck in the warp in place and use other fibres to warp the edges
Displaying circular woven items
Pupil’s activity
Page 50
Leatherwork
Leatherwork: thronging technique
- Leather is obtained from hides and skins of animals.
- Large animals like cattle and others with hair give hides.
- Smaller animals like young one of calves, goats give us skins.
- Leather is used to make traditional items like musical instruments (drum), bags, hats, furniture, jewellery, sheaths.
Sources of leather
- Skins e.g from goat
- Hides e.g from cow
Leather items
- Drums
- Shields
- Hats
- Bags
- Masks
Collecting traditional leather items
You can collect hides or skin from the local environment.
Thronging technique
- Before making an article from leather, a design should be laid out and the different pieces cut out carefully.
- The various pieces are then joined together either by gluing or sewing.
- Articles can also be stitched together using strips of leather called thongs.
- The technique of joining two or more pieces of leather using thongs for lacing when making an article is referred to as thonging
Making drums using thronging technique
Pupil’s activity
Page 53-57
Materials need to make a simple drum
- Leather material
- Cutting tools such as a pair of scissors, knives or blades
- Old containers such as buckets, tins or hollow wood
- Marking tools
- Mallets
- Hammer
- Rulers.
Identifying thongs on drums
- Every community has their own unique way of constructing the drum.
- Some drums are covered with a membrane on the top side and others on both top and bottom.
- The membrane on top or bottom of the drum can be attached by lacing using thongs.
- The internal shape of every drum is what gives it the quality of sound produced.
- Drum produce sound by beating.
How to cut thongs
- Thongs should be stretchable as possible
- The best way to cut thongs is either diagonally or in a circular way if the piece of lather available can allow.
- By cutting this way the thong will not be cut easily when stretched during lacing.
- Look for old leather item
- Cut out a big piece from the item
- Lay your piece of leather on a flat surface
- Measure the size of the thong needed and mark using a pen
- Using a pair of scissors, cut the strips as accurate as possible.
Process of making a drum
- Cut out leather pieces so that they are slightly wider than the container for making the resonator of the drum.
- Make similar number of holes on the cut out leather for the top and bottom pieces
- Cut out the thongs for joining the top and bottom pieces of leather.
- Place the cut out leather at the top and bottom
- Use the thongs to lace the pieces of leather firmly in place.
Pupil’s activity
Page 57
Pottery
- Pottery is the art of making containers or articles such as cups, plates, flower vases and pots out of clay.
- Pinch method is one of the technique of modelling pots and containers.
Modelling – Pinch technique
- The pinch method involves shaping containers of various sizes and shapes by pressing on the walls using thumb and forefingers.
- The process can be used to model simple containers such as cups and sugar dishes.
- Containers made using pinch technique are referred to as pinch pots.
- Another name for pinch pots is thumb pots
Identifying pinch pots
- Cups
- Pots
- Sugar dishes
- Plates
- Flower vases
Materials need to model a pinch pot
- Clay
- Sticks or incising tool
- A container with water
- Papers or leaves for placing the clay and modelled articles
How to model a container using the pinch technique
Clay preparation
- Collect clay from the local environment.
- Remove impurities such as stones, roots
Preparing clay
- After collecting the clay and removing impurities, mix the clay thoroughly by pressing it over and over again until the moisture is evenly distributed.
- This processing is known as kneading
- The process is important because it removes air bubbles from the clay, making it uniform and easier to work with.
Modelling a pinch pot
- Take a lump of clay and roll it into a ball then hold it on the palm of one hand.
- Make a hole in the ball by pushing the thumb of the other hand into the lump of clay
- Rotate the clay while pinching against the wall of the container using thumb and fingers to widen the hole and shape the pinch pot. Ensure the wall of the container is of even thickness.
- Place your thumbs inside the pinch pot then press it gently on a flat surface to give it a stable base. Shape the lid as well. This can be done using fingers or by pressing it gently on a flat surface.
- Use a stick, a scraper or your hand to smoothen the pitch pot. you may wet your hands with water as you smoothen the article. Do not pour water on the container as you smoothen as this may cause it to become soggy and crumble or crack.
- Leave the container to dry slowly under a shade. Cover the pinch pot si that it dries slowly.
Modelling pinch pots of varying sizes and shapes
- Pinch pots are used for different purposes.
- That is why they can be modelled in different sizes and shapes depending on their purpose.
- They can be small, wide or thin
Pinch of different sizes and shapes
Pupil’s activity
Page 61-62
Methods of decorating clay items
- Modelled clay are decorated to make them more attractive.
- Methods of decorating include
- Stamping
- Scratching
- Incising
- Stamping involves pressing an object on wet clay articles before they are completely dry.
- Scratching technique, shallow marks are made on the walls of wet clay using sharp tools such as nails, sharp stick or wire
- Incising technique is done by cutting out patterns on the walls of the wet clay article.
- A sharp object such as wire can be used to decorate the articles using incising technique.
Materials need to decorate a pinch pot
- Clay for modelling
- A textured item such as maize cob, aloe vera leaves or comb
- Incising tools such as sticks, wire, thorn or blade
- A container with water
- Hollow objects such as a hollow stick, straw, biro pen or biro lid
- Papers or leaves for placing the clay and modelled articles.
Making and decorating a pinch pot by stamping
Pupil’s activity
Page 63-64
Making and decorating a pinch pot by incising
Pupil’s activity
Page 63-64
Download Indigenous Kenyan Craft - Grade 4 Art and Craft Revision Notes.
Tap Here to Download for 30/-
Get on WhatsApp for 30/-
Why download?
- ✔ To read offline at any time.
- ✔ To Print at your convenience
- ✔ Share Easily with Friends / Students