
Displaying items by tag: Craft
Integrated Learning areas Art/Craft, Music & PHE Activities Questions and Answers - Grade 5 Opener Exams Term 1 2023 Set 2
ART/CRAFT
- Which one of the following is not a dry media?
- charcoal
- pencil
- chalk
- ink
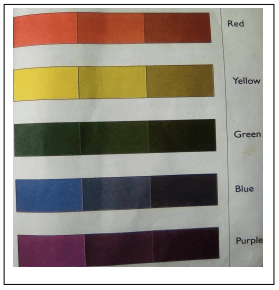
Complete the colour wheel below

- Name the colours represented by X and Y respectively
- Green and Red
- Purple and Orange
- Red and Orange
- Green and Orange
- Which colour do we get by mixing colours blue and Red?
- Contrasting colour
- Primary colour
- Secondary colour
- Tertiary colour
- Drawing a picture of something that you saw somewhere is drawing from
- Memory
- Observation
- Imagination
- Still life
- ______________________________________ means spreading of colour
- Shading
- Smudging
- Montage
- Crosshatching
- Which of the following is an element of art? _____________________________
- form
- overlapping
- proportion
- balance
- ______________________ is the lightness or darkness of a colour.
- Tone
- Form
- Light
- Balance
- A tool that is used for interlacing warps and wefts is called a _________________________
- loom
- tray
- adze
- fibre
- The letter below is an example of _______________________________

- 3D block letter
- Beautiful letter
- 2D block letter
- 4D block letter
- Which of the following is not a way of decorating a pot?
- Wedging
- Texturing
- Empressing
- Incising
- The mounting of artwork by sticking it on a hard surface is called A
- Collage
- Matting
- Montage
- Mosaic
- Which one of the following is not an example of adhesives?
- glue stick
- wattle tree sap
- office glue
- wax
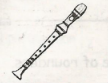
Use the diagram below to answer questions 13-15
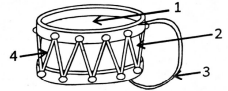
- What is the name of the part labelled 1?
- Resonator
- Membrane
- Sling
- Amplifier
- Which of the following parts is used for making the sound louder?
- 1
- 2
- 3
- 4
- Which of the following is not a way of tuning the instrument above?
- Hitting gently
- Rubbing with the palms
- Placing near fire
- Placing it in the sun
MUSIC
- Sacred songs are also called _______________________________ songs.
- Topical
- Religious
- Round
- Singing game
- Which word is missing in this part of EAC Anthem. "Uzalendo pia _________________________________"
- ulinde
- yetu
- mshikamano
- zetu
- How many verses are in the Kenya National Anthem?
- 3
- 2
- 4
- 1
- A song that belongs to people of the same community is called a __________________________________ song
- counting
- patriotic
- action
- folk
- A descant recorder has ____________________________________ joints.
- 2
- 3
- 1
- 4
- In a descant recorder sound is produced through _________________________________
- Holes
- Joints
- head joint
- Strings
- Juma has a Y shaped stick, a wire and bottletops. He wanted to make a _____________________________________
- drum
- wandindi
- shaker
- descant recorder
- A drum produces sound by ______________________________________________
- blowing
- shaking
- bowing
- hitting
- During a performance grade 5 made the following formation

Which formation did they make?- Y formation
- X formation
- Rectangular formation
- Circular formation
- Which note is missing: d ____________m f
- l
- t
- r
- f
- Combination of long and short sounds make the _____________________ of music
- pitch
- rhythm
- soloist
- harmony
- Songs that are sang in turns in different voices are called ________________________________ songs
- part
- action
- lullabies
- singing game
- To maintain rhythm of the song we clap the __________________________
- feet
- hands
- head
- shoulders
- We sing to be _____________________________
- angry
- sad
- annoyed
- happy
- Complete this line of the National Anthem.
"Justice be our shield and __________________________________- Nation
- Creation
- Defender
- Unity
PHE
- Which is the most appropriate shape of an athletic track?.________________________________
- square
- circle
- rectangle
- oval
- The act of working together to achieve a set goal is called. _____________________
- teamwork
- cooperation
- obedience
- hardwork
- Which of the following materials cannot be improvised to make a soccer ball?
- glass
- newspaper
- socks
- banana fibres
- Which is the most appropriate distance when performing the underarm pass?
- long
- circular
- short
- medium
- Which is the best size of a ball for a Grade 4 learner in the game of football? _____________________________________________
- size 5
- size 4
- size 3
- size 2
- Which of the following items is used in the game of rounders? _______________________________________
- bat
- net
- ring
- table
- The equipment below is called a ______________________________________
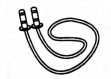
- string
- tape measure
- rope
- tie
- The above equipment is used for __________________________
- swimming
- kicking
- juggling
- skipping
- An activity in gymnastic where two or more skills are formed is called
- headstand
- sequence
- task
- balance
- The equipment used to play frisbee is called a ______________________________
- ball
- disc
- plate
- roller
- Which one of the following is not a safety measure to observe when skipping?
- follow given rules
- remove sharp objects
- wear appropriate shoes
- avoid warm ups
- The normal heart beat of an adult is between _____________________________
- 60 to 100
- 70 to 150
- 30 to 50
- 90 to 200
- The state in which the body has enough water is called _______________________________
- dehydration
- thirst
- hydration
- hunger
- A meal with all the required nutrients is said to be a _______________________________
- balanced diet
- lunch
- protective
- energy giving
- The foods that give our bodies energy are referred to as _________________________
- Proteins
- Vitamins
- Minerals
- Carbohydrates
MARKING SCHEME
ART/CRAFT
- D
- D
- C
- A
- B
- A
- A
- A
- A
- A
- A
- D
- A
- B
- C
MUSIC
- B
- C
- A
- D
- B
- A
- C
- D
- B
- C
- B
- C
- B
- D
- C
PHE
- D
- A
- A
- C
- B
- A
- C
- D
- B
- B
- D
- B
- C
- A
- A
Indigenous Kenyan Craft - Grade 4 Art and Craft Revision Notes
Basketry
Basketry: traditional twine technique
- Basketry is the making of baskets by weaving or braiding long slender pieces of material (as reed or sisals).
- Basketry is a traditional craft practised by many communities.
- It involves
- Weaving
- Twining
- Plaiting or sewing flexible fibres
Identifying basketry traditional items
- There are many items made using basketry technique
- They include
- Containers for storing grains and food
- Items for decorative purpose
- Household goods such as baskets, trays, furniture and baby cots.
- In some communities, basketry technique is used to make houses, barns, granaries, chicken coops, fish traps and winnowing trays.
Materials needed for basketry
- Materials can be natural or synthetic
- Natural materials include
- Thin flexible sticks
- Plant roots
- Vines
- Variety of grass such as elephant grass
- Banana fibres
- Cane
- Bamboo
- Stem
- Raffia
- Sisal
- Palm leaves
- Osier
- Reeds
- Rattan
- Wattle sticks
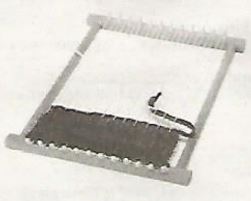
Weaving a circular mat using the twinning technique
- In twinning technique the wrap and two sets of wefts are used
- Warp are the threads that form the framework of a woven item
- The wefts are the threads which go over and under the wrap.
- The wefts are twinned around the warp.
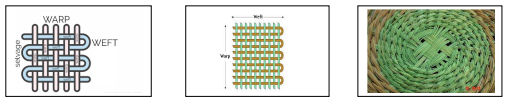
How to weave a circular mat using the twining technique
- Collect the necessary materials need from your local environment e.g. banana fibres, knives, reeds, sisal fibre, palm leaves
- Prepare the fibres for weaving
- Set up the warp in order to start weaving.
Done by arranging several fibres into a star shape - Tie the fibres at the centre
Pupil’s activity
Page49-50
Weaving a circular mat
- Cut the warp to the required size.
- Set the warp in a tar shapes
- Pick the weft and start twinning around the warp
- Continue weaving until you achieve the size you required.
Finishing and neatening the edges of a woven circular mat
- To make the mat neat and prevent the weft and warp from coming off, you need to finish the edges neatly.
- This is done either by stitching or binding.
- First cut off the lose fibres and tuck in the warp then stitch or bind.
- Stitching is done by using a thread and needle to stitch along the edges.
- Binding is done by stitching a cloth around the edges of the circular mat.
- You can also tuck in the warp in place and use other fibres to warp the edges
Displaying circular woven items
Pupil’s activity
Page 50
Leatherwork
Leatherwork: thronging technique
- Leather is obtained from hides and skins of animals.
- Large animals like cattle and others with hair give hides.
- Smaller animals like young one of calves, goats give us skins.
- Leather is used to make traditional items like musical instruments (drum), bags, hats, furniture, jewellery, sheaths.
Sources of leather
- Skins e.g from goat
- Hides e.g from cow
Leather items
- Drums
- Shields
- Hats
- Bags
- Masks
Collecting traditional leather items
You can collect hides or skin from the local environment.
Thronging technique
- Before making an article from leather, a design should be laid out and the different pieces cut out carefully.
- The various pieces are then joined together either by gluing or sewing.
- Articles can also be stitched together using strips of leather called thongs.
- The technique of joining two or more pieces of leather using thongs for lacing when making an article is referred to as thonging
Making drums using thronging technique
Pupil’s activity
Page 53-57
Materials need to make a simple drum
- Leather material
- Cutting tools such as a pair of scissors, knives or blades
- Old containers such as buckets, tins or hollow wood
- Marking tools
- Mallets
- Hammer
- Rulers.
Identifying thongs on drums
- Every community has their own unique way of constructing the drum.
- Some drums are covered with a membrane on the top side and others on both top and bottom.
- The membrane on top or bottom of the drum can be attached by lacing using thongs.
- The internal shape of every drum is what gives it the quality of sound produced.
- Drum produce sound by beating.
How to cut thongs
- Thongs should be stretchable as possible
- The best way to cut thongs is either diagonally or in a circular way if the piece of lather available can allow.
- By cutting this way the thong will not be cut easily when stretched during lacing.
- Look for old leather item
- Cut out a big piece from the item
- Lay your piece of leather on a flat surface
- Measure the size of the thong needed and mark using a pen
- Using a pair of scissors, cut the strips as accurate as possible.
Process of making a drum
- Cut out leather pieces so that they are slightly wider than the container for making the resonator of the drum.
- Make similar number of holes on the cut out leather for the top and bottom pieces
- Cut out the thongs for joining the top and bottom pieces of leather.
- Place the cut out leather at the top and bottom
- Use the thongs to lace the pieces of leather firmly in place.
Pupil’s activity
Page 57
Pottery
- Pottery is the art of making containers or articles such as cups, plates, flower vases and pots out of clay.
- Pinch method is one of the technique of modelling pots and containers.
Modelling – Pinch technique
- The pinch method involves shaping containers of various sizes and shapes by pressing on the walls using thumb and forefingers.
- The process can be used to model simple containers such as cups and sugar dishes.
- Containers made using pinch technique are referred to as pinch pots.
- Another name for pinch pots is thumb pots
Identifying pinch pots
- Cups
- Pots
- Sugar dishes
- Plates
- Flower vases
Materials need to model a pinch pot
- Clay
- Sticks or incising tool
- A container with water
- Papers or leaves for placing the clay and modelled articles
How to model a container using the pinch technique
Clay preparation
- Collect clay from the local environment.
- Remove impurities such as stones, roots
Preparing clay
- After collecting the clay and removing impurities, mix the clay thoroughly by pressing it over and over again until the moisture is evenly distributed.
- This processing is known as kneading
- The process is important because it removes air bubbles from the clay, making it uniform and easier to work with.
Modelling a pinch pot
- Take a lump of clay and roll it into a ball then hold it on the palm of one hand.
- Make a hole in the ball by pushing the thumb of the other hand into the lump of clay
- Rotate the clay while pinching against the wall of the container using thumb and fingers to widen the hole and shape the pinch pot. Ensure the wall of the container is of even thickness.
- Place your thumbs inside the pinch pot then press it gently on a flat surface to give it a stable base. Shape the lid as well. This can be done using fingers or by pressing it gently on a flat surface.
- Use a stick, a scraper or your hand to smoothen the pitch pot. you may wet your hands with water as you smoothen the article. Do not pour water on the container as you smoothen as this may cause it to become soggy and crumble or crack.
- Leave the container to dry slowly under a shade. Cover the pinch pot si that it dries slowly.
Modelling pinch pots of varying sizes and shapes
- Pinch pots are used for different purposes.
- That is why they can be modelled in different sizes and shapes depending on their purpose.
- They can be small, wide or thin
Pinch of different sizes and shapes
Pupil’s activity
Page 61-62
Methods of decorating clay items
- Modelled clay are decorated to make them more attractive.
- Methods of decorating include
- Stamping
- Scratching
- Incising
- Stamping involves pressing an object on wet clay articles before they are completely dry.
- Scratching technique, shallow marks are made on the walls of wet clay using sharp tools such as nails, sharp stick or wire
- Incising technique is done by cutting out patterns on the walls of the wet clay article.
- A sharp object such as wire can be used to decorate the articles using incising technique.
Materials need to decorate a pinch pot
- Clay for modelling
- A textured item such as maize cob, aloe vera leaves or comb
- Incising tools such as sticks, wire, thorn or blade
- A container with water
- Hollow objects such as a hollow stick, straw, biro pen or biro lid
- Papers or leaves for placing the clay and modelled articles.
Making and decorating a pinch pot by stamping
Pupil’s activity
Page 63-64
Making and decorating a pinch pot by incising
Pupil’s activity
Page 63-64
Picture Making - Grade 4 Art and Craft Revision Notes
Picture Making
- Picture making involves the application of various methods such as painting, drawing, collage and montage.
Drawing
- It is making pictures using lines and shades.
Smudge technique
Drawing using smudge technique
- In a picture, there are dark and light areas.
- The areas that appear dark are those that are hidden from light.
- The areas that appear light are the ones exposed to light.
- This means that colours on the side where light is coming from have a lighter tyone and colours in areas away from the light have a darker tone.
Drawing through smudge technique
- Smudging is smearing colour onto a surface.
- It is achieved when you smear or rub a pencil, crayon or charcoal onto a paper.
- When a pencil, crayon, charcoal or chalk is rubbed onto a surface, different tones are created.
- We create the different tones in a drawing by rubbing a pencil, crayon or charcoal much less on the paper.
- When rubbed much and hard, a dark tone is made and when less rubbing is done, there is a lighter tone
Materials need for smudge technique
- Ruler
- Paper or drawing book
- Sharpener
- Pencil
- Rubber
- Crayon
- Charcoal
- Chalk
Tonal graduation strip
Pupil’s activity
Page 3-4
Creating value graduation
- Graduation is a change of tone from either dark to light of from light to dark.
- The change can either be blended or staggered.
- In blending the tone flows into one another smoothly from dark to light or from light t dark without any break.
- In staggered tone, there is clear break between each tone. In this way you are able to see the end of each tone.
- It can also be done by rubbing a pencil, charcoal, chalk and crayon onto paper.
- For dark tones, more pressure is applied and rubbing done for longer time.
- For light tones, less pressure is applied and rubbing done for longer time.
- For light tones, less pressure is applied for a shorter time.
- You can rub using circular, horizontal or vertical movements.
- In order to see how the tone changes, you need to draw a value graduation done.
Materials need for creating value graduation strip
- Ruler
- Pencil
- Sharpener
- Paper or drawing book
- Rubber
Drawing a value graduation strip
Pupil’s activity Page 5-6
Creating a smooth value graduation strip
Pupil’s activity
Page 5-6
Displaying of work
Pupil’s activity
Page 5-6
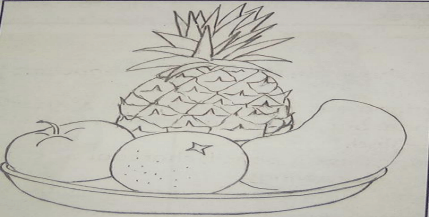
Drawing: still life drawing (smudging technique)
- A still life is a drawing of an arrangement of non-moving objects
Still life drawing using smudge technique Materials
- Still life objects
- Paper or drawing book
- Ruler
- Pencil
- Rubber
- Sharpener or razor blade
Procedure
- Set up a still life composition in a creative way. {place objects close to each other such that, some objects appear partly hidden by others. The ones in front cover part of or overlaps the ones behind]
- Observe the shapes of the objects in still life keenly before drawing.
- Draw the objects when looking at them. {this is known as drawing from observation}
- Shade the drawing you have made using smudging technique.
NB: make sure you note the ones placed in front of the others and their sizes.
Shading a composition using smudging technique
Pupil’s activity
Page 9-10
Drawing human forms (smudge technique)
Drawing human forms using smudge technique
- To draw a human form, look at the person keenly.
- First study how the features of the body relate to one another then draw the whole body.
- Shapes and parts of the body features should be done correctly.
- The parts of the body should compare well with the other parts.
For example, the head should not be too big or small when compare with the rest of the body. This is known as proportion.
Materials needed to draw human forms
- Pencil
- Ruler
- Rubber
- Paper or drawing book
Pupil’s activity
Page 11-13
Drawing a human form doing an activity
Pupil’s activity
Page 13-14
Drawing: pictorial composition in crayon etching
Pictorial composition using crayon etching
Crayon etching
- Crayon etching is a picture done on a specially prepared surface.
- The picture is done by scratching.
- The surface is prepared by thickly rubbing over it.
- A dark coat of ink is then applied over the paper.
- A little soap is used during the application to help the ink or point stick on the crayons.
- The surface is left to dry before drawing by scratching.
Materials needed for crayon etching
- Ruler.
- Pencil
- Drawing paper
- Wax crayons
- Painting brush
- Soap
- Sharp tools for etching such as sticks, pins or nails
- Black ink or black watercolour paint
- Containers for holding water, brushes and paint or ink
- A rag
Pupil’s activity
Page 16-17
Making a picture using crayon etching method
Displaying crayon etching work
Drawing pictorial composition using crayon etching
- A pictorial composition is a picture that tells a story.
Pupil’s activity
Page 18-19
- Think of a pictorial composition you would like to draw.
- Take a piece of paper and draw the pictorial composition.
- Prepare a surface for crayon etching. Plan the crayon rubbing carefully.
- Take the paper and draw the margins for the picture frame.
- Select the colour you want to use.
- Plan on how to colour the crayons you have selected. Rub them as you wish. You can rub horizontally, vertically, diagonally or in spirals. Rub the crayons thickly within the drawn margins.
- Apply a little soap on the work, then using a brush, apply black ink over the crayons
- Leave it to dry.
Pictorial composition using crayon etching
Materials need for crayon etching
- The sketch of a pictorial composition
- The prepared surface for crayon etching
- Sharp tools for etching such as sticks, pins, nails or table knives
- Rags
Creating crayon etching
- When the surface you have prepared has dried well, scratch out the pictorial composition on the surface.
- Do not work under the sun because it may melt the wax and spoil your picture. Take care to scratch too deep, the sharp tool may damage the crayon rubbed surface.
Procedure
- Look at your own sketch
- You may improve it a bit
- Use a sharp tool to scratch out your pictorial composition.
- Use a rag to brush off flakes of black etched pieces of crayon.
- Take care not tear your paper when etching.
Pupil’s activity
Page 20-21
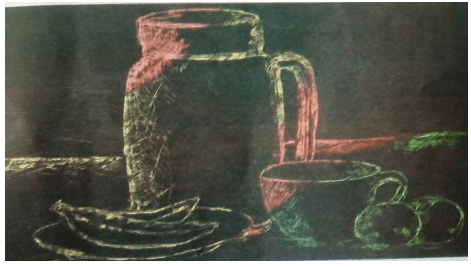
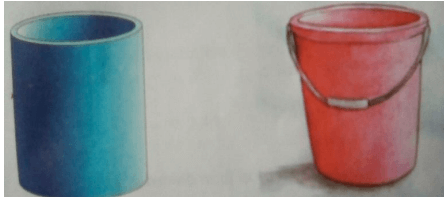
Painting
Painting: tonal variation strip
- Painting is the art of creating pictures or images by applying colour on a surface
- Colour can be applied using a brush, fingers, sponge or any other paining tool.
Tonal variation
- Tone is the lightness or darkness of a colour.
- Every colour varies in darkness or lightness.
- In painting tonal variation is achieved by adding an amount of either black or white to a colour.
- Dark tone is created by adding black and light tone is created by adding white.
Materials needed to create tonal variation strip
- Paper or drawing books
- Ruler
- Pencil
- Brush
- Palette
- Black and white paint
- Container for holding water
- Rag
A three tone variation strip using black and white
Pupil’s activity
Page 23-24
A five tone variation strip using black and white
Pupil’s activity
Page 23-24

- A tonal variation strip can have more than 3 parts.
- White can be added to black continuously until the lightest grey is achieved
- You can also add a little black to the white continuously until the darkest grey is achieved.
Blended tonal variation
- Tonal variation strips can also be creted by blending tones one into another without creating any break.
- This means that the tones flow into another as you paint, it is done by mixing the colour on the palette little as you move from dark to light tone.
Creating blended tonal variation strips with black and white
Pupil’s activity
Page 25

Experimenting with black and white on other colours to make tonal variations strips
Pupil’s activity
Page25
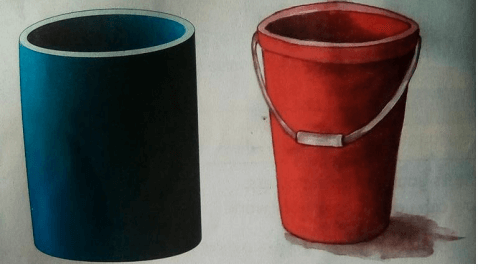
Painting: tonal value using white
Using white on cylindrical forms to create tonal variations
- When we add white to another colour, the colour becomes lighter.
- For example, when we add white to colour blue it becomes lighter. When we add white to colour green it becomes lighter
Materials needed to create tonal variation on cylindrical forms
- Papers or drawing book.
2. Rulers
3. Pencils
4. Paints
5. Brushes
6. Palettes
7. Rags
Creating tonal variation on cylindrical forms using white
Pupil’s activity
Page 30-31
Creating staggered tonal variations on cylindrical forms
Pupil’s activity
Page 31-32
Creating blended tonal variation on a cylindrical form
Pupil’s activity
Page 32-33
Painting; tonal value using black
Using black on cylindrical forms to create tonal variation
- When black is added to another colour, it becomes darker.
- This means when black is added, the colour losses its brightness.
- For example, when black is added to red it becomes darker and when black is added to yellow it becomes darker.
- The more black is added to a colour the darker it becomes.
Materials needed to create tonal value strip
- Paper or drawing book
- Brush
- Pencil
- Rag
- Ruler
- Palette
- Paint
- Container for holding brushes and water
Creating tonal variations strips on cylindrical forms using black
Pupil’s activity
Page 35-36
Creating staggered tonal variation on cylindrical forms using black
Pupil’s activity
Page 36-37
Creating blended tonal variations strips on a cylindrical form
Pupil’s activity
Page 38-39
Montage
Montage: cutting and pasting technique
- Montage is technique of selecting, editing and piecing together separate sections of pictures to form a continuous whole.
- Montage is another technique of picture making.
- It involves cutting different pictures together to make one pictorial composition.
Montage composition
- In montage, whole or part of pictures and photographs are cut, arraged and glued on a surface to form one composition.
- The picture and photographs should be related to topic or theme.
- Montage composition gives very interesting combinations.
- Explore different ways of combining pictures in order to enjoy creating montage.
Materials needed to create a montage
- Adhesives
- Printed photographs
- Sharp cutting tools such as scissors, blades
- Old newspaper and magazines with relevant pictures
- Mounting board/suitable for sticking the pictures such as cardboard or manila paper.
- You can also need pencils, rubber an d ruler to draw the picture frame and paint to make your composition more beautiful.
How to create a montage pictorial composition
- Choose an interesting theme.
- Collect pictures and photographs related to the theme.
- Cut the pictures and photographs.
- Prepare the sticking surface
- Try to fix the pictures in different ways on the prepared surface.
- Use an adhesive to stick the pictures and photographs on the surface.
Pupil’s activity
Page 41-42
Planning a montage composition on the theme of food
Pupil’s activity
Page 42-43
Identifying types of food in montage composition
Pupil’s activity
Page 43
Creating a montage composition
Pupil’s activity
Page 43-44
Displaying montage composition
Pupil’s activity
Page 44
Indigenous Kenyan Craft - Art and Craft CBC Grade 6 Notes
- Basketry
- Coil And Stitch Technique
- Samples Of Coil And Stitch Items
- Selecting Materials For Coil And Stitch Technique
- Preparing Selected Materials For Coil And Stitch Technique
- Methods Of Preparing Selected Materials For Coil And Stitch Technique
- What to consider when coiling and stitching an item.
- Making a floor mat using coil and stitch technique using man-made materials or natural materials.
- Leatherwork
- Coil And Stitch Technique
Basketry
Basketry is the art of making containers and other items using flexible fibres.
Coil And Stitch Technique
- It is the art of coiling materials and sticking them together using a needle and thread to make an item.
Samples Of Coil And Stitch Items
- There are two types of coils
- Plaited coils – are made by braiding two or more strands of a material to make a pattern.
- Roiled coils – are made by roiling strands of materials together
- Items made using the coil and stitch technique are made using any suitable materials that can be rolled e.g. banana fibres, palm leaves
- In weaving, the materials used are interlaced vertically and horizontally on a loom to form an item.
- The vertical threads are called warps and the horizontal threads are the wefts orfillings.
- In basketry, one does not use a loom.
- In the coil and stitch technique, the materials are rolled in a circular form and stitched together using a needle and a string.
Selecting Materials For Coil And Stitch Technique
- Coil and stitch materials can be sourced from
- natural materials or
- man-made materials
- Natural materials are those that can be found in the environment
- Man-made materials include synthetic.
| Man-made materials | Natural materials |
| Nylon Carbon fibre Polyester Yarn Acrylic yarn |
Raffia Wool Silk Reeds Cane Banana fibres sisal |
- Materials used in coil and stitch technique should be flexible and easy to roil to form the coils needed.
- When selecting materials to make a door mat using the coil and stitch technique, consider whether they are
- Durable
- easy to clean and
- non slippery.
- Always use non slippery materials to avoid slip and fall accidents
Preparing Selected Materials For Coil And Stitch Technique
- There are different ways fo preparing materials to be used to make an item using the coil and stitch technique.
- They include
- Dyeing
- Plaiting
- Tearing
Methods Of Preparing Selected Materials For Coil And Stitch Technique
- Tearing methods
- Involves splitting materials such as banana fibres into thin strips for easier use.
- This can be done using your hands or a fibre stripper.
- Dyeing
- Is the process of changing the original colour of materials used to make an item to different colour.
- Plaiting
- Is a technique whereby strands of suitable materials such as rope or silk are braided together to make a single string of fibre.
- Stripping method
- Collected the suggested tools- Fibre stripper/basin/cutting tools/sisal/water
- Spilt the sisal stem into thin strips that can fit in the fibre stripper.
- Place the sisal strips in the middle of the fibre stripper and pull them through to get sisal fibre.
- Wash the fibre using clean water
- Dry the washed sisal fibre in the open sun.
What to consider when coiling and stitching an item.
- Uniformity of coils
- Consistent tension
- Craftsmanship
- Materials
Making a floor mat using coil and stitch technique using man-made materials or natural materials.
- Collect the suggested materials and tools.
Needle/scissors/thread/man-made materials - Prepare the strand by rolling the length of the strand you need
- Use nylon paper or sellotape to wrap and cover the beginning end of the strand.
- Coil the wrapped end of the strand to form a small circle. Using a thread and needle, stitch the wrapped end of the strand by inserting and pulling the needle through the strand. Start stitching from the center as you move outwards.
- Fasten the loop after the first round by passing the needle from right towards the left onto the back of the strand.
- Continue to coil and stitch the strand to make a mat. Add more rope until you get your desired size of the floor mat.
- Finish the floor mat by fastening the end of the strand using stitches
- Display your floor mat
Leatherwork
- Leather work involves using different types of leather materials to make items.
- Leather materials is produced from skin hides of animals.
Montage - Art and Craft CBC Grade 6 Notes
- Pictorial Composition
- Characteristics Of A Montage
- Spacing And Balancing Forms In A Montage Composition
- Creating A Montage Composition
- Montage is a picture composition that is created by cutting and joing images that relate to each other.
Pictorial Composition
Montage Pictorial Composition
- The cut out pictures used to create montage are glued on a surface known as base or mounting surface.
- The base used should be flat.
- A base can be:
- Manila paper
- Cardboard
- Hardboard
- Plywood
- Or any other flat surface.
Characteristics Of A Montage
- in a montage picture are arranged in a manner that they can overlap each other.
- Overlapping means one picture is glued on top of the other.
- Picture used to make a montage can be sourced from old newspapers, old magazines, and calendars, downloaded and printed images from the internet.
- The pictures used are usually related so as to tell the same story or communicate a particular message.
- Cut out text can also be used to help a montage to communicate even better.
Spacing And Balancing Forms In A Montage Composition
- Arranging cut out images on the base before pasting them will help you to achieve balance when creating a montage.
- You can use chose to arrange the picture cut outs side by side. Or overlap them
- In montage overlapping involves putting one picture cuts out on top of another in a way that allows the picture at the back to be partly visible
- When overlapping, let the small picture cuts be glued on top of the big picture cut out.
- Ensure proper use of space by using more than half of the mounting surface.
- Good use of space helps to create balance and center of interest for the montage.
- When balancing objects, arrange them in away they communicate well with each other in order to tell a story or send a message.
Creating A Montage Composition
- Collect the suggested tools and materials.
Base/adhesive/razor/scissors/pictures - Pick the subject matter for your montage
- Cut out the pictures. You need for your montage.
- Arrange the pictures cut outs on the base.
- Mark the position of each picture to avoid disarranging when you will be pasting.
- Apply glue on the back side of each picture cut outs and then paste it to the base.
- Add more details to your montage by making cut outs of other things like grass
- You can trim parts of the cuts outs that are outside the mounting surface.
- Mount your work
Appreciating each other’s work
The Teacher Can Appreciate Pupils Work By
- Displaying of good pieces of work
- Showing personal enthusiasm by the teacher.
- Evident interest in what learners are doing.
- Discussing and judging of good work.
- Personal enthusiasm by other learners.
Painting - Art and Craft CBC Grade 6 Notes
Painting is the skill of creating an image by using paint.
Imaginative Composition
Painting Imaginative Composition
- Materials used in painting are
- Paints
- Painting surface like:
- paper
- cloth
- canvas
- stone
- skin
- wall
- boards
- Tools like
- paintbrush
- sponge
- paint palette
- Spatula
NOTE: Palette is a flat surface on which a painter arranges and mixes paints. It can be made
of wood, plastic or carton paper.
- Tools and materials used for painting can me found or made locally within our environment.
Factors To Consider When Painting
- Depth
- Proportionality
- Centre of interest
- Subject matter
- Every painting is based on a theme or topic also known as the subject matter
- A painting can be about:
- Sports
- Family
- Education
- Celebration among others.
- The part of a painting that attracts your attention is known as centre of interest.
You can create centre of interest in painting by
- Making a particular object bigger than the rest.
- Using colours that contrast (different colours)
- Placing an object at the centre of the painting.
- Painting the actual size and shape of an object compared to another is called proportionality.
- On the painting surface objects that are near you should be placed lower and be bigger in size while objects far from you should be placed higher and smaller in size.
- This helps to create depth and make the painting look real.
Creating Tonal Value In Painting
- In painting an object can be made to look real by varying the lightness and darkness of the colours used.
- The lightness or darkness of colour is also known as the tonal value of the colour.
- Tonal value is created using shading and tinting techniques.
- Shading involves adding black to a colour to make it look dark.
- Tinting involves adding white colour to a colour to make it light.
- The addition of black or white colour creates tonal variation.
- In order to create tonal value effect when painting, identify the direction of light reflecting on the object.
- Apply dark colour paint of the object that you want to be dark and use white colour on areas that you want to be light. Merge the two colours gradually.
Painting an imaginative composition – sporting activity
Art & Craft and Music Questions and Answers - Grade 5 End of Term 3 Exams 2022 Set 1
ART AND CRAFT & MUSIC
GRADE 5
END OF TERM 3
Questions
Section A: Music (25marks)
This section contains 10 questions. Answer as per the instructions provided
- Name two types of songs. (2marks)
- A song sung during worship is called . (2marks)
- When singing the national anthem every one should (2marks)
- One uses facial expressions while singing to express ____________ and _____________ (2marks)
- What is a trio? (2marks)
- Draw one indigenous instrument. (2marks)
- Make a wind instrument using locally available materials such as hollowed out wood, bamboo stem, straight or coiled animal horns and guards. (l,marks)
- Make a folk song costume using locally available materials such a', old newspapers, sisal fibres, old blankets and clothes. (4marks)
- What is structure in music? (2marks)
- Draw a semi-breve and write its French Rythm name. (3ma rks)
Section B: Art & Craft (25marks)
This section contains 10 questions. Answer as per the instructions provided , width and
- A three-dimension figure has (2marks)
- What is a book jacket? (2marks)
- What is a still-life drawing? (2marks)
- Draw two tools used in carving. (4marks)
- Name the technique used in decorating the indigenous pot below. (2marks)

- Skins are used to make items such as (2marks)
- State two materials that can be used for weaving. (2marks)
- Name the weaving tool in the picture below. (2marks)
- Draw the National Flag and colour it appropriately. (4marks)
- Write name of your school in 3D and colour it.(3marks)
Marking Scheme
MUSIC
- Patriotic, folk, action, topical, sacred
- Sacred song
- Attention/alert
- Emotions and feelings
- A musical composition for three voice parts
- nzumari, coro, drum
- Assess
- Assess
- Assess
- Assess
ART AND CRAFT
- Length, width and height
- Assess
- Assess
- Assess
- Knife, stone etc
- handbags, drums, shoes, sheaths
- banana fibres, raffia, grass, sisal
- a peg loom
- Assess
- Assess
Art & Craft, Music and P.H.E Questions and Answers - Grade 5 End of Term 2 Exams Set 2
SECTION A
ART AND CRAFT (20MARKS)
- Name three things you can use when making wax crayons.
- ____________________________
- ____________________________
- ____________________________
- Name one primary colour _____________________________
- Give 2 examples of secondary colours.
- _______________________________________
- ________________________________________
- Name two materials that you can use for basketry.
- ____________________________________
- ____________________________________
- A place where we dry and harden the modelled items is called a ________________________________________
- Which technique has been used to add value in the picture below?
 (cross hatching, smuldge)
 - _____________ is the surface appearance of an object. (value, colour, shade)
-
- Primary colour + primary colour = ________________________
- Primary colour + 'secondary colour = ______________________
- How many dimensions are there in a 3D artwork?__________________________________
- Draw a basket and show the warps.
SECTION B (20 MARKS)
MUSIC.
- Some songs are sung when people are happy while others are sang when people are sad. Sadness or happiness in a song is the ____________________________ (tone, mood, value)
- Write the first line of the East African Community Anthem.
___________________________________________________
___________________________________________________
___________________________________________________ - When two voices are in agreement while singing together, they are said to be in ______________________________
(speed, harmony, rhythm) - In which languages are folk songs perfomed? __________________________________
- I am the person who plays instruments in a song. What is my name? ________________________________
- How do we play this instrument?
 ______________________________________
 - We play this instrument by ___________________________
- Name two parts of a descant decorder.
- _____________________________________
- _____________________________________
- Draw a symbol for the following note.
tag
SECTION C (20 MARKS)
PHYSICAL AND HEALTH EDUCATION
- Explain the meaning of the following commands as used while starting an elongated start in athletics.
- On your marks - __________________________
- Get set - ___________________________
- Go - __________________________
- Identify the four stages of hurdling.
- _______________________________
- _______________________________
- _______________________________
- _______________________________
- Name three physical fitness gained from participating in hurdling events.
- ____________________________________
- ____________________________________
- ____________________________________
- Identify two tools and equipment that are needed while playing softball.
- ____________________________________
- ____________________________________
- The diagram below shows a softball bat. Name the parts labelled X, Y, and Z.
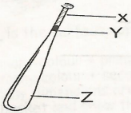
X_____________________________
Y_____________________________
z_____________________________ - Name 2 examples of throwing skills in the game of rounders.
- _____________________________________
- _____________________________________
- Briefly explain the following terms as used in the game of rounders.
- Push pass ___________________________________
- Stance ______________________________________
- Stamping ____________________________________
MARKING SCHEME
Section A: Art and Craft
-
- Paraffin
- Cutting tools
- Bees wax
- Blue/yellow/red
-
- Orange
- Green
-
- Banana fibres
- Palm leaves
- Sisal fibres
- Kiln
- Cross hatching
- Colour
-
- Secondary colour
- Tertiary colour
- 3 dimensions
- Check diagram
Section B: Music
- Mood
- Ee Mungu twaomba uilinde
- Harmony
- Local languages
- An instrumentalist
- By hitting
- Blowing
-
- Mouth piece
- Thimble hole
- Check diagram
Section C; P.H.E
-
- The body shpould be in a crouch position
- Get ready with the whole body while the hips are raised abovethe shoulders.
- Press hard against the nground for a forward push
-
- Approach
- Take off
- Flight
- Hurdle clearance
-
- Makes bones and muscles stronger
- Makes one to be active
- Promotes brain function
-
- bats
- soft balls
- X-knob
Y-Handle
Z- Barrel -
- Under arm
- Over arm
-
- It is a type of pass used to move a ball by a push action
- Refers to the placement of a kicking foot and the arms when performing a push pass
- Stepping on a player who is on the ground.
Integrated Learning Areas - Grade 5 End Term 1 Exam 2021 SET 2
COMPETENCY BASED CURICULUM
GRADE 5, END OF TERM 1
INTEGRATED LEARNING AREAS
NAME....................................................SCHOOL...............................
ART & CRAFT
- List 5 materials that are needed when creating a still life composition using smudge technique.
___________________
___________________
___________________
___________________
___________________ - In the space beiow, draw two overlapped cylindrical forms and shade using cross hatching technique to create light and dark effect.
- List 5 materials that are needed to create crayon etching pictorial compositions.
___________________
___________________
___________________
___________________
___________________ - Write 5 secondary colours you know.
___________________
___________________
___________________
___________________
___________________ - What is painting?
____________________________________________________________________________ - Draw and paint a colour wheel to show primary, secondary and tertiary colours.
- List any 3 materials that are needed when drawing a colour wheel.
___________________
___________________
___________________
MUSIC
- Explain what these songs are:
- Patriotic songs _______________________________________________________________________________________________
- Lullaby songs
_______________________________________________________________________________________________ - Action songs
_______________________________________________________________________________________________ - Topical songs
_______________________________________________________________________________________________ - Sacred songs
_______________________________________________________________________________________________
- Write the first verse of the East African Anthem in Kiswahili. (5 marks)
____________________________________________________________________________________________________________________________________________________________________________________________________________________________________________________________________________________________________________________________________________________________________________________________________________________________________________________________ - Outline 4 aspects of folk songs.
______________________________________
______________________________________
______________________________________
______________________________________ - State 4 safety measures that should be observed when performing folk songs.
______________________________________
______________________________________
______________________________________
______________________________________ - Name 4 Kenyan musical instruments:
______________________________________
______________________________________
______________________________________
______________________________________ - Draw a descant recorder in the space below.
PHYSICAL & HEALTH EDUCATION
- Give 4 health benefits gained through participating in running
______________________________________
______________________________________
______________________________________
______________________________________ - Outline 2 safety measures that should be observed when practising the -run through finish' technique.
______________________________________
______________________________________ - List 2 materials that can be used to improvise a relay baton.
___________________
___________________ - Give 4 safety measures that should be observed when improvising'a relay baton.
______________________________________
______________________________________
______________________________________
______________________________________ - Draw a relay baton in the space below.
- Explain the term straddle as used in skipping rope.
_______________________________________________________________________________________________ - Outline 4 safety measures that should be observed when practising straddle to avoid injuries.
______________________________________
______________________________________
______________________________________
______________________________________ - List 5 health benefits of rope skipping.
______________________________________
______________________________________
______________________________________
______________________________________
______________________________________ - List 3 responsibilities of infield players when playing batting
games.
______________________________________
______________________________________
______________________________________ - Outline three qualities of a good outfield player when playing batting games.
______________________________________
______________________________________
______________________________________