

Weaving
Plain And Twine Techniques.
- The weaving process involves interlacing two sets of thread. The two sets are known as
- Warp - threads that form the framework of a woven article. The warp are the threads fixed on a loom during the weaving process.
- Weft - the threads that interlace over and under the warp.
- The warps are the threads that form the framework on the woven item.
- The wefts are threads that interlace over and under the warp. To interlace means to pass one set of weaving material over and under another.
- The weaving technique can be used to make different items such as clothes, mats, curtains and wall hangings.
- The weaving process takes place in a machine called loom- this is a machine used for weaving.
- The process by which weft threads close together during the weaving process is called Beating. The purpose of beating is to compact weft so as to make the woven article firm and tight.
- There are two methods of weaving:
- Plain weave - a weaving technique where the weft interlace over one under one warp across a fabric.
- Twine technique - a weaving technique where two sets of weft interlace by warping around a warp thread.
- Weaving materials are categorized into two:
a. Flexible weaving materials which are easy to bend - they include bamboo, maize stalk, millet stalk, reeds and twigs.
b. Stiff weaving materials - are the ones that are relatively hard to bend - they include bamboo, maize stalk, millet stalk, reeds and twigs.
Weaving Loom
- This is a device or tool used to weave an article
- A loom is used to hold warp in place and thereby speeds up the weaving process.
- There are many types of loom. They include:
- Frame loom
- Serrated card loom
- Back strap loom.
- The easiest type of loom to make is the dowel loom. A dowel loom is made up of 4 posts or sticks tied to form a frame shape.
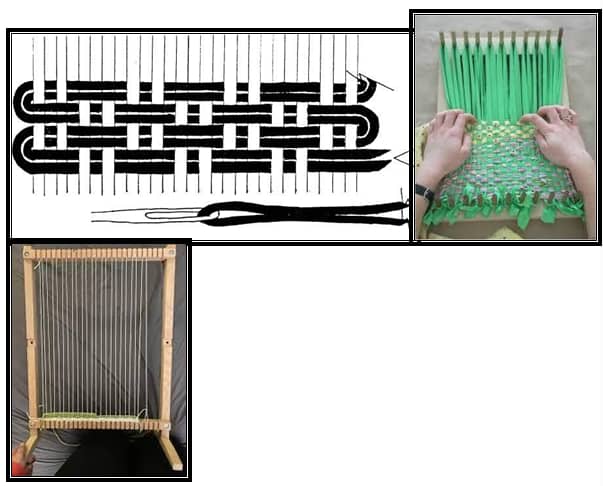
Weaving a mat in two colours using plain and twine technique.
To start weaving you need to tie the warp on the loom.
Use the procedure below to start.
- Identify strong weaving materials for the warp,.
- Tie the warp on one end of the dowel loom and then wind it across the loom as shown.
Procedure of weaving a mat
- Sketch the design of the two colour floor mat showing how plain and twine weave will be used. Select two colours you will use to weave.
- Select weaving materials of two colours of their choice. These will be used as the weft.
- Interlace the weft over and under threads to make a plain weave.
- Press the weft threads close together after weaving each line. Use the fingers or stick to press the wefts close together. This process of pressing the wefts close together is known as beating.
- Fold the weft to pass behind and in front of the warp and then twist it before the next warp. Keep repeating the process until they reach the end. Once at the end of the first row, return back with the same process.
Leather Work
Thonging Method.
- Many communities in Kenya use leather to make functional and decorative items such as belts, sandals, shoes, bags, hats, quivers, drums, ornaments, sleeping mats and clothes.
- Leather, which is the basic material, is obtained from animal hides and skins.
- These hides and skin undergo a process known as tanning to prevent them from decomposing, rotting and removes bad smell.
- The tanning process also makes the leather soft and improves its texture. Colour can also be added in the process/
- Thonging is one of the techniques used in leather work. In this technique strips of cut leather are used to lace or join two or more pieces of leather together. Thonging method can also be used to decorate an item made out of leather.
- Therefore thonging - is the process of lacing or tying leather pieces together using thongs. And thongs are narrow strips of cut leather used to lace or tie pieces of leather together.
- The tool used for making holes on the leather is known as Awl.

Making a pencil case using the thonging technique
- Draw a sketch of a pencil case to be made out of leather.
- Make a paper cut out to show how the parts of the pencil will look like as shown below.
- Trace the template on the leather and cut out the desired shape.
- Cut out thonging strips of even thickness from leather as shown below. The thonging strips will be used to lace or join the parts of the pencil case.
- Fold the leather according to your design and make holes on the sides. Make sure the holes are evenly spaced. The holes can be made using a nail and a hammer.
f - Join the pieces of leather using the overcast stitch. Start by tying a knot at the hole at the edge, pass the leather strip into the hole on the second piece and back through the next hole. Continue until the whole side is held on the second piece and back through the next hole. Continue until the whole side is held in place with the thongs. Make sure they are tightly held.
Decorating the pencil case
There two methods that can be used to decorate the pencil case:
- Decorating by stitching
- Decide on the beads to use and choose their colour. Place the beads on the pencil case to check their fit.
- Thread the needle, push through the leather from the inside and tie a knot on the inside.
- Push the needle from the back of the leather to the front and a few more beads before making another stitch.
- Push the needle through to the underside of the leather . secure the thread with a knot and trim the excess thread.
- Continue stitching with the beads until the end.
- Decorating by pasting
- Decide on the beads to use and choose their colour. Place the beads on the pencil case to check their fit.
- Apply glue on the marked areas of the pencil case.
- Place the beads on the pencil case according to your design.
- Leave the pencil case to dry.
Pottery
Coil Method.
- Pottery is the art of modelling functional articles and containers using clay. Articles that can be modelled are items such as pots, cups, spoons, flower vases and plates.
- Clay is mixed thoroughly in order to make it even and to remove air bubbles through a process called kneading.
- In order to apply decoration in pottery in some sections of the modelled container is cut out through the Incising method
Modelling pottery items using coil technique.
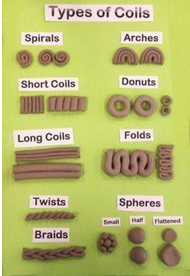
Procedure
- Make a drawing sketch of the coil pot you want to model.
- Take a little clay from the lump of clay and roll it on a flat surface or in between the palms of their hands to make a coil.
- Continue rolling more clay coils. To ensure that the coils are of even thickness, they should not apply pressure at the same place of even thickness, do not apply pressure at the same place continuously. Move your hand in different areas of the clay as they roll the coils. Keep the coils moist by covering them with a damp cloth.
d - Add successive coils to the required shape and size. To join one coil to another, press two ends of the coils and smoothen the coils with their fingers.
To decorate the pot use the method below.
- Stamping/embossing -is the pottery decoration technique now being used where an object with a pattern is pressed firmly on leather hard clay. The pattern is then transferred to the walls of the modelled article.
Sculpture
Carving
- Sculpture involves three dimensional forms or figures . Some common techniques used to make sculptural work include modelling, casting and carving.
- Modelling technique involves shaping forms using malleable materials such as clay or plasticine.
- In casting a liquid material that can solidify is poured into a mould. The material takes the shape of the mould when it solidifies.
- Carving refers to cutting away or chopping off parts from a solid material. This is done until the shape you want is formed.
- Materials that can be carved include: wood, stones, styrofoam, rubber and clay. Slab. to carve the materials you will need sharp cutting tools like the knife, pangas, axe or blades.
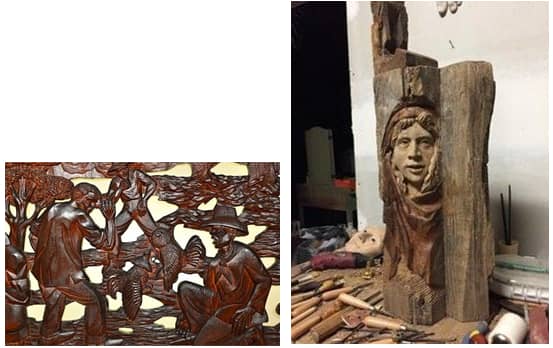
Materials and tools used in sculpture
Some common softwood that can be used to carve wooden sticks include; cypress, pine, podo, grevillea and cedar.
How to carve wooden stick or ladle
Use the following procedure to carve cooking stick or ladle
- Cut the piece of wood to the length of the cooking stick.
- Mark the position where the handle of the cooking stick or ladle will be as shown below.
- Cut the unwanted parts to form the general shape of the cooking stick
- Refine the shape of the cooking stick or ladle.
- Sand the cooking stick or ladle to make it smooth. E.g. by using sand paper.
Decorating a wooden cooking stick
A variety of techniques can be used to decorate the cooking sticks. They include:
- Smoking - this involves placing the cooking stick over a lit flame from a candle or burning stick. You can then move the stick over the flame to create patterns as shown below. Be careful to avoid burns.
- Polishing - this can be done by rubbing the carved wood using sandpaper, a sharp blade or broken piece of glass. This should be done repeatedly until the cooking gets a smooth polished finish. You can add wax and rub or buff with a soft cloth. This will leave the wood smooth and shiny.
- Texturing - this involves creating different textures on the wooden cooking stick. This can be done by scratching or engraving into the cooking stick with a sharp object or tool as shown.
- Burning - this involves placing a hot metal rod over the cooking stick or ladle. The metal rod can be placed repeatedly in different ways to create interesting patterns on the cooking stick as shown in the picture.
- Incising - this involves cutting out lines to form shapes lines or grooves on the wooden sticks.
- Embossing - this process involves pressing an object firmly on the cooking stick. The pattern on the object is then transferred onto the cooking stick by stamping as shown.
Join our whatsapp group for latest updates
Tap Here to Download for 30/-
Get on WhatsApp for 30/-
Download Indigenous Kenyan Craft - CBC Grade 5 Art and Craft Revision Notes.
Tap Here to Download for 30/-
Get on WhatsApp for 30/-
Why download?
- ✔ To read offline at any time.
- ✔ To Print at your convenience
- ✔ Share Easily with Friends / Students