
Displaying items by tag: revision notes
Presentation and Exhibition - CBC Grade 5 Art and Craft Revision Notes
Mounting Artwork -window Mounting
- Artworks are mounted for the following reasons:
- To make them look better
- Protect and make them last longer
- To make them stiff while hanging on a wall
- To prevent them from bending, wrinkling or creasing.
- Artworks that can be mounted include drawings, paintings, crayon etching, fabric decoration, mosaic and collage. These types of artwork are referred to as “two dimensional” (2 D) artwork.
- They are artwork that can be done on a flat surface such as paper, board or cloth.
- Mounting - is the process of attaching a drawing, photograph or other work art done on paper to a cardboard or other backing by using adhesive.
- There are surfaces for mounting which include conventional and unconventional surfaces used for mounting 2D artwork. It includes:
- Conventional - refers to commonly used surfaces e.g. various papers
- Unconventional - surfaces manufactured for a given use but re-use for another purpose e.g. Hessian, plastic, hardboard, soft board or canvas.
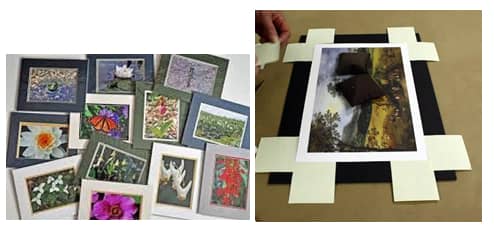
Mounting Artwork
Window mounting using conventional and unconventional surfaces.
Mounting Art Using A Conventional Surface
- Identify and select your paper. Ensure the paper is strong to withstand the weight of your artwork.
- Select the artwork that they would like to mount.
- Use a blade or pair of scissors to trim and cut the edges of the artwork so that they are neat and straight.
- Creating the window place artwork on the mounting surfaces and mark at the edges as illustrated.
Place other marks inside from the first set of marks that you had made. Make sure they are just inside enough not to cover any important part of the artwork as shown. - Draw a margin around the second set of marks that you have made, then cut the margin line you have drawn. This will create a window on the mounting surface. The window should be slightly smaller than the artwork to be mounted.
- Flip the mounting surface on the reverse side then apply adhesive along the window space as shown.
- Fix the artwork using glue on each mounting surface and press it firmly in place as shown.
Mounting Artwork Using Unconventional Surface Procedure
- Identify an old fabric and cartons from the environment. Ensure the fabric is larger than the carton by at least 5 cm on each side by measurement.
- Select the artwork that they would like to mount
- Use a blade or pair of scissors to trim and cut the edges of the artwork so that they are neat and straight.
- Create the window on the carton surface.
- Apply glue on their cut-out window and attach it to the fabric as shown.
- Draw marks at the four corners and two diagonal lines across the window as shown below. Using scissors, trim off the small square marks at each of the four corners. Cut through the diagonal lines you made using a sharp blade then apply glue on the carton.
- Start by folding the outer flaps of the fabric to cover the carton as shown. Then fold the middle pieces fabric over to completely cover the carton.
- Apply glue on the created window frame then attach the artwork.
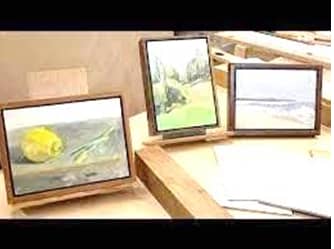
Exhibition Skills - 2d And 3d Artwork Exhibition.
- To a greater extent and exhibition is a culmination of artwork done over a period of time.
- To exhibit is to display items so that they are clearly seen by others. The main reason for exhibiting items are to enable people to have a clear view of the items, appreciate and admire them and also to buy the item.
Exhibition Skills
Skills required to exhibit include:
- Use of space
- Placement of the artwork
- Colour and contrast of background
- Labelling of 2D and 3D artwork.
Design Mixed Media and Technology Graphic Design - CBC Grade 5 Art and Craft Revision Notes
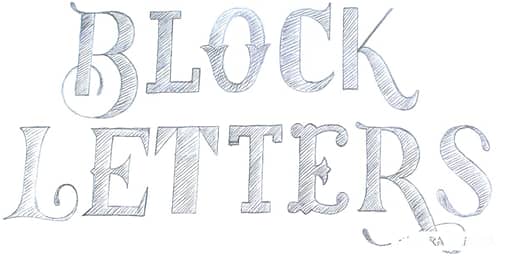
Letter Construction
- Graphic design is the art of combining words and pictures to pass a message.
- Roman letters are letters based on the Roman alphabet. E.g. A B C D E F G H
- Block letters refers to straight letters constructed individually, with no letters joining.
- 3 Dimensional - this is having length, height and depth. Raised from the surface.
Construction Of 3 Dimensional Letters
- Draw guidelines in the drawing book using a ruler and a pencil
- Write the alphabetical letters using a pencil.
- Draw an outline around using freehand or a ruler. Rub the inner lines after drawing the outline. These will now be two dimensional letters.
- Draw small projected lines to represent the shadows as they would appear. They can choose to use freehand or a ruler.
- Connect the ends of the projected lines using freehand or with a ruler. Practice constructing simple words like Baraka, Pendo, Amani, NEEMA
Decorating 3 Dimensional roman letters
- Decide on the decoration method to use.
- Prepare or acquire the tools and materials
- Decorate the face of the letters
- Decorate the shadow
- Finish by erasing any unwanted pencil marks
Book Craft
Book jacket - is a removable cover made of paper used to protect the cover of a book A book jacket contains the following:
- Illustration - which is a picture showing what the book is about.
- Author - this is the writer of the book
- Title of the book.
Measuring and cutting the book jacket
- Place the book on the manila paper to get the right measurement.
- Draw the measurement on the book jacket on the hard paper then trim off the excess paper. Mark the flaps, front , spine and back
- Write the title of the book and author’s name on the front cover using block letters.
- Fold out the two flaps and the spine as shown below.
Making the applique and attaching to the book cover
- Applique - decorative designs in which pieces of fabric are sewn or stuck on to a large piece of fabric to form a picture or pattern.
- The following are the steps to decorate the book jacket with applique
- Make a sketch design that goes with the title and then draw their desired shape on a hard paper.
- Cut out the shape and place it on a fabric of their choice.
- Cut out the shape on the fabric
- Place the cut-out shape of fabric on larger fabric.
- Attach the cut out fabric to the larger fabric using running stitches.
- Arrange the beads on the fabric to see how they fit.
- Apply glue on the beads, then rearrange the beads on the fabric and allow them to dry.
- Use glue to attach the applique onto the book jacket and allow it to dry before folding.
Puppetry
- It is the art of making and manipulating puppets in a performance. A puppet is a toy or figure in the shape of a human or animal that is moved by a human to make them appear like they are alive.
- There are several types of puppet. They include:
- Glove puppets
- Stick and rod puppets
- Marionettes
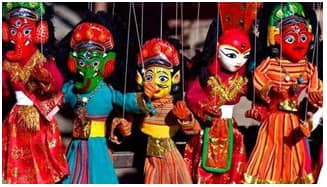
Marionettes
- A marionette is a toy of a person or animal, controlled from above by strings attached to its movable body parts.
- Marionettes are used as characters in performances in entertainment. The person manipulating a marionette is known as a marionettist. They may be hidden or seen by the audience.
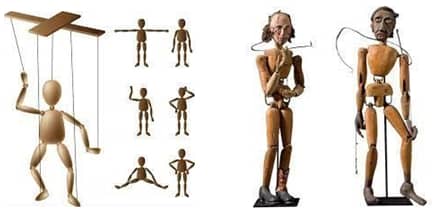
- A marionette has 3 parts
- Model - thi is the main puppet that may be of human or animal figure with movable body parts.
- Handle - this is the part the puppeteer uses to control the marionette. The most common one is a horizontal bar with others attached to it at right angle it is connected to the marionette using strings.
- Strings - these are attached from the handle to different body parts of the marionette. They are used to control the movement of the body parts during a performance.
- A marionette can be made from different materials ranging from wood, cloth, paper and even clay. The main techniques of making a marionette are construction and assemblage.
Making a marionette
- Draw and colour the full figure of the puppet on paper as they would want it to look like.
- Collect pieces of timber for each part of the body, two arms, two legs, the main body section and the head. The pieces should look very close to the parts of the body to minimize carving.
- Measure each piece of timber according to the body part it will form.
- Cut and carve using a knife or adze the piece of timber to look like the parts of the body. Follow the steps they used while carving the cooling stick or ladle in sculpture.
- Assemble the carved pieces by laying out the torso piece down first, then arrange the arms and legs on the marionette so that a section of each overlaps with the torso (the trunk or the part of the human body that doesn’t include the head, arms or leg) piece.
- Creating the joints and dressing the puppet: drill holes using nails or any sharp object and push a wire through each joint in the pupper as shown. The joints should remain loose and flexible enough for the limbs to move easily.
- Dressing the puppet. Sew simple clothing, dress the puppet and attach other details such as the hair using sound materials and objects such as buttons or seed to fix eyes.
- Creating the handle or control bar - lay down two sticks or pencils to form a cross. Tie the sticks together where they intersect using strong strings.
- Attaching the strings - thread a needle with a string (fishing line is best because it is transparent). Know and cut the string after making each attachment. The length of the string extending from each section needs to be long enough to reach the sticks.
- Connecting the strings - knot the fishing line extending from the puppet’s shoulders to the centre of the cross. Knot each of the four strings connected to the puppet’s limbs to an individual arm of the cross.
- Perform for a friend to test the marionette by manipulating the control bars at intervals.
Photography
- Photography is the art of taking pictures with a camera. Cameras range from digital camera and mobile phone camera.
- In photography certain elements needs to be taken into consideration. They include:
Focus
which includes: background, image quality, center of interest viewpoint, 3 views perspective lightning.
Focus is very important in photography. A focused image is sharp and clear. It involves adjusting the camera lens and the distance from the subject, that is the object being photographed. In digital cameras this can be done automatically

Background
refers to what is behind the main subject being photographed.
Choose a background that will make the subject stand out
tell where the background is standing out Image quality - refers to the sharpness and the brightness of a photograph.
Make sure your photograph is well focused, hold your camera firmly to avoid shaking. Take time until the image looks clear on the screen.

Centre of interest - is the most outstanding part or object in a photograph.
Choose one center of interest where possible. This should be the main subject in the picture.
No centre of interest

Clear Centre of interest
Viewpoint - in photography or point of view is the position of the camera in relation to that of the subject being photographed.
There are three most common points of seeing objects. These are
When the camera is at the same level with what is being photographed. This is called Eye level.
When the camera is above what is being photographed. This is called Bird’s eye view.
The camera can be below what is being photographed and that is called Worm’s eye view.
Lighting - lighting is important in photography as you cannot see without light.
One should consider the following when taking your photographs.
- Avoid bright light behind your subject
- Avoid very dark shadows
- Where possible avoid taking photographs when the sun is very bright like at noon. Mornings and evenings have better light for taking photography.
- Framing (placement of forms within the frame)
Framing is the placement of forms within the photograph.
- Choose the object to include in the picture carefully making sure the subject is clearly seen and well placed within the frame.
- The main subject of the photograph should be the center of interest.
- Avoid having too many objects in the photograph.
- composition
This refers to making something by arranging several things to form a whole. The composition of your photograph is done by combining different things to make the whole photograph.
These includes the lines, shapes and object such as people or animals
Indigenous Kenyan Craft - CBC Grade 5 Art and Craft Revision Notes
Weaving
Plain And Twine Techniques.
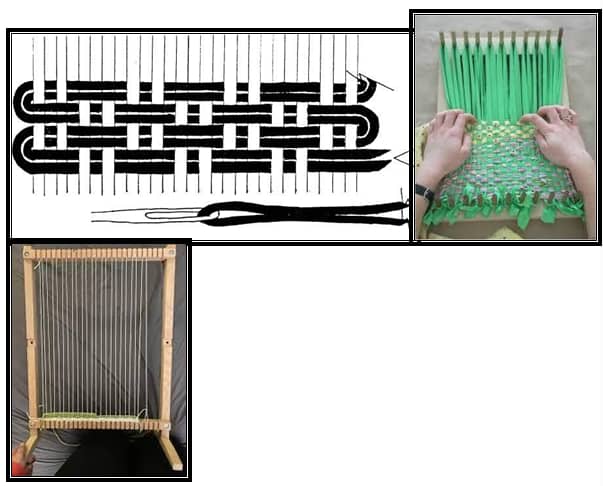
- The weaving process involves interlacing two sets of thread. The two sets are known as
- Warp - threads that form the framework of a woven article. The warp are the threads fixed on a loom during the weaving process.
- Weft - the threads that interlace over and under the warp.
- The warps are the threads that form the framework on the woven item.
- The wefts are threads that interlace over and under the warp. To interlace means to pass one set of weaving material over and under another.
- The weaving technique can be used to make different items such as clothes, mats, curtains and wall hangings.
- The weaving process takes place in a machine called loom- this is a machine used for weaving.
- The process by which weft threads close together during the weaving process is called Beating. The purpose of beating is to compact weft so as to make the woven article firm and tight.
- There are two methods of weaving:
- Plain weave - a weaving technique where the weft interlace over one under one warp across a fabric.
- Twine technique - a weaving technique where two sets of weft interlace by warping around a warp thread.
- Weaving materials are categorized into two:
a. Flexible weaving materials which are easy to bend - they include bamboo, maize stalk, millet stalk, reeds and twigs.
b. Stiff weaving materials - are the ones that are relatively hard to bend - they include bamboo, maize stalk, millet stalk, reeds and twigs.
Weaving Loom
- This is a device or tool used to weave an article
- A loom is used to hold warp in place and thereby speeds up the weaving process.
- There are many types of loom. They include:
- Frame loom
- Serrated card loom
- Back strap loom.
- The easiest type of loom to make is the dowel loom. A dowel loom is made up of 4 posts or sticks tied to form a frame shape.
Weaving a mat in two colours using plain and twine technique.
To start weaving you need to tie the warp on the loom.
Use the procedure below to start.
- Identify strong weaving materials for the warp,.
- Tie the warp on one end of the dowel loom and then wind it across the loom as shown.
Procedure of weaving a mat
- Sketch the design of the two colour floor mat showing how plain and twine weave will be used. Select two colours you will use to weave.
- Select weaving materials of two colours of their choice. These will be used as the weft.
- Interlace the weft over and under threads to make a plain weave.
- Press the weft threads close together after weaving each line. Use the fingers or stick to press the wefts close together. This process of pressing the wefts close together is known as beating.
- Fold the weft to pass behind and in front of the warp and then twist it before the next warp. Keep repeating the process until they reach the end. Once at the end of the first row, return back with the same process.
Leather Work
Thonging Method.
- Many communities in Kenya use leather to make functional and decorative items such as belts, sandals, shoes, bags, hats, quivers, drums, ornaments, sleeping mats and clothes.
- Leather, which is the basic material, is obtained from animal hides and skins.
- These hides and skin undergo a process known as tanning to prevent them from decomposing, rotting and removes bad smell.
- The tanning process also makes the leather soft and improves its texture. Colour can also be added in the process/
- Thonging is one of the techniques used in leather work. In this technique strips of cut leather are used to lace or join two or more pieces of leather together. Thonging method can also be used to decorate an item made out of leather.
- Therefore thonging - is the process of lacing or tying leather pieces together using thongs. And thongs are narrow strips of cut leather used to lace or tie pieces of leather together.
- The tool used for making holes on the leather is known as Awl.

Making a pencil case using the thonging technique
- Draw a sketch of a pencil case to be made out of leather.
- Make a paper cut out to show how the parts of the pencil will look like as shown below.
- Trace the template on the leather and cut out the desired shape.
- Cut out thonging strips of even thickness from leather as shown below. The thonging strips will be used to lace or join the parts of the pencil case.
- Fold the leather according to your design and make holes on the sides. Make sure the holes are evenly spaced. The holes can be made using a nail and a hammer.
f - Join the pieces of leather using the overcast stitch. Start by tying a knot at the hole at the edge, pass the leather strip into the hole on the second piece and back through the next hole. Continue until the whole side is held on the second piece and back through the next hole. Continue until the whole side is held in place with the thongs. Make sure they are tightly held.
Decorating the pencil case
There two methods that can be used to decorate the pencil case:
- Decorating by stitching
- Decide on the beads to use and choose their colour. Place the beads on the pencil case to check their fit.
- Thread the needle, push through the leather from the inside and tie a knot on the inside.
- Push the needle from the back of the leather to the front and a few more beads before making another stitch.
- Push the needle through to the underside of the leather . secure the thread with a knot and trim the excess thread.
- Continue stitching with the beads until the end.
- Decorating by pasting
- Decide on the beads to use and choose their colour. Place the beads on the pencil case to check their fit.
- Apply glue on the marked areas of the pencil case.
- Place the beads on the pencil case according to your design.
- Leave the pencil case to dry.
Pottery
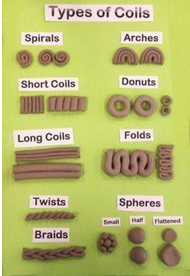
Coil Method.
- Pottery is the art of modelling functional articles and containers using clay. Articles that can be modelled are items such as pots, cups, spoons, flower vases and plates.
- Clay is mixed thoroughly in order to make it even and to remove air bubbles through a process called kneading.
- In order to apply decoration in pottery in some sections of the modelled container is cut out through the Incising method
Modelling pottery items using coil technique.
Procedure
- Make a drawing sketch of the coil pot you want to model.
- Take a little clay from the lump of clay and roll it on a flat surface or in between the palms of their hands to make a coil.
- Continue rolling more clay coils. To ensure that the coils are of even thickness, they should not apply pressure at the same place of even thickness, do not apply pressure at the same place continuously. Move your hand in different areas of the clay as they roll the coils. Keep the coils moist by covering them with a damp cloth.
d - Add successive coils to the required shape and size. To join one coil to another, press two ends of the coils and smoothen the coils with their fingers.
To decorate the pot use the method below.
- Stamping/embossing -is the pottery decoration technique now being used where an object with a pattern is pressed firmly on leather hard clay. The pattern is then transferred to the walls of the modelled article.
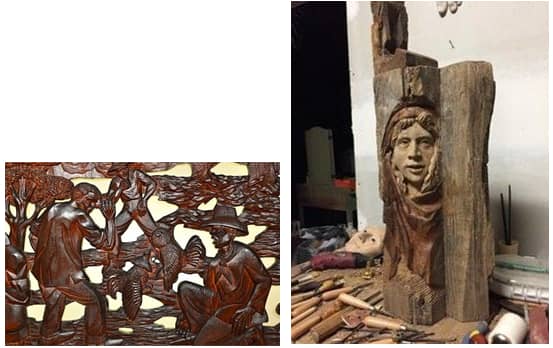
Sculpture
Carving
- Sculpture involves three dimensional forms or figures . Some common techniques used to make sculptural work include modelling, casting and carving.
- Modelling technique involves shaping forms using malleable materials such as clay or plasticine.
- In casting a liquid material that can solidify is poured into a mould. The material takes the shape of the mould when it solidifies.
- Carving refers to cutting away or chopping off parts from a solid material. This is done until the shape you want is formed.
- Materials that can be carved include: wood, stones, styrofoam, rubber and clay. Slab. to carve the materials you will need sharp cutting tools like the knife, pangas, axe or blades.
Materials and tools used in sculpture
Some common softwood that can be used to carve wooden sticks include; cypress, pine, podo, grevillea and cedar.
How to carve wooden stick or ladle
Use the following procedure to carve cooking stick or ladle
- Cut the piece of wood to the length of the cooking stick.
- Mark the position where the handle of the cooking stick or ladle will be as shown below.
- Cut the unwanted parts to form the general shape of the cooking stick
- Refine the shape of the cooking stick or ladle.
- Sand the cooking stick or ladle to make it smooth. E.g. by using sand paper.
Decorating a wooden cooking stick
A variety of techniques can be used to decorate the cooking sticks. They include:
- Smoking - this involves placing the cooking stick over a lit flame from a candle or burning stick. You can then move the stick over the flame to create patterns as shown below. Be careful to avoid burns.
- Polishing - this can be done by rubbing the carved wood using sandpaper, a sharp blade or broken piece of glass. This should be done repeatedly until the cooking gets a smooth polished finish. You can add wax and rub or buff with a soft cloth. This will leave the wood smooth and shiny.
- Texturing - this involves creating different textures on the wooden cooking stick. This can be done by scratching or engraving into the cooking stick with a sharp object or tool as shown.
- Burning - this involves placing a hot metal rod over the cooking stick or ladle. The metal rod can be placed repeatedly in different ways to create interesting patterns on the cooking stick as shown in the picture.
- Incising - this involves cutting out lines to form shapes lines or grooves on the wooden sticks.
- Embossing - this process involves pressing an object firmly on the cooking stick. The pattern on the object is then transferred onto the cooking stick by stamping as shown.
Picture Making Techniques - CBC Grade 5 Art and Craft Revision Notes
Drawing
Still-life Drawing
- Drawing involves a lot of techniques which include: smudge technique, value gradation and composing images in still life. Pictorial.
- When drawing Images are arranged in landscape or portrait
In landscape format objects are arranged in a horizontal layout within the pictorial space of an artwork.
In portrait format - objects are arranged in a vertical layout within the pictorial
space of an artwork.
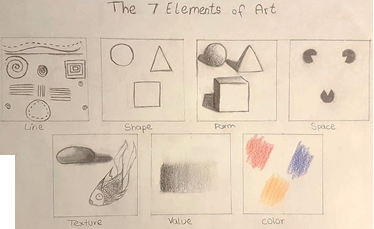
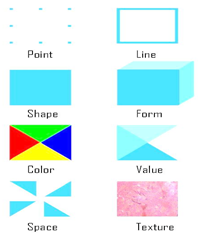
Elements of art applied while drawing pictorials include:
- Line - this is a mark made on the surface by a moving object, joined to create various shapes.
- Value - it is the light and dark areas on an object created by how light falls on the objects.
- Texture - this is the surface quality of an object described as either rough or smooth.
- Form - it is the detail within the boundaries of a shape that gives it volume and solidity.
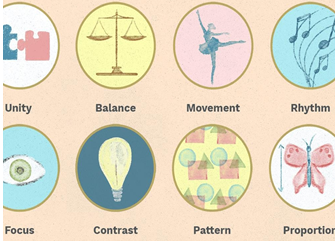
There are also principles of art that are used to organize the elements in the pictorial space when creating images. These principles are -
- Rhythm and movement - it is the arrangement of objects to create distance and depth within an artwork.
- Balance- It is a state of equilibrium of the visual weight in a composition
- Proportion - it is the size relationship of objects within an artwork with each other and the whole composition.
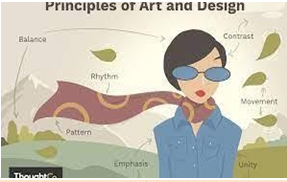
Remember that all these elements should be applied in still-life drawing.
Cross-hatching technique
- This is a technique of shading where lines are drawn to cross over each other, sparsely in lighter areas and close together in dark areas.
- Cross-hatching is another technique of showing value on forms. Value is the effect of light and dark on objects shown as light falls on the objects.
- In cross-hatching use of cylindrical forms will assist to create still life composition of cylindrical forms. Cylindrical forms is an object having a circular cross section with straight parallel sides.
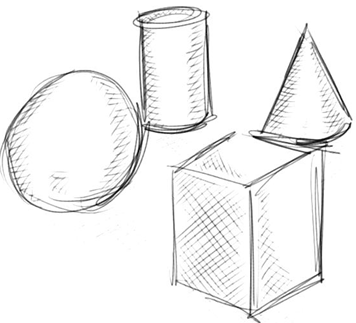
Still-life composition on cylindrical forms
The following procedure is used:
- Identify cylindrical objects such as cup and a jug. Use portrait layout. Draw the outlines of the cup and jug balancing it from the axis.
- Place the cup in front of the jug such that the jug does not block the cup to create an overlap.
- Ensure the cup and cylinder are drawn to occupy most of the working area.
- Start by making straight or slanted lines from the edges of the objects towards the center areas receiving more light as shown.
- Create the hatch lines as you move gradually to the lighter areas. Varied lines such as faint, thin or light are used to shade light areas and dark, thick and bold lines are used to shade dark areas. Use closely packed lines to create dark areas and sparsely packed lines to show the light areas.
- Draw hatch lines to crisscross the earlier lines. This is called cross hatching. Create a shadow to show the base of the two items. Complete the drawing and prepare for display.
Refer to bookmark art and craft grade 5 teachers book for images
Crayon
Is a tool for making a composition that is found in numerous shades of colour that is rubbed on a surface to create interesting patterns, features and compositions.
Wax will be used in crayon etching where etching is the scratching through a layer to reveal another layer that creates an image and overlaying is applying a layer of material on top of another.
The following procedure is used in making wax.
- Cut the bees or paraffin wax in small pieces and put it in a metal container. The amount of wax used should be equal to the amount of crayons you intend to make.
- Heat the wax in a container on low heat in a double container. It should not be direct heat but inside hot water. This is to prevent wax from overheating hence producing harmful fumes.
- Prepare your mold by rolling stiff paper in tubes. Place modelling clay on one end of the rolled-up paper tubes and place them on the working surface in an upright position.
- Add dry powder paints in a color of your choice to the melted wax and stir to obtain uniform colouration. Do not use liquid since it won't mix.
- Press the rim of the metallic tin to form a spout.
- Remove your tin from the heat and carefully pour the mixture into the rolled paper mould.
- Leave the wax to harden. Using a cutting tool such as a knife or razor blade, cut the side of the rolled paper mould to remove the wax crayon.
- Wash your hands with soap and water. Clean the working area after completing the work. Taste the work to see how it works.
How to make a crayon etched pictorial composition
You will require the following: paper, coloured crayons, black Indian ink or black powder paint, soap, soft rags, paint, brushes, scratching tools and masking tape.
- Rub patches all over a piece of paper using the bright coloured crayons you made. Rub on each patch several times, press down on the crayon to make sure the patch is fully coloured.
- Mix black powder paint with a little soap and water. The soap helps the powder paint adhere on the surface as shown below.
- Use a paintbrush to apply the mixed black powder paint on top of the surface covered with bright coloured crayons. Ensure you cover all the areas to create a black overlay. This creates a top layer that will be scratched off to reveal the coloured crayons beneath.
- Use a sharp tool to scratch through the black overlay to reveal your pictorial composition.
- Scratch more lines to reveal light areas and less lines to reveal dark areas.
Painting
Colour classification
Colours are classified into the following categories

- Primary colours - these are pure colours that are mixed to obtain other colours. They include red, blue and yellow.
- Secondary colours - they are colours obtained when you mix two primary colours in equal proportional.
- Tertiary colours - they are colours obtained when you mix a primary and a secondary colour in equal proportion. They are also called intermediate colours.
Colour Wheel - a chart showing the primary, secondary and tertiary colours.
Colours are graded using black and white and colour toning will help in the mixing of colour to get the best.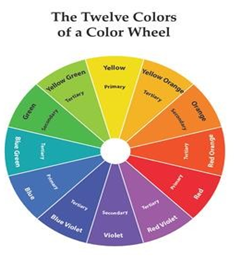
How to draw and paint on a colour wheel
- Draw a circular shape using a pair of compass or a protractor and pencil.
- Divide the circle into twelve parts as shown. Label the parts so that you can identify which part to paint a specific colour as shown.
- Paint the primary colours on the places marked red, blue and yellow on the colour wheel.
- Mix two primary colours in equal amounts to obtain a secondary colour and paint on the sections marked green, orange and violet on the colour wheel.
- Mix a primary colour and secondary colour in equal amounts to obtain a tertiary colour and paint on the sections marked red-orange, red-violet, blue-violet, blue- green, yellow-orange and yellow-green.
Collage
Pictorial Composition
- Montage is a technique used in creating an image by pasting pictures. In this method it involves cutting photographs, sorting and pasting them on a surface to create a composite image.
- Collage - is a technique of creating pictures by pasting different materials on a surface to create a pictorial composition.
- This method involves pasting which is the act of sticking objects on a surface using glue to create the collage.
- The objects are stuck together using adhesives such as glue.
- Materials for collage should be improvised as much as possible and re-used to avoid wastage.
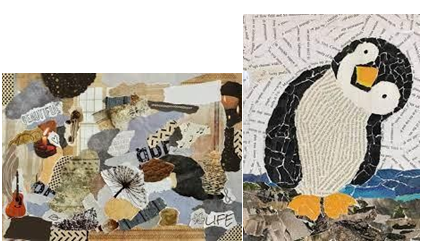
Samples of collage
Making mixed media collage landscape composition Collecting and preparing materials.
- Collect the materials and tools for their project from their local environment as follows.
- Stiff support surface e.g. plywood, cardboard, carton box that will carry the weight of the materials.
- Adhesives like office glue or plant glue. It should be strong enough to hold the materials in place.
- Assorted materials e.g. leaves, grass, sand, tree barks and inedible seeds
- Cut and sort the materials according to size and type.
Making the collage pictorial composition- Draw the landscape composition on paper. Outline of the landscape showing the main features like trees, sky, houses and anything else of interest.
- Identify and mark the areas they want to paste each material on the sketched composition.
- Cut and arrange the materials in the marked areas to check how they fit.
- Remove the materials and using a brush, apply glue in sections of the cardboard. Paste the cut materials on the cardboard. Continue pasting until the surface is covered.
- Leave the work to dry then paint over some parts if they desire.
Outdoor and Recreational Activities - CBC Grade 5 Physical Health Education Revision Notes
Outdoor activities are done outside class. They enhance learning through nature.
Suitable sites for these activities are mountain sides, rocky areas, near water bodies like rivers.
Planning.
While choosing suitable places for outdoor activities, you should consider;
- Accessibility for learners with varied needs.
- Services and amenities (toilets, water e.t.c).
- Cost.
- Security.
- Weather (rainy or sunny season).
- Mode of transport.
- Location (convenience).
- Outdoor activities help us to find peace in nature, have fun, learn and relax.
- An outdoor activity should include all the activities from departure to coming back.
- The following is a two days sample of outdoor activity programme;
Days Time Programme Day 1 8 am – 11 am
11 am – 12 noon .
1 pm – 4 pm
4 pm – 6 pm
6 pm – 8 pm
8 pm – 9 pm
9 pm – 6 amTravelling to Masai Mara Park.
Arrival and setting up tents
Game drive
Visiting Masai Mara market.
Dinner.
A recap of the day.
Sleeping and waking up time.Day 2 6 am – 7 am
7 am – 9 am
9 am – 12 noon12 noon – 1 pm
1 pm – 4 pmMorning workout (aerobics).
Take bath and breakfast.
Hiking and team building activities.
Lunch.
Travelling back.
Health measures to observe before taking off for the activity.
- Clean food packaging.
- Pack boiled water.
- Wash hands as they pack the food.
- Clean the raw food such as fruits before packaging.
- Dispose off waste appropriately.
Health measures to observe during the outdoor activity.
- Cover the drinking water all the time.
- Store the food in a clean and dry place.
- Ensure that food is well cooked, especially meat.
- Do not congest or overcrowd.
- Sleep in a well-ventilated place.
- Wash hands all the time especially when handling and eating food.
- Ensure the wash rooms are kept clean.
Safety measures to observe before taking off for the activity.
- All persons going for the activity should make sure they are in good health.
- Have a well-equipped First Aid kit.
- Take the learners through basic First Aid and fire drill.
- Write a letter to inform the head teacher and the security team.
- Inform the parents and guardians to get consent.
- The lead person should be a good first aider.
- Have a programme ready for the activity.
- Inspect the area to go to in advance.
Safety measures to observe during the outdoor activity.
- Do not move away from the team without permission from the team lead.
- Avoid areas of natural hazards.
- Do not wander alone to avoid getting lost.
- Devise coded language to alert for danger.
- Adjust the programme when adverse weather is noted.
- On arrival, acclimatize the learners to the surrounding.
- Have a fire rally point (assembly point).
- Arrive early to avoid inconveniences.
- Always observe discipline.
Tracking Signs.
- These are objects or markers used to help a group move without getting lost during outdoor activity.
- It is a method of communication between different groups by giving directions in an outdoor activity.
- The signs are made from small rocks, stones, wood and sticks.
Importance of tracking signs for an outdoor activity.
- To show the direction followed.
- To warn about dangers ahead.
- To inform whether you have arrived at the campsite.
- To find someone if they get lost.
- Signs are easy to understand.
Roles And Responsibilities.
These are duties or work each member does when in an outdoor activity. It is important to be in groups with group leaders assigned.
Each member has a role to play in the group.
Qualities of a group leader.
- Should have a positive attitude towards others.
- Must be well disciplined.
- Should have effective communication skills.
- Must be quick in thinking.
- Readily inspires others.
- A committed person.
- Should be good in decision making.
- Good in time keeping.
- Has integrity.
- Creative.
Responsibilities of a group leader.
- Holding group members accountable.
- Sharing work among group members.
- Helping in resolving conflict.
- Peer counselor.
- Advising team members.
Roles of the other members of the group.
- Fetching firewood.
- Cooking.
- Pitching the tents.
- Washing utensils.
- Laying tracks.
Conflict Resolution.
A conflict is a serious disagreement or quarrels between members of a group.
Conflict Resolution are ways a group settles their quarrels and disagreements during outdoor activity.
People have different views about issues and all are entitled to be considered. Conflicts should be settled in a friendly manner.
Causes Of Conflicts In A Group.
- Poor communication.
- Unfriendly relationships.
- Lack of enough space for all team members.
- Disagreements in power.
- Unwillingness to share resources.
- Lack of planning.
- Poor selection of a leader.
- Favoring some group members.
Consequences of conflicts in a group.
- Misunderstanding among the group members.
- Group members often quarrel.
- Members disagree.
- Some members feel frustrated and angry.
- Criticism and lack of support.
- Tension amongst members.
- Some group members may not want to play with others.
Ways of avoiding conflicts.
- Giving support and encouragement to group members.
- Job sharing.
- making use of volunteers.
Ways of Resolving Conflict.
- Talking openly about your feelings.
- Listening to each other.
- Discussing different solutions as a group.
- Being fair to each other.
- Asking for forgiveness when you are on the wrong.
- Learning to walk away when nothing else works.
Food Preservation.
Food preservation refers to how food is either treated or handled to ensure it stops or slows from being spoilt.
If properly preserved or handled, food can go for a long period without getting spoilt.
Methods of preserving food;
- Drying.
- Canning.
- Heating.
- Boiling.
- Bottling.
- Salting.
- Smoking.
- Fermentation.
- Sugaring.
- Freezing.
Different foods use different methods of preservation. During an outdoor activity, you should use the correct method of food preservation depending on the food you have carried.
Health and Fitness - CBC Grade 5 Physical Health Education Revision Notes
Skill Related Fitness.
-
Balance.
Balance is the ability to control or stabilize the body when a person is standing still or moving.
Fitness is a condition in which an individual has enough energy to perform a task without getting tired.
These are some of the skills that can be done to develop balance;- T balance.
- V balance.
- Hand balance.
- Crab walk.
- Wheelbarrow walk.
- Crouch balance.
Balance helps us to perform activities without falling and injuring ourselves.
-
Agility.
Agility is the ability to change and control the direction and position of the body while maintaining a constant rapid motion.
Some of the activities that are performed to develop agility are;- Forward running.
- High knee running.
- Lateral running.
- Shuttle running.
- Pivoting.
- Reaction time.
Reaction time is the ability to reach or respond quickly to what you hear, see or feel.
Good reaction requires one to;- Be alert and attentive.
- Respond quickly without delaying.
It is important in daily life because it enables us to perform activities like running, walking and playing quickly when given command or signal.
Some of the activities that improve reaction time are; sitting and standing, ‘on to your marks', 'Set and Go’ command, run and stop. Reaction time is very important when driving, playing sports and running away from dangerous situations.
-
Sit and reach.
Sit and reach test is a simple measurement of lower back and arm string flexibility.
Flexibility is the ability to bend without breaking. To measure the sit and reach test you require;- Sit and reach the test box.
- Metre ruler or tape measure. How to perform sit and reach test;
- Sit on the floor with legs fully extended.
- Place one hand on top of the other, slowly bend forward and reach as far as possible holding the stretch for two seconds.
- Record the distance that you were able to reach in centimeters. Do this three times.
- Calculate the average of the three distances to tell your flexibility.
First Aid In Sports.
Sports Injuries.
These are injuries that occur during sports, athletic activities or exercising.
-
Closed wound.
This is an injury on the body where no bleeding takes place on the skin. Tissue damage and bleeding occur under the skin surface.
Closed wound occurs when you are hit or bumped. A bruise is an example of a closed wound.
Safety precaution when addressing a closed wound.- Wear protective gloves before dressing a closed wound.
- Wash your hands before and after dressing a wound.
- Dispose materials and equipment used in dressing wounds.
How to manage a closed wound to avoid infection.- Rest the wounded part.
- Ice application to reduce any swelling and pain.
- Compress the wound.
- Elevate or raise the wounded part.
-
Sprain.
Sprain is stretching or tearing of ligaments.
Ligaments join bones together to form joints
Sprains may occur in any part of the body near the joints but mostly at the wrist, thumb, ankle and knee joints.
Signs and symptoms of a sprain.- Swelling of the affected ligament.
- Sprain causes pain.
- It is difficult to move the affected joints.
- Hearing or feeling a pop sound in your joint at the time of injury.
- Bruising.
- The affected area feels warmer when touched.
- The injured area becomes stiff.
Management of sprain injury.- Rest, ice application, compression and elevation.
- Avoid vigorous activities until the sprain heals.
- For wrist, thumb, knees and ankle sprains, compress the area with an elastic wrap or bandage. Crutches can also be used to give support for ankle and knee sprains.
- If the sprain is serious, medical and surgical treatment may be required.
-
Strain.
A strain is an overstretched, torn or twisted tendon or muscle.
Strain mostly affects the lower leg muscles, thigh muscles, feet muscles, arm muscles and back muscles.
Signs and symptoms of strain.- Pain.
- Swelling.
- It is difficult to move the injured part because of pain.
- Skin colour changes where the strain is located.
- Muscle cramping.
- Muscle weakness.
Management of strain injury.- Protect the strained muscle from further injuries.
- Rest the strained muscle.
- Apply ice on the strained muscle for at least 20 minutes in every hour.
- Gently compress with ice or other elastic bandage to provide support and decrease swelling.
- Elevate or raise the injured part to prevent swelling.
Two-person support method.
- Two person support method is where an injured person is carried by two people.
- The method is done by;
- The rescuers stand on either side of the injured person.
- They place their hands on the injured person’s waist.
- The injured person’s arms are placed on the rescuers’ shoulders.
- The rescuers and the injured person all face the same direction.
- The injured person is supported by the two as they move slowly.
Games and Sports - CBC Grade 5 Physical Health Education Revision Notes
Athletics
Track Events.
Track events are athletics events that involve running or walking around an athletics track.
The track events include the following.
- Medium sprint start.
- Elongated start.
- Run through finish technique.
- Improvising the relay baton.
- Visual baton exchange technique.
- Phases in hurdling.
Sprints are short races that require an athlete to make use of crouch stance when in starting position.
The main types of crouch start in this level are medium sprint start and elongated sprint start.
In an elongated start, the knee of the rear leg is placed slightly behind the front foot heel and the feet are spread out slightly wider than medium start. Run through finish technique is one of the three types of common methods of finishing races.
In run through finish technique, the athlete crosses the finish line at top speed when the trunk is leaning forward with shoulders and chest.
Hurdling phases include.
- Approach.
- Take off.
- Flight or hurdles clearance.
Drills;
- Box drill.
- Single leg box drill.
- Reaction drill.
Medium Start In Sprints.
How to perform a medium sprint start.
- At the command ‘’on your marks’’, the body should be in a crouch position.
- Do not touch either the start line or the ground beyond it with your hands or feet.
- Place your hands shoulder width apart on the ground.
- Place the foot of the leading leg behind the starting line with the knee bent.
- Place the knee of the back leg beside the foot of the front leg.
- Wait for the next command, ‘’set’’. Raise hips to a position above the shoulders.
- Head and knees should be in line with the spine.
- Shoulders should be placed slightly forward than the hands.
- At ‘’go’’ command, leave the starting line
Elongated start in races.
How to perform an elongated start.
- During ‘’on your mark’’ command;
- Place hands on the ground shoulder width apart and behind the starting line.
- Place one foot behind the starting line.
- Place the knee of the back leg slightly behind the heel of the front foot.
- Spread out the feet slightly wider than in the medium sprint start.
- During ‘’set’’ command, lift the knee of the back leg off the ground ready for the last command, ‘’go’’ and leave the starting point.
- Drills;
- Push start.
- Pedal the bicycle drill.
Importance of participating in Running Activities.
- Improves mental health.
- Strengthens the lungs.
- Helps prevent the body from being attacked by diseases such as high blood pressure.
- Helps control body weight.
- Makes the bones stronger.
- Helps to relax the body.
- Improves blood circulation.
- Helps in relieving stress.
- Helps in increasing confidence.
Run through finish technique.
This is one of the types of finish that the athletes use to reach the end of a race at full speed.
It is performed by;
- Maintaining top speed as you approach the finish line.
- High knees lift maintaining full speed.
- Drive your arms harder through the final metres of the race.
- Continue running past the finish line.
Improvising the Relay Baton.
Relay batons are hollow inside so as to make them light in weight, not to be heavy, to make it easy to carry.
It is painted bright in colour so as to make it more visible, be seen better.
Safety measures observed while improvising Relay Baton.
- Paint and allow it to dry.
- Clean the working area.
- Burn or throw to the dustbin the waste products.
- Wash your hands.
Visual Baton Change.
When performing visual baton change technique;
- Runners changing the relay baton must be in high speed.
- The visual baton change should be done smoothly without dropping the baton.
- The runner receiving the baton should stretch his or her arm with the hand being open and look at the runner bringing the baton.
Positioning of the hand of the runner receiving the baton:
- Stretched out and behind.
- Open and facing up.
How the runners changing the baton position themselves:
- Running in motion.
- Legs apart at high speed.
HURDLES (approach, take off, flight, hurdle clearance and landing.)
These include running and going over an obstacle at a speed.
Stages in hurdling.
- You are required to go over barriers called hurdles when in high speed.
- The following are the five stages in hurdling
- Approach – runner sprints towards the first hurdle after the start command.
- Take off – runner places the take-off foot about 20-35 cm from the top of the hurdle and quickly lifts the thigh of the leading leg to the chest and to go over edge appropriate hurdle.
- Flight – the body should be streamlined and take the shortest time possible.
- Hurdle clearance – runner goes over the hurdle with the toe of the leading foot pointing up and the foot of the leg behind being flat with toe pointing out.
- Landing- leading leg touches the ground with the back of the foot followed by the back leg.
Field Events.
Long Jump
it is used by athletes as a field event.
Athletes combine speed, strength and ability to jump as far as possible from a take-off point.
The following are the sections of the long jump facility.
- Runway – this is the sprinting or approach area.
- Take-off board – this is the point you jump from.
- Landing pit – this is a sand filled pit for safe landing. The equipment found in the long jump facility include;
- A 50 metre measuring tape.
- A rake for leveling the sand pit.
Long Jump Technique.
Stages in Long Jump.
- Approach – the athlete runs along the runway using quick long strides.
- Take-off – placing one foot next to the take-off board or line and then lift the body off the ground.
- Flight – cycling action of the legs in the air to move the body.
- Landing – contacting or touching down on the landing pit area with both feet and knees bent.
The following are the important rules to be followed for a good long jump;
- Takeoff foot must not cross the takeoff board or line.
- Use quick long strides, when running along the runway during approach.
- Land on the pit with knees bent and the head leaning forward with the hands in front.
Standing Discus.
A discus is an equipment used for throwing in athletics field events.
A discus facility has a throwing sector with a diameter of 2.5 metres and a landing sector.
There are different weights for discus. Boys under 13 years throw discus weighing 1 kilogram, while for girls it is 0.75 kilograms.
Other equipment found in the discus facility include:
- Marking flags or pegs – used to mark several throws made by players.
- Measuring tape – it is used for measuring length of the throws made by players.
- Score cards – they are used by the teacher to record the scores and other details of the players.
Standing Discus Technique.
It is a method used when performing a discus throw.
It is used to teach athletes how to throw a discus. This is done from a stsnding position.
Stages or phases of performing standing discus technique.
- Stance;
- Stand with the feet shoulder width apart.
- The left or right shoulder should point to the direction of throw.
- Grip;
- The discus sits flat against the palm of the throwing hand.
- The fingers hold the edge of the discus.
- The thumb rests on the back of the discus. The discus is held in loose grip.
- Swing;
- The non-throwing arm is extended towards the throwing direction.
- The throwing arm is extended back.
- Swing the discus and bring it on top of the palm of the non-throwing arm.
- Swing the hip, torso and shoulder while pivoting the back foot to the front.
- Release and recovery;
- Continue to hold the correct grip.
- Step forward with the opposite foot to the throwing hand before releasing the discus.
- Release the discus from a comfortable height, not too high.
- As the discus is released, the non-throwing arm swings back for recovery.
Rope Work.
Straddle And Straddle Cross.
These are techniques in rope skipping.
Rope work involves skipping or jumping in different styles using a rope.
How to perform straddle and straddle cross rope skipping.
- Stand straight, shoulders level and head looking forward.
- Put the arms slightly forward and extend sideways.
- Grip the handle of the rope firmly and comfortably with your fingers, ready to make small circles with the wrists when swinging the rope.
- With elbows close to the body and knees slightly bent, swing the rope from behind the feet and jump to clear it.
- In straddle rope skipping, jump the rope with feet apart on the first rotation of the rope followed by jumping the rope with feet together on the next rotation. Keep repeating this rhythm but in a smooth and relax manner.
- In a straddle cross rope skipping, jump the rope alternating the right and left foot in front and back. Repeat the rhythm.
SKIER.
This is a technique used in performing rope skipping. The balls of the feet are used when performing the skill.
How to perform skier rope skipping.
- Stand straight with your feet shoulder width apart.
- Keep knees slightly bent and arms extended sideways.
- Keep the body weight well balanced on the balls of the feet.
- Grip the rope at the handle and lower it on the ground behind your feet. Swing the rope overhead and jump over it using small jumps.
- Continue with the small jumps but moving the feet when together and side to side.
HEEL TAPS.
This is a style for performing rope skipping where the heel is used when performing the skill.
How to perform heel taps rope skipping.
- Stand with knees slightly bent, feet shoulder width apart and arms extended sideways.
- With the body weight well balanced on the balls of the feet, swing the rope from behind the feet and jump up and down over the rope.
- As you continue jumping, begin to tap the ground with the heel of one foot and then keep alternating the feet.
Batting Games.
SOFTBALL; Field, Equipment And Choosing Bat.
Softball is one of the batting games which is played between two teams on a large field, with nine players from each team.
The aim of the game is for a team to score more runs (points) than the other team by batting (hitting) a ball into play and running around the bases, touching each one in succession. The defending team is referred to as fielding team.
Parts of the field.
- Bases – these include 1st , 2nd , 3rd and home plate. The bases are made of rubber material and are square shaped while the home plate is 5 sided.
- Infield – this is the area around the four bases and the surface is generally grass.
- Outfield – this is the area outside the infield. It consists of left fielder, centre fielder and right fielder.
- Foul lines – two straight lines extending from the 1st and 3rd base lines that mark fair territory.
- Pitcher’s plate - is placed at the middle of the diamond from which the pitcher throws the ball.
- Batter’s box – two long rectangular boxes marked near the home plate where a batter player must stay while batting.
Softball equipment include:
- Batting helmet.
- Softball balls.
- Fielding gloves.
- Catcher’s mitts.
- Bats.
- Chest protector.
- Sliding shorts.
- Leg guard.
- Uniform.
The positions of the players at the start of the softball game are:
- Pitcher – position 1.
- Catcher – position 2.
- 1st base fielder – position 3.
- 2nd base fielder – position 4.
- 3rd base fielder – position 5.
- Shortstop – position 6.
- Left fielder – position 7.
- Centre fielder – position 8.
- Right fielder – position 9.
N/B For the batting team, nine batters line up near the batting box ready to get into batters’ box in turns for batting. They must follow this order all through.
Responsibilities of in field players.
- Catching or collecting ground balls.
- Catching high balls.
- Throwing caught balls to various bases.
- Helping to cover the bases.
- Assisting each other (backing up).
- Tagging (touching using the hand holding the ball) the running batter.
Qualities of a good infield player.
- Keeps his or her eyes and mind alert on every ball thrown by the pitcher.
- Puts effort by going after the ball.
- Able to move quickly in all directions to collect the balls.
- Courageous enough to catch balls which have been hit hard.
Responsibilities of the outfield players.
- Catching all the flying balls.
- Fielding ground balls.
- Throwing balls to infielders at various bases.
- Backing up their teammates.
Qualities of a good outfield player.
- Ability to position themselves properly for different batting opponents and at different positions.
- Ability to make quick and good judgment on the direction of the balls batted.
- Have strong and accurate ability to throw balls.
- Outfielders should be fast.
FIELDING: Ready Position and Footwork.
Ready position is when the fielder player positions the body in a way that he or she is ready to move to any direction when the ball is released.
How to perform ready position and footwork in fielding.
- Stand with legs apart and get the body low to the ground by squatting.
- Balance the body weight by using the balls of your feet.
- Wear a glove on the left hand. Stretch the gloved hand further towards the ball.
- Bending low to the ground with the back straight and head up, face the batter, stay alert and focused,
- In that position move your feet forward, backward and side to side.
THROWING: Overhand throw.
How to perform overhand throw:
- Standing upright with the ball in your throwing hand and feet apart, face your target.
- Turn sideways about 90 degrees to your right side or left side if you are left handed.
- Lift your non-throwing arm to point at your target. Shift your weight to your back foot and lift your throwing arm in a way that it is near your ear.
- Twist your chest as you bring the arm over the shoulder.
- Release the ball with enough force aiming at your target.
CATCHING.
- Catching a ground ball.
Lower your body into ready position.
Bring the hand with the glove near the ground with the tips of your fingers touching the ground to prevent the ball from rolling under the glove.
Place your other hand without the glove on the bottom edge of your glove. Move towards the oncoming ball and close your glove to catch the ball. - Catching an aerial ball or high ball.
Move in front of the ball.
Hold your hand with the glove straight up.
With your eyes focused on the oncoming ball, open your mitts or glove to catch the ball.
Quickly place your other hand at the side of the glove.
BATTING: Stance And Grip.
When performing stance and grip during batting:
- Hold the bat at the handle with your fingers.
- If you are right handed, set your right hand higher up on the handle and place your left hand close to the base of the handle.
- Place your feet wider than shoulder width apart as you stand.
- Bend your knees to be in a comfortable position.
- Ensure your toes and shoulders are facing the home plate or the direction the ball is coming from.
- Raise your arms until hands are at ear-level and the bat is resting on top of the right shoulder.
Note: when playing the softball game, each of the two teams alternate in batting and fielding roles. The teams compete to earn scores known as ‘’runs’’. The team which gets more ‘’runs’’ becomes the winner.
The Swing Technique.
When performing the swing technique:
- Stand with your feet apart. Knees bent and toes facing the home plate.
- Stretch your arms with elbows out and use the correct grip on the handle of the bat.
- Bend the upper part of the body slightly forward.
- With hands firmly gripping the bat by the handle, move the bat up and above the shoulder.
- Swing the bat to hit the ball by the middle part of the barrel of the bat with enough force.
- Ensure the ball is hit towards the fair territory of the softball field.
- Make the follow through by moving one step forward.
Base Running And Sliding.
Base running.
- Take quick strides as you run to the next nearest base.
- Use strong arm action as you run in order to have maximum speed.
- Run straight to the base and then round it.
- As you run around it, step on the inside corner of the base.
- Run as close to the base line as possible.
Base running and sliding skill.
- Run at full speed to the next base, when you are 4 to 5 steps away from the base, bend your knees. Shift your weight to the left side of your body and get low to the ground. As you get low to the ground, fold your left leg under your right leg to form shape 4 as you slide on the ground.
NOTE: The thigh and shin of the left leg are the parts of the body used in sliding. - Lift up your hands past the head with arms stretched out to balance the body while sliding. This will also help to prevent the defender from easily tagging your hands.
- Tuck your chin in your chest to prevent your head from flopping backward and hit the ground.
Importance of sliding in softball.
- To prevent injury – players can slide to avoid collision with whoever is making a tag at 1st , 2nd or 3rd base.
- Sliding is the quickest way to the base – running to the base might be slow; so sliding will help the player get to the base faster.
- To avoid a tag – a player can slide away from the person tagging.
- To make a diversion – if a player wants to make a change of direction around the base.
ROUNDERS: fielding, Throwing, Catching and Stamping.
The Rounders game is played by players referred to as fielders and batters. The fielders try to put out the batters by stamping the post they are running to.
The game should be played between two teams with a maximum of 15 players.
Throwing the ball in rounders.
There are two throwing skills in rounders. They include:
- Over arm throwing – it is mostly used by the fielders to pass long balls to other team members. The ball is passed to a teammate who is near the base which is in front of the leading batter. It is mostly used for the balls which have been hit far from the post.
- While using the over arm throw, grip the ball in a way that your first and second fingers are over the two seams.
- Direct your shoulder towards the teammates you are passing the ball to and release the ball.
- Under arm throwing – it is mostly used by the fielders when making short passes to the teammate in order to stamp opponents. Grip the ball as it is done in an over arm throw between the fingers and the thumb. The player swings the arm forward as he or she steps in front to release the ball with a flick of the wrist.
Catching the ball in rounders.
Catching is done by the fielders when receiving a thrown ball in order to stamp the post and put the batter out. The golden rule of catching is to keep the eyes on the ball from the moment it leaves the pitcher’s hands and follow it all over.
When catching the ball, stretch out your arms in front of the chest. Thumbs should point each other. When the ball gets in your palms, close your fingers over it to prevent it from bouncing out.
Stamping in rounders.
- Stamping is touching a post by the fielder using the hand with the ball.
- Fielders stamp the nearest post that the batter is approaching so as to stamp him or her out.
- Once a batter is stamped out, he or she is out of the game.
Technical, tactical approaches and rules of the game.
Technical approaches are skills that the players apply to ensure they win the game. These skills include; catching, throwing and stamping the post.
Tactical approaches are methods that are planned and used to achieve a particular goal.
Examples of tactical approaches are; Spread all over the field of play, Communicate with your teammates loudly and clear, Work as a team, Be quick and alert.
Rules of the rounders’ game.
- It is played between two teams. One team bats while the other team fields and bowls.
- The game starts when the bowler bowls the ball to the batter who hits the ball forward on the rounder’s pitch. The batter runs around tapping every post before the fielders can stamp the nearest post.
- If the batter reaches 2nd or 3rd post in one hit. The team scores half a rounder. If the batter reaches the 4th post in one hit. The batter scores full rounder.
- A batter is put out when he or she leaves the nearest post and run to the next post and it is stamped before he or she gets there.
Soccer Passes.
- Push pass.
When passing the ball in soccer using push pass;
- Use a flat ground which is free from dangerous objects.
- Wear a suitable sports kit.
- Perform enough warm up and cool down activities before and after the game.
- Follow your teachers’ instructions correctly.
- Wall pass.
When playing wall pass skill;
- Communicate loud and clear ‘’wall pass’’ among your teammates involved in the pass.
- A minimum of two teammates should be involved in the passing in order to move the ball past an opponent player.
- One player makes a good pass and sprints into the open space in order to receive the ball from the second teammate.
- The player who receives the pass should sprint behind the defender. The teammate should then pass the ball in the space in front of him or her.
- Outside of the foot pass.
When passing the ball using outside of the foot;
- Approach the ball with the upper body slightly bent.
- Bring the non-kicking leg to the same level with the ball but slightly away from the kicking foot.
- Shift the body weight to the supporting leg and slightly bend it.
- Turn the toes of the kicking foot inwards to face the non kicking leg.
- Swing the kicking leg and strike the ball with the middle of outside foot.
- Ensure the pass is directed at the intended target or teammate.
Volleyball.
Facility, equipment and positioning.
A volleyball court is rectangular in shape. It measures 18m long and 9m wide.
It is divided into two halves by a centerline.
A net is placed at the center; each court is divided into two by an attack line which is 3m from the center line and 6m from the back court.
Basic equipment used in playing volleyball games are; net, ball and two posts to support the net.
Each team must have 6 members playing at the start of the game.
Improvising volleyball equipment.
Improvising is making an item using what is available because you do not have what is needed.
Equipment are things needed for a particular purpose or activity.
How to improvise the volleyball posts.
- Cut long wood from any tree available. Make sure it is smooth and about 1.93 metres long. Metal material can also be used as posts.
- Make holes on the ground to support the posts.
- Insert the posts in the holes and make sure they are firm.
How to improvise a volleyball net.
- Materials such as; nylon ropes, sisal fibre and old clothes cut into long and thin pieces can be used to improvise a volleyball net.
- Volleyball nets can be twined using sisal fibre or old pieces of clothes that are cut into thin pieces.
Underarm serve.
- This is a type of service in volleyball where the player serving the ball holds it about waist high.
- The player slightly tosses the ball up and hits it with the opposite hand using an under hand motion.
- The hand hits the ball at the bottom with a closed fist.
- Tossing is throwing the ball upward above the waist before striking it.
When applying an underarm serve;- Stand behind the service line with your feet apart.
- Hold the ball with the non-dominant hand, slightly above the waist and in front of the body.
- As you toss the ball, swing the other hand backward and forward to hit the ball across the net.
Note; non-dominant hand is the hand that is note active.
The Dig.
This is a way of receiving or passing the ball that is below the waist.
- It involves standing in line with the incoming ball.
- Hand fist of one hand overlapped over the fingers of the other hand and extended forward but below the waist.
How to perform the dig pass;
- Stand with your feet shoulder width apart for balance.
- Put arms together and join the hands, locking the wrist and elbow joints.
- Contact the ball with the part of the arms just above the hands.
- Move the hands upward and forward to give the ball an upward motion.
The volley.
- This is a way of passing a ball that has been received at the full hand level.
- It is used to keep the ball in play, set the ball for an attack and for passing the ball over the net.
How to perform the volley;
- Stand with your feet apart for balance.
- Knees bent and body slightly leaning forward.
- Elbows bent with palms facing upwards.
- Contact the ball just in front of the forehead.
- Push the ball up with force using fingers. Pass it to a teammate or over the net.
Kabaddi Game.
Facility and Position of Players.
Kabaddi is also called a game of struggle because it is one player against 7 players.
The aim of the game is to score points by raiding into the opponent court touching as many defensive players as possible without being caught by any of the opponents.
Defensive players are called antis while attacking players are raiders.
The Kabaddi field of play measures 8 metres by 11 metres for junior boys and girls.
Each team has seven players at the start of the game.
Each team selects a raider who runs across the centre line to the other team’s court.
As the raider enters the opponent’s court, he or she chants ‘Kabaddi’, ‘Kabaddi’, ‘Kabaddi’ and tries to tag any member of the opposing team.
Once the raider tags a member or members of the opponent team, he or she runs back to their court. A point is awarded.
Entry.
- This involves getting into the opponent’s court chanting ‘Kabaddi, Kabaddi, Kabaddi’ and trying to step or touch the opponent player.
- The raider tries to touch an opponent player while the opponent player puts effort to prevent the raider from touching them.
- The raider should be done with tagging a member from the opponent team within 30 seconds.
Foot work.
- This is the movement made by the raider with his or her feet during the course of the raid.
- It is guided by the stance, body position, speed and the ability to bend in any direction.
How to perform footwork;
- Stand with one foot in front of the other.
- Position your body to face forward.
- Move forward with speed.
- Dodge the opponents to avoid being tagged.
Rules for successful footwork in Kabaddi;
- Each team should take turns to run across the centre line.
- Tag a member of the other team.
- Run back to your half court.
Legal Touches.
In Kabaddi, legal touch means a raider touching any member of the defending team by any part of their body including clothes, shoes and any other part of the body.
Types of legal touches.
- Toe touch – it is when the raider touches the opponent’s foot using the toes and gets a point.
- Running hand touch – it is when the raider requires to move fast and stretch hands to touch the opponent before moving back.
- Frog jump – it is when the raider jumps above the opponent and tries to touch him or her.
- Scorpion kick – it is when the raider faces away from the opponent, he or she quickly curls the leg to touch the opponent.
- Dubki – raider escapes from the opponent by squatting below him or her to avoid being tapped before reaching the half way line.
Cant.
Can't is the chanting of “Kabadii” continuously once a raider is in the opponents part of the field. If a raider stops chanting, he or she is out.
Cant is also the capacity of the lungs to hold the breath which is required to maintain raid for a longtime.
Raiding.
- This is the taking of turns in sending a player into the opponents’ court to try tagging them and win a point.
- It is also a repeated clear sound of the word “Kabadii” in one single breath during raid by the raider.
Roles of Raiders.
- Try and touch as many players in the opponent team as possible in order to score, tap them out and score points.
- He or she must say “Kabadii” several times until a tag is made or he has faulted.
Tag Rugby Game.
Facility and Equipment.
This is a game of rugby that involves tagging as opposed to tackling.
It is a non-contact game in which each player wears a belt that has two tags or small loops attached to it.
It is played by a player trying to protect his or her tag as he or she runs and passes the ball to a partner. The opponent tries to stop them from scoring by pulling the tags from their waist or belt.
Tag Rugby field of play is rectangular in shape. Its standard measurements are 70 metres by 50 metres. The pitch size varies depending on the number of players and their age i.e a pitch of 55-60 metres long and 30-35 metres wide is suitable for grade five learners.
It is played by two teams of 7 players per team for two halves of each 20 minutes.
Equipment used in tag rugby are: tag belts, rugby ball, sportswear and training cones. Handkerchief, pieces of clothes or ribbons can be used to improvise tags for Tag Rugby.
Passing and ball carriage.
These are styles or techniques for playing tag rugby. It involves passing the ball to a teammate and how to carry the ball.
Passing the ball in a tag rugby game.
- The ball can only be passed sideways or backwards through the air. It cannot be handed over to another player or teammate.
- The ball cannot be snatched from the carrier, it can only be intercepted.
Ball carriage.
- Carriage is holding the ball under the armpit firmly and moving with it. It is done to avoid losing the ball to the opponents.
- Lateral pass is when the player collects the ball from a tap or roll ball and passes it to teammates on either side.
- Hold the ball with both hands, turn to the receiver and swing the ball across the front of your body.
- Direct the ball to the chest level of the receiver.
- Release the ball as the upper body turns and the arms extend.
Running.
This is moving with the ball in your hands away from the opponent.
In Tag Rugby, players run sideways more since most of the opponents are focusing ahead. This helps them to avoid being tagged.
Tagging and Offside rule.
- Tagging is pulling out one of the two tags or ribbons attached to the ball carrier's waist or belt.
- Only the player with the ball can be tagged.
- The opponent should hold the tag above their head and shout “tag” after removing it from the ball carrier’s waist. Then the referee shouts ”pass” to confirm the tag.
- The ball carrier cannot defend the tags from being taken using hands, they can only doge taggers.
- When the ball carrier is tagged, they have to pass the ball to the teammate within three seconds.
- If tagged near the try line, they are allowed one step to score a try.
- When a ball carrier is tagged and passes the ball, he or she must take the tag and put it back. No play without a tag.
- Offside is when a player is in a prohibited area during the game.
- The offside rule occurs immediately when a tag has been made.
- All defenders must go back to their side.
- A defender should not knowingly wait to block or intercept a pass from the attacking team after a tag.
Scoring.
- A score in Tag Rugby is called a try and is awarded 1 point.
- To score a try, a player must carry the ball over the opposing goal line and place the ball down on the ground.
- Opponents must remove the ball carrier’s tag to stop them from scoring.
- A player cannot dive over the try line to ground the ball.
- If a player drops the ball over the try line, a try is not given. The ball is given to the opponents.
Optional Games And Sports.
Frisbee.
Frisbee is a game that is played using a disc. It is also called ultimate.
Two handed rim catch.
- A two handed rim catch is a style or technique used when receiving a disc from another player.
- It is the best catching method when the disc comes above the shoulder height. However, you can also use it when the disc is below the waist.
- The catcher should concentrate on the leading edge of the disc and grab it.
- To catch the disc when it is above the shoulder, stretch your arms up, open your hands as thumbs face down.
- When catching the disc which is below the waist, open your hands with thumbs facing up and fingers pointing towards the ground.
- Bend your knees and catch the disc near the ground by its edge.
Cutting in Frisbee.
- Cutting is a technique used to confuse defenders or opponents.
- It involves running and changing direction so that you throw the disc safely to your partner.
How to perform cutting in Frisbee.
- The player with the disc runs a short distance, then stops and changes direction.
- The opponent ends up not being able to catch up.
Marking in Frisbee.
Marking is a technique used to control the ball carrier and limiting them from throwing the disc.
How to perform marking in Frisbee.
- Stand slightly in front of the thrower.
- Keep your arms extended and bent slightly with hands near the waist level.
- Legs should be shoulder width apart, with knees bent and weight should be on your balls of the feet to enable easy movement. The arms should be bent at the elbows.
- Move your hands up and down to prevent the opponent from throwing the disc towards the intended direction.
- When the person you are marking manages to throw the disc, shout to your teammates “up or air” to alert them to intercept or block.
Pivoting in Frisbee.
Pivoting is done with one foot maintaining contact on the ground while turning and stepping with the other foot.
Pivoting is done to give the player a better chance of passing the disc to the teammates.
How to perform Pivoting.
- Stand with legs apart and firmly place one foot on the ground.
- The other leg is lifted from the ground.
- Turn and move to any direction with the leg which is lifted.
- Step on the ground with the moving leg.
- Do not move the leg which is firmly placed on the ground.
Spirit of the Game.
- This is the mindful behavior that players practice before the game, during and after the game.
- It involves:
- Knowledge of the rules (there is no referee in the game).
- Fairness (when there is a mistake, it is accepted and settled).
- Safe play.
- Space awareness.
- Clear and calm communication.
Note; Through “spirit of the game”, moral lessons like honesty, fairness, politeness, teamwork among others are taught.
Swimming.
Breaststroke.
Breaststroke is a swimming style that is performed with the body facing down in a streamlined position.
The arms perform semi circular movements and the legs perform a frog like kick, the head bobs in and out of water.
Streamlining the body.
- For the body to be streamlined, place yourself horizontally in water. Let your toes point to the wall behind you. Stretch your arms out in front of you. The fingers should point towards the wall ahead.
- Keep the head facing down towards the bottom of the pool.
- Stay in that position for a few seconds to help your body get used to the water.
Arm Action.
- for arm action, start from the streamlined position. Turn both palms outward without bending the elbows. Then push them out and slightly down.
- When your arms form a “Y” shape with your body, bend elbows and bring hands down and back towards your face.
Leg action.
- For the leg action, begin by pointing the feet outwards from the body by rotating the ankle. Bring the heels towards your bottom as you bend hands down and back towards the shin.
- Extend your knees slightly past the width of your shoulders. Push your legs straight back behind you and bring them back together.
Backstroke.
It is a swimming style performed with the body lying on the back and streamlined.
The head is submerged above half level of the ears and the face is left off the water surface at all times.\
Body positioning.
- Lie with your back on the water and streamline your body.
- Put your head half way into the water.
- Lower your legs and hips slightly.
- Put your legs together and straighten them.
Leg action.
- Once you are in a stable position, start kicking.
- As you raise one leg, kick using the other leg. Keep alternating the kicks.
- For best results, kick from your hips.
Arm action.
- As you start kicking forward, keep the arms at your side then stretch one arm in front.
- When the hand contacts the water, bring it down and pull outward to move yourself forward. Raise your other arm to do the same.
Sidestroke.
Sidestroke is a swimming style where the swimmer lies on the side in the water. It is used for life saving , leisure and for swimming long distances.
Body position.
- Start from a glide side position.
- Lay one side of your body straight in the water.
- Drop one shoulder in the water with your hip below the water surface.
Head positioning.
- Position your head in line with your spine.
- Half of your face should be in the water, the other half of the face above the water.
- One side of the face and ear should be in the water.
Arm action.
- Extend the leading arm forward with the palm facing downwards. Place your arm on your side.
- Palm of the leading arm pushes water backwards and downwards. The hand then moves upwards and inwards.
- Your other arm moves forward, bending at the elbow.
- Your leading hand moves forward in a straight line with palms rotating from upward to a downward facing position.
- Your other hand performs a semi-circular backward sweep.
Leg action.
- Bend your lower leg and move the foot towards your back. At the same time, straighten the upper leg.
- Make “scissors kicks” with your legs to move the body forward.
Gymnastics
Individual balances.
- Gymnastics include general categories of movement such as travel, weight transfer, balance, jumping, flight or landing.
- These skills can be developed with integration of other body aspects and movement elements. For example locomotor and non-locomotor movements, space and effort aspects.
- Hand balance into splits and hand walk.
- Hand balance into splits and hand walk is standing upright with the support of the hands with toes pointing up, splitting the legs sideways and making few steps.
- It helps in developing; balance, coordination, reaction time, flexibility and many more.
- How to perform hand or frog balance into splits.
- Get into a squat position and place hands on the ground in front of the feet, next to the toes.
- Move the knees so that they rest against the bent elbows for support. With your knees in this position, they will help carry some of your body weight to make the hold possible.
- Lean forward into the hold taking weight onto the hands so that the feet are raised completely from the floor.
- Hold the position for 30 seconds.
- How to perform a hand walk.
- Once you are stable on your hand balance position, try to move one hand forward. Make short steps as you lean the body slightly in the direction you are moving to. Move the other hand.
- Once you have made several steps or you are tired, lower your body by bending the knees. Land with your feet on the ground.
Hand balance into splits and hand walk helps us to develop the following physical fitness components:- Balance – the body is able to stay upright and in control of movement.
- Coordinating – ability to move two or more body parts under control.
- Reaction time – ability to respond quickly to a command or stimulus.
- Flexibility – ability to move the joints easily without getting injuries.
- Shoulder roll.
This is a kind of roll that is performed over one shoulder.
It prevents you from hurting your head, hands or knees if you fall on the ground.
How to perform shoulder rolls.- Kneel down on the ground with legs apart.
- Bend the legs at the knees and body to lean on one side of the shoulder.
- Push the body forward while placing one arm diagonally across the body.
- Tilt the head to the side as you tuck the chin to the chest.
- Roll over.
- Through vault into forward roll.
It is a movement done by going over a vaulting box or an obstacle.
Forward roll is a movement that involves rolling of the body forward on the ground or on a mat.
Learning points for through vault into forward roll.- Have a fast run up and take off powerfully on both feet.
- Hands together on the vaulting box.
- Hips and feet horizontal.
- Tuck the legs up to the chest.
- Swing the knees through your arms and bring the legs forward to prepare landing.
- The moment your body touches the ground, push over your back so that the body rolls forward and hips are pushed over the head.
- Side vault.
It involves jumping over an obstacle or object with the hands placed on the object and the legs being moved away on the side of the obstacle while jumping.
How side vault is performed;- Make a short run towards the obstacle or vault.
- Place both hands on one end of the obstacle.
- Jump over the obstacle with the legs on one side.
- Release the arm that is closer to the legs.
- Then come down as you release the other hand.
- Run out or move smoothly from the vault.
- Cartwheel.
It is a sideways circle movement of the body.
It is performed by bringing the hands to the ground one at a time while the body inverts.
Steps in performing cartwheels.- Place your dominant leg in front and bend it slightly as the other leg remains straight. Arms should be straight above the head.
- Place your hands on the ground with fingers well spread out.
- Push your feet over your head one at a time. The foot that takes off first should land first.
- Land in such a way that you are facing the opposite direction. Your arms should be over your head near your ears. Your front leg should be slightly bent and your back leg straight.
- Round off.
This is a movement of turning the body parts from one point to another in the air.\
The take off can either be off hands or off feet.
How round off is done;- Start in an upright standing position with one leg forward and arms lifted straight above your head with palms facing forward.
- Bend your body trunk forward and lift up the back leg.
- With palms placed firmly on the ground, rotate the hands towards each other.
- Put legs together at the top and push them through so that you land facing the direction you started from.
- Five action sequences.
A sequence is the performance of a series of gymnastics skills in a continuous movement.
The finishing point of one skill marks the starting point of the next skill.
- Five action sequences therefore, is performing five activities continuously which is a combination of spring balance, vault, roll and balance.
The purpose of the sequence is to connect movements into smooth and flowing order without stopping.
- Five action sequences therefore, is performing five activities continuously which is a combination of spring balance, vault, roll and balance.
Political Systems and Governance - CBC Grade 5 Social Studies Revision Notes
Leadership and Political change
Traditional Leaders In Kenya
- A traditional leader is someone who was chosen by his or her community to lead them.
- A traditional leader was someone who was famous for one reason or another. Sometimes they were wisemen and women. At other times they were brave warriors, famous medicine people or successful traders.they were obeyed and respected. People would go to them for advice and guidance.
Contribution of Traditional Leaders in Kenya
Kivoi wa Mwendwa
- Kivoi wa Mwendwa was born in 1780 in Kitui.
- He was a great long distance trader who travelled between Mombasa and Mt. Elgon.
- He was able to organize hunting and raiding activities to acquire trade goods in the region
- When he took the goods to the coast, he exchanged them for clothes, cowrie shells, ornaments, knives, daggers, spices and glassware from Arab traders.
- In 1846, he met Dr. Krapf for the first time at Rabai and they became great friends.
- In 1849, Dr. Krapf visited Chief Kivoi in his home in Kitui from where he saw a snow-capped mountain. It was amazing to find such information along the equator.
- When Ludwig Krapf inquired about it, Chief Kivoi informed him that the name of the mountain was “Kinyaa”, which Krapf interpreted as Kenya, the present-day name of our country.
- His Friendship with Dr. Krapf led to the spread of Christianity among his people.
Mekatilili wa Menza
She was born in 1840. She was a prophetess and a political leader of the Agiriama people
- Mekatilili was opposed to hut tax and forced labour, slavery, the destruction of the Kayas (traditional shrines) and recruitment of Giriama youths who were forced to work on European farms. She led her people to fight against the occupation of Giriama land along River Sabaki.
- They attacked European settlements and traders passing through their land.
- During the fight she was arrested and deported to Kisii.
- After this, the Agiriama lost their political power.
- She escaped from Kisii prison and trekked back to Kilifi.
- She was re-arrested and deported to Kismayu in August 1914.
- She died in 1920.
- Mekatilili wa Menza was a famous army general and a great pride of the Agiriama community, an inspiration to present-day women due to her toiling spirit.
Differences and similarities between Kivoi wa Mwendwa and Mekatili wa Menza
| Similarities | Differences |
| Both leaders were respected by their communities | Kivoi wa Mwendwa was a long distance trader while Mekatilili wa Menza was a prophetes. |
| Both leaders were symbols of unity to their communities | Kivoi wa Mwendwa welcomed the European missionaries while Mekatilili wa Menza resisted them |
| Both leaders interacted with Europeans | Mekatilili wa memnza was arrested and deported to Kisii and Kismayu while Kivoi wa Mwendwa was not arrested. |
| Both leaders defended the welfare of their people. | Kivoi wa Mwendwa was a chief while Mekatilili wa Menza was a military leader |
| Mekatilili wa Menza united her people against the British through oaths while Kivoi wa Mwendwa did not give any oath. |
Early Forms Of Government
Early Forms Of Government Among The Maasai.
- The Maasai belong to the Nilotes.
- They live in the plains where they can get enough pasture for their animals
- The Maasai were ruled by a council of elders.
- The community had age sets and each age set had its time of leadership.
- Moran was the most active age set.
- The Olaiguani was the title of the military captain.
- The spiritual leader of the Maasai was known as Oloibon.
- Lenana was a famous Oloibon in their social life.
- The maasai worshipped a supreme being called Enkai. Enkai was the source of life and punished bad people.
- The Laibon prayed to God on behalf of other people in the community.
- There was a council of elders that settled disputes amongst the Maasai.
- The Morans defended the community against external attacks. They also raided other communities to get cattle.
Early Forms Of Government Among The Ameru
- The Ameru are Bantu speakers who live around Mt. Kenya.
- The traditional system of Ameru was based on the age set system.
- There were to sets of rulers: the Kiruka and the Ntiba.each of these age sets was headed by a council of elders and ruled at a particular time before handing over to the other.
- The handing over of the ceremony was marked by a ceremony called Ntuiko.
- The generation in power had a council of elders called the Njuri Ncheke. This council was made up elderly men who were selected because of their ability and wisdom.
- They dealt with murder, land issues, witchcraft and theft.
- They also made laws in the community.
- They settled disputes, maintained law and order, presided over religious matters, protected the environment and advised on the best economic activity for the community.
- Law breakers were punished by a council of elders called Nkomango.
- Matters that were difficult to handle were dealt with by selected members of Njuri Ncheke called Njuri Impeere.
- They had a religious leader called Mugwe. He blessed major events like sacrifices to ancestors, declared curses on matters of public interest, declared things taboo and prohibited, and conducted rites when age sets were being promoted
Differences and similarities between the Maasai and the Ameru.
| Similarities | Differences |
| In both communities there was a council of elders who settled disputes | The Maasai had a prophet and a medicine man while the Ameru did not |
| In both communities leadership was in form of age sets | The Maasai were led by Oloibon while the Ameru were led by a council of elders |
| In both communities, Law and order was maintained by the elders | The Maasai leadership was hereditary while the Ameru was not. |
Citizenship
Good citizenship in Kenya
Ways of becoming a Kenyan Citizen
- A citizen is a person who belongs to a particular country.
- Citizenship is the state of being a member of a given country.
- In Kenya, citizens are issued with identity cards to show that they are Kenyans. A person can become a Kenyan citizen in two ways.
- By Birth
- A child born of Kenyan parents becomes a Kenyan Citizen. The child is registered and given a birth certificate. At the age of 18 he or she can use the birth certificate to get an identity card.
- If the child is born in Kenya by parents who are foreigners, the child has the option of becoming a Kenyan citizen or not.
- By registration
- A person born outside Kenya who has attained the age of 21 years can apply to be registered as a Kenyan citizen.
- He or she must fulfil the following conditions.
- He or she must have been living in Kenya for at least seven years
- One of his or her parents must be a Kenyan citizen
- He or she must have knowledge of Kiswahili or English.
- He or she must be of good character and make a good citizen.
- By Birth
Requirements for Dual Citizenship
Dual citizenship is the state whereby a person is a citizen of more than one country under the laws of those countries.
A Kenyan citizen by birth does not lose Kenyan citizenship by acquiring citizenship of another country, as long as he or she can prove that one or both parents were Kenyan citizens at their time of birth.
Someone who qualifies for dual citizenship is required to be of good conduct, law abiding and should show interest in becoming a dual citizen
He or she should also present the following documents:
- Two passport photographs
- Copy of birth certificate
- Copy of Kenyan passport
- Copy of Kenyan identity card
- Copy of the other country’s passport
- Copy of the other country’s certificate of citizenship
- Copy of police clearance certificate.
Ways in which one May lose Kenyan Citizenship
- Kenyans who obtain citizenship of another country are required to disclose their other citizenship within three months of becoming a dual citizen. Failure to do so is an offence.
- If a person acquired the citizenship by registration, the citizenship may be lost if one:
- Is discovered to have used false documents during registration
- Fails to renew citizenship when it expires
- Is convicted of an offence which has a penalty of at least seven years imprisonment within five years of registration
- Is convicted of planning to overthrow the government (treason).
- Is working with an enemy of Kenya to fight Kenya.
- Willingly denounces Kenyan citizenship
If a person acquired the citizenship by birth, the citizenship may be lost if:
- The age of the person is discovered and reveals that the person was older than eight years when he or she was found on Kenyan soil.
- The nationality or parentage of the person becomes known and reveals that he or she was a citizen of another country.
- The person used false documents during registration.
Good Citizenship
A good citizen does the following:
- Obeys the laws of the country
- Is loyal and loves his or her country
- Defends his or her country
- Respects the authorities
- Takes part in community activities
- Pays tax to the government
- Takes care of the environment
National Unity In Kenya.
National Symbols in Kenya
The national symbols in Kenya include:
-
The national anthem
- Is a national prayer
- It expresses the hopes and wishes of Kenyans
- It was first sang at independence
- It is written in Kiswahili and English
- It is sang when raising the flag and when opening and closing national days celebrations
-
The National flag
- It is flown in all official functions, government offices and at schools.
- Senior government officials fly the national flag on their cars. It is also raised when our sportsmen and women win medals in international games. It is the most popular
-
National symbol.
- It has four colours: black, white,red and green.
- The red colour is a reminder of the blood shed and lives lost during the fight for independence.
- The black colour is our skin and we are proud of it.
- The green colour is the beautiful environment that supports the growing of crops
- The white colour shows peace in our country and the unity of Kenyans.
-
The coat of arms
- It is the logo of our country
- It has two lions holding spears as a sign of strength and readiness to defend our country from external forces
- The cock with an axe shows that we can fight anybody as we defend our country.
- Crops represent the agricultural products of our fertile soil and the ability of Kenyans to feed themselves.
- Harambee - this is our national motto. Kenyans work together to build our country.
-
The Public seal
- It is circular in shape
- It has a coat of arms at the centre
- It is the government signature on its official documents
- The crops represent our main agricultural products.
Factors That Promote National Unity
Some of the factors that promote national unity are:
- National holidays - these are days when great events are celebrated. They include, Madaraka Day celebrated on 1st June, Mashujaa Day celebrated on 21st October, Jamhuri 12th December .
- National symbols - these include the coat of arms, the national flag,the national anthem and public seal.
- National languages -the use of Kiswahili and English brings people of different communities together.
1) The president
2) Sports and games
3) The Kenyan constitution
4) The National Assembly
Human Rights
- A right is what is legally yours. Our rights are written in a document that contains all the laws of Kenya. The document is called the constitution of Kenya.
- We all have rights and our rights should be respected.
- Some basic rights are:
- Right to life - life is important to all human beings. No one has the right to take another person’s life.
- Right to basic needs (food, shelter, clothing and education) - every child should have adequate food, clothing, good medicinal care, education and shelter.
- Right to shelter - place to protect from danger, rain.
- Right to protection
- Freedom of worship - Every Kenyan citizen is free to hold his or her own beliefs and belong to a religious group of his or her choice
- Right to vote - every Kenyan citizen above 18 years of age has a right to vote.
- Right to fair trial - A person who has been arrested should be presumed innocent until proven guilty.
- Right to own property - we are allowed to own property anywhere in Kenya. We can buy land or do business in any part of Kenya.
- Freedom from discrimination -all people are equal before the law and should be protected from any discrimination regardless of age, sex, race, colour or tribe.
Importance of Human rights
- When human rights are respected citizens live in peace and harmony.
- Respect for human rights will help us feel secure and safe.
- Promotes democracy in the society
- They are a guarantee for equal and fair treatment
Children's rights helps them to grow up well and become good citizens
Governance In Kenya
Democracy In Society
Types Of Democracy In Kenya
- Democracy refers to a form of governance where the government rules according to the wishes of the people and for the benefit of the people.
- The leaders are elected by the people through elections.
- There are two types of democracy:
- Direct democracy - this is also called participatory democracy or pure democracy. . in this type of democracy, all citizens are involved in making decisions on various issues that concern them. This is the best form of democracy.
- Indirect democracy - this is also called representative democracy. In this type of democracy, citizens elect representatives who make decisions on their behalf. The elected representatives are supposed to make decisions the way people who elected them would like them to.
Benefits Of Democracy In Society.
- Democracy enables people to elect leaders of their choice.
- Democracy promotes good governance in the society
- Democracy promotes development and stability in the society
- Democracy enables citizens to express themselves freely
- Democracy promotes justice in society because all people are ruled by the law.
- Democracy helps to protect the basic rights of all citizens
- Democracy promotes peace, love and unity in society. This helps reduce conflicts.
Electoral Process In Kenya Importance Of Voting In Kenya
- Voting is the action of electing someone in an election.
People vote to choose leaders who will represent them in the government, to exercise their democratic right and to replace bad leaders with good leaders.
Elective Political positions in Kenya
In Kenya we have six elective political positions.. They are:
- President - who leads the national government.
- Governor - who is the head of the county government.
- Senator - who represents the county in the senate
- Member of parliament - who represents the constituency in the parliament.
- Woman representative - represents women who are considered as marginalised group by the constitution.
- Member of county assembly - who represents the ward in the county assembly.
Voting Steps In Kenya
The following are the steps of voting in Kenya.
- Registration of voters on the voter’s register by the independent Electoral and boundaries Commission (IEBC) Giving civic education to the voters to help them understand the proceedings of voting.
- On the day of voting, voters go to the polling station to elect their leaders. For a voter to be allowed to vote:
- He or she must have a national identity card or valid passport
- He or she must appear on the voters register.
- Verifying of the names from the voter’s register using voters identification card
- When cleared, the voter is given a ballot paper to fill. This is done in a booth or private room. He or she puts a mark next to the name of the candidate of his or her choice.
- The voter casts his or her ballot in a ballot box.
- Once the voter casts his or her vote, a non-washable ink is used to make a mark on his or her small finger.
The National Government in Kenya
Arms of the National Government and their Functions
The three arms of National Government in Kenya include:
- The legislature - is the arm of the National Government that makes the laws that govern the country. These laws are contained in the constitution of Kenya.
- The Executive - is the arm of the National Government that runs the government. The president ensures that there is law and order in the country. This arm of the National Government comes up with policies of the government.
- The Judiciary - Is the arm of the National Government that listens to cases brought to the courts and administers justice
The Composition of the three arms of the National Government in Kenya
The Legislature
- National Assembly
- The speaker
- 290 elected members of parliament
- 47 elected women representatives
- 12 members nominated by political parties
- The senate
- The speaker
- 47 senators
- 16 women nominated by political parties
- 2 youth representatives (male and female)
- 2 members representing people with disabilities (male and female)
Composition of the Executive
- The president
- The deputy president
- Cabinet secretaries
- Attorney General
- Public servants
Composition of the Judiciary
- The Chief Justice
- The Deputy Chief Justice
- The Chief Registrar
- Judges of the Supreme Court
- The Judicial Service Commission
- Other Judicial officers and staff
Participating In National Governance
We take part in national governance by doing the following:
- Obeying the rules and laws of our country
- Encouraging people in the society to participate in democratic activities such as voting.
- Creating awareness on the importance of respecting human rights.
- Being good citizens and educating other people in the society on good citizenship.
- Supporting the elected leaders in the society.
- Encouraging our leaders to be fair and transparent in their leadership
Resources and Economic Activities - CBC Grade 5 Social Studies Revision Notes
- Resources found in Kenya grade 5
- Agriculture
- Dairy Farming in Kenya
- Horticulture In Kenya
- Mining In Kenya
- Fishing in Kenya
- Wildlife and Tourism in Kenya
- Transport in Kenya
- Communication In Kenya Modern Means Of Communication.
Resources found in Kenya
- A resource is something that we can use to create wealth. Kenya has many natural resources such as land, minerals, water and forests.
- Economic activity - is what one does with the resources to make money or wealth.
- These resources can be used for the benefit of the people. When people use resources to make money, we say they are carrying out economic activities.
- We use land in growing crops like tea, coffee, vegetables and also keep animals like sheep, carmels and goats.
- Minerals are valuable substances that are naturally found on earth. Minerals found in Kenya include: soda sh, limestone, salt, diatomite and petroleum.
- We use water to rear fish. Fish found in Kenya include Tilapia and mud fish. Water is also used to water crops and animals as well as in industries.
- Forests act as homes for wild animals which attract tourists to our country.
How we can care for the resources found In Kenya
We care for resources in Kenya through the following ways:
- Planting new trees when we cut old ones
- Adding manure and planting cover crops to take care of soil.
- Keeping water sources clean.
- Using minerals wisely
- Protecting forests by not lighting fires and destroying them.
Agriculture
This is the growing of crops and keeping animals.
Farming Methods:
Subsistence farming
it is a type of farming whereby farmers grow crops for use at home.
Characteristics of subsistence farming
- Farmers grow crops and keep animals mainly for home use
- The farms are divided into small portions
- Farmers use simple tools such as hoes, ox ploughs and pangas to do cultivation.
- Farmers grow crops such as maize, beans, millet, cassava, yams and arrowroots in small quantities.
- Animal waste is used as manure
- Family labour is used
- A few animals such as cows, sheep, goats and chicken are kept.
Small scale farming
Is the type of farming whereby the farmer grows crops and keeps livestock on small pieces of land.
Characteristics of small scale farming
- It is practical in areas which are densely populated. The land available for farming is limited.
- It is practised in areas which have fertile soil and which receive enough and reliable rainfall.
- Improved methods of farming such as rotation, application of fertilizer and spraying are used.
- Farmers plant crops and keep animals for food and also for sale.
- Family labour is used by farmers.
- Food crops and cash crops such as coffee, tea,sugarcane, pyrethrum, fruits, vegetables and flowers.
Importance of Farming
● It’s a sources of income for farmers
● It’s a source of raw materials for industries
● Source of food for many people
● Promotes better standards of living
● Earns revenue for the government
● Promotes proper use of land.
Dairy Farming In Kenya
This refers to the keeping of cattle for the production of milk and milk products. It can be carried out on a small and large scale.
The following factors favour dairy farming in Kenya:
- Cool temperatures, which discourages breeding of ticks
- High and reliable rainfall to enable pastures to grow.
- Good transport system to ensure quick transportation of milk
- Enough land to grow grass to feed the cattle.
- Plenty of water for animals in order to produce enough milk.
- Veterinary services to give advice to farmers and treat animals when they are sick.
- A large market to buy dairy products which have to be sold quickly. Areas where dairy farming is mainly practised include Meru, Embu, Kirinyaga, Murang’a, Nakuru, Nyandarua, Laikipia, Nyeri, Kiambu, Kisii, Nyamira, Nandi, Bungoma, Uasin Gishu and Trans-Nzoia counties.
- Dairy products include: Milk, cheese, yoghurt, ghee, butter and cream.
Benefits of Dairy Farming
Improves the living standards of people
Provides people with milk and other milk products such as yoghurt.
Farmers can earn income when they sell milk
It’s a source of employment
Government gets revenue from milk exports
Milk is a source of protein and thus it improves our health
Hides and skins are used in the leather industry to make shoes and belts.
Challenges Facing Dairy Farming In Kenya
- Dairy farming is very expensive to practise and needs a lot of money.
- Lack of enough capital
- Lack of enough storage and cooling facilities to store milk
- Poor means of transport because the roads are damaged
- Lack of adequate market for milk
- Delay of payment of farmers by the buyers
- Lack of enough pasture during the dry period
- High cost of commercial feeds.
- Competition from cheap imported dairy products.
Horticulture In Kenya
- Horticulture is the growing of flowers, fruits and vegetables.
- Horticulture farming is done in green houses under natural conditions e.g. flowers grown in Kenya are: Roses, lilies, hibiscus, carnations and orchids
- Fruits grown in Kenya are: Oranges, grapes, lemons, mangoes and pineapples.
- Vegetables grown in Kenya include: onions, tomatoes, cabbages, carrots and sukuma wiki (kale) among others
- It is mainly practised in the following areas:
- Mount elgon
- Kitale
- Cherangany hills
- Mois Bridge
- Nyahururu
- Taveta
- Naivasha
- Ngong
- Kisii
- Embu
- Eldoret
- Nairobi
- Naivasha is the main horticultural growing area in Kenya.
Contribution Of Horticulture To The Economy Of Kenya
- It earns the country foreign exchange when they are exported.
- Improves living standards when farmers get their money.
- It’s a source of employment. People are employed to work in farms.
- They are a major source of food for the people of Kenya
- Some horticultural crops are used as raw materials in industries.
Mining In Kenya
- Minerals are valuable substances that are naturally found on earth or underneath.
- Mining refers to the process of removing minerals from the rocks in the ground.
- Major minerals found in kenya include:
- Soda ash - mined at Lake Magadi
- Diatomite - mined at Kariandusi near Gilgil.
- Limestone - mined at Athi River near Nairobi and Bamburi in Mombasa.
- Salt - mined in Lake Magadi and also along the coast at Malindi and Ngomeni.
- Petroleum - mined in Turkana county.
Importance Of Minerals In Our Country.
- They earn our country foreign exchange when they are exported.
- They are important in the construction industry e.g cement mixed with sand.
- Different minerals are used as raw materials in industries that manufacture different products such as cement, glass, soap and chemicals.
- Some minerals are used in our homes to add taste to our food e.g. salt.
Problems Facing Mining In Kenya
- Poor transport system
- Lack of skilled labour
- Insecurity in the mining areas
- Collapsing of mines which causes death or injury to the miners.
- Inadequate capital.
Fishing In Kenya
- Fishing refers to the harvesting of fish from water for use directly as food at home or for sale in the market.
- Fishing can be done in lakes, oceans, rivers or ponds.
- A fishing ground is an area where fishing is carried out.
Methods Of Inland Fishing
- Inland fishing is carried out in freshwater bodies like lakes, rivers and fish farms (ponds) located on the main inland fishing grounds in Kenya
- Lakes: Victoria, Turkana, Naivasha, Jipe and Baringo.
- Rivers: Tana, Yala, Sagana, Nzoia and Nyando.
- Dams: Masinga and Kiambere.
- Fish farms: Naromoru, Nanyuki, Borabu, Bamburi and Aruba.
- Methods of inland fishing include:
- Harpooning or spear method. - this is mostly done in clear water. Fishermen catch fish by spearing them.
A spear is aimed at the fish in the water. It is a method used in catching a few fish for home use. - Net drifting - a net is placed vertically in a lake. The net is supported by floats at the top and has weights at the bottom. Fish swim into the net and get trapped and cannot move.
- Lamp attraction method - lamps are lit in boats over the water surface to attract fish at night. As the fish move towards the light, they are caught using baskets and nets. This method is commonly used in Lakes like Victoria, Turkana to catch small fish like Omena
- Hook and line method- a string with a hook on the head is tied to a rod. A bait is then put on the hook, which is dipped into the water. The bait could be a piece of meat or an insect. The fish get attracted to the bait and are caught by the hook. Only one fish is caught at a time.
- Use of baskets - a conical-shaped basket is pushed into the river where the water flows very fast. After some time, the basket is removed from the water with whatever may have got in. this method is used in rivers and near banks of lakes
- Harpooning or spear method. - this is mostly done in clear water. Fishermen catch fish by spearing them.
Contribution Of Fishing To The Economy Of Kenya
- Tourist attraction - tourists come to kenya to do fishing as a sport and for enjoyment.
- Fish is exported to earn the country foreign exchange.
- Fish is a source of food e.g. source of protein.
- Fishing is a source of employment for many e.g. in industries that process fish, fish farms.
- It's a source of income- selling fish earns fishermen income thus improving their living standards.
- Fish is a source of medicine - fish contains the cod liver that is used as medicine.
- Fishing has led to the growth of other dependent industries that make fertilizers, animal feeds and fish processing.
Wildlife and Tourism in Kenya
National park and Game reserve
- A national park is a wildlife protection area controlled directly by the national government through the Kenya wildlife service. In national parks people are not allowed to settle.
- A game reserve is a wildlife protection area managed by the local county government. In game reserves, people are allowed to live and graze their cattle.
Locating National Parks and Game reserves in Kenya (map)
Importance Of Wildlife In Our Country
- Wildlife is an important natural resource in kenya. The following are some reasons why wildlife is important:
- It is a major tourist attraction in kenya. National parks and game reserves have rare kinds of animals which tourists pay to see. The government gets revenue from the tourists.
- It creates job opportunities for many people. Some people are employed to work in national parks and game reserves . others are employed as tour guides or workers in hotels.
- It helps us to make good use of unproductive lands. Game parks and reserves are located in areas which cannot support domestic animals and crops.
- Some wild animals are eaten as food. This happens when the population of wild animals is high. E.g. gazelles, crocodiles, giraffes,zebras and impalas.
- It promotes cultural exchange. When tourists interact with Kenyans, they exchange ideas, beliefs and cultural values and practices.
- It is a national heritage and it contributes to the beauty of the land.
- It promotes development of transport and communication facilities in Kenya. Roads leading to game parks and reserves have been improved.
- Some wild animals have medicinal value and are used in the manufacture of medicine.
Tourists Attractions In Kenya
- A tourist is someone who travels to various places for leisure or enjoyment.
- Tourism is the practice of offering services to tourists with the intention of making money.
- Tourist attractions are things that tourists come to see or the places they visit.
- The main tourist attractions in Kenya are:
- Wildlife- this is the main tourist attraction. Tourists come to see animals such as the big five and flamingos in Lake Nakuru.
- Historic built environments - such as Fort Jesus, Gedi Ruins and the Nairobi National Museum.
- Sandy coastal beaches- tourists visit the beaches to relax and sunbathe.
- Culture- Kenya has varied and unique cultures. These include dances, artefacts, ways of dressing and shelters.
- Warm climate - Kenya experiences a warm climate most of the year. This attracts tourists when it is cold in their countries.
- Sports - some sports such as mountain climbing, sport fishing and motor vehicle rallies attract tourists.
- Conference facilities - Kenya has modern conference facilities such as Kenya International Conventional Centre (KICC) , UNEP headquarters and several five-star hotels.
- Beautiful scenery - this includes the Great Rift valley, the hot water springs at Olkaria and the snow peaks of Mount Kenya
Contribution of Tourism to the economy of Kenya
- Tourism contributes to the economy of Kenya in the following ways:
- It is a source of foreign exchange
- It creates employment for Kenyans
- Tourists bring new ideas when they visit our country
- Hotels where tourists stay promote the growth of agriculture in those areas. They create a market for crops grown by farmers.
- It leads to growth of urban centres. For example, Narok town has grown due to the presence of Maasai Mara Game reserve.
- It provides a market for locally made items such as baskets and ornaments.
Ways Of Promoting Tourism In Kenya
- Ensuring safety and security of tourists.
- Constructing electric fences around game parks and reserves to prevent human wildlife conflicts.
- Conserving all the natural forests and planting more trees to sustain the wild animals.
- Establishing anti-poaching units in all game parks and game reserves.
- Charging affordable fees at all tourist attractions.
- Building modern hotels and lodges for tourists.
- Ensuring that roads to tourist attraction sites are well maintained.
Transport In Kenya
Modern Forms Of Transport In Kenya
- Transport is the movement of people or goods from one place to another.
- There are various forms of transport used in Kenya.these are: road, railways, water, air and pipeline.
- Road transport is the oldest and most common form of transport. People and goods are transported using cars, bicycles, buses, matatus,motorbikes, lorries and trailers.
- Water transport involves the movement of goods and people over water. It is the most suitable form of transportation for bulky goods. However it is slow.
- Railway transport involves the movement of people and goods on a railway line.
- Air transport involves the movement of people and goods using aircraft. It is the fastest and most expensive form of transport.
- Pipeline transport is mainly used to transport water,oil and gases.
Causes Of Road Accidents In Kenya
- Ignorance of traffic rules and road signs
- Driving beyond the speed limit
- Driving vehicles that are not in good condition
- Overloading of goods and passengers
- Driving under the influence of alcohol or harmful drugs
- Poor state of roads
Ways of reducing road accidents in Kenya
- Educating drivers and other road users on the proper use of roads
- Constructing footbridges, tunnels and pedestrian paths
- Enforcing traffic rules to stop driving beyond the speed limit. Using speed governors on public service vehicles to control their speed.
- Constructing speed bumps on roads
- Placing correct road signs at the right places along the roads
- Punishing and penalising drivers who do not obey traffic rules
- Inspecting vehicles regularly to ensure that they are roadworthy.
- Not using mobile phones when driving.
Road signs and their meanings (pic pg. 120)
Ways Of Observing Road Safety In Kenya
- Observe road signs on your way.
- At pedestrian crossing, look left, right and again then cross when the road is clear.
- Fasten your seat belts when in a moving vehicle
- Do not play near the roads
- Always use sidewalks.
Communication In Kenya Modern Means Of Communication.
- Communication is the sending or receiving of information. Examples of modern means of communication in Kenya include:
- Mobile phones and telephones - this is the fastest and most reliable way of sending and receiving messages. It can be used to send both written and spoken messages.
- Magazines, newspapers, journals - they are produced either daily, weekly or monthly. They report information about events happening in the country and around the world. They report on politics, business, sports and other happenings.
- Radio - this method sends messages to many people at the same time. These messages are aired in English, Kiswahili and local languages.
- Television - this is sending messages using visual aids and sending to many at once.
- Internet - this involves sending of emails using electronic means among others like video conferencing.
- Postal services - this is the delivery of written messages in the form of letters and parcels from one place to another. This service is offered through post offices.
- Courier services - this is sending and receiving of letters and parcels to people living far away . In this service, the parcels are delivered to the owners personally. It is fast and reliable
People and Population - CBC Grade 5 Social Studies Revision Notes
Language Groups in Kenya
The main language groups in Kenya are
- Bantu
- Nilotes
- Cushites
- Asians
- Europeans
THE BANTU
They originate from Congo Forest
They are the largest group in Kenya
They consist of Abakuria, Abagusii, Abaluhya, Abasuba, Agikuyu, Ameru, Aembu, Mbeere, Akamba, Mijikenda (Giriama, Digo, Duruma, Kambe, Kauma, Jibana, Chonyi, Rabai and Ribe), Wapokomo, Wataita, Wataweta, and Waswahili)
THE NILOTES
They originated from Bahr- el- ghazal in South Sudan.
They kept animals and grew crops such as millet and sorghum.
They consist of Nandi, Kipsigis, Keiyo, Markawet, Tugen, Pokot, Sabaot, Terik, Luo, Maasai, Samburu, Iteso, Turkana and Elmolo.
THE CUSTHITES
They originated from the Horn of Africa, popularly known as Somalia.
They consist of the Dahalo, Sanye, Makogode, Sniah, Borana, Rendile, Burji, Oromo, Ormo, Awera and Gabbra
THE ASIANS
They originated from Asia
They include the Indians, Japanese and Chinese.
They live in towns and work as traders and business people.
THE EUROPEANS
They came from Europe
They were interested in african land in order to get raw materials and settle.
They include people from Germany, France, Italy and Spain.
Interdependence of Language Groups in Kenya
Language groups in Kenya depend on each other through various means. They include:
- Food
- Treatment
- Education
- Market
Benefits of interdependence among the language groups in Kenya include:
- It promotes love and unity among different language groups
- It brings development e.g. the development of roads which connect different communities.
- It discourages tribalism, racism and corruption
- It leads to the exchange of culture, goods and services.
Population Distribution In Kenya
- Population refers to the total number of people living in an area at a particular time.
- The total number of people living in Kenya makes up the population of Kenya.
- The population of an area can either be sparse or dense.
- If an area has many people the area is said to be densely populated.
- If an area has few people it is said to be sparsely populated.
- Population density is the number of people living in an area per square kilometre.
- Population density can be described as high, medium or low.
- Areas of high population in Kenya include:
- Highlands such as western highlands and central highlands, parts of Machakos.
- Lake basins such as Nyanza region, especially north of Lake Victoria
- Coastal areas
- Major towns such as Nairobi, Mombasa and Kisumu, Nakuru and Eldoret
- Areas of low population density include:
- Deserts like Chalbi and Taru
- Steep slopes of mountains.
- Restricted areas such as near game parks and airports
Culture And Social Organization
- Culture is the way of life of people. It includes how they eat, what they eat, how they dress, their religion among other things.
- African traditional education is a form of learning in traditional african societies in which knowledge, skills and attitudes of the community were passed from elder to children to prepare them for adult life.
- Methods of instructions used in african traditional education include:
- Apprenticeship
- Songs and dances
- Storytelling
- Narratives or narrations
- Proverbs
- Riddles
- Ceremonies
- Learning from specialist
- Skills taught to girls included:
- Cooking
- Fetching water
- Looking after young ones
- And fetching firewood
- Skills taught to boys included:
- Herding
- Hunting
- Cultivating the land
Importance of african traditional education in promoting values
- It emphasizes the value for respect for all
- It emphasizes obedience
- It encourages honesty among all members of the community
- It encourages responsibility and hard work
- It encourages faithfulness.
- It promotes generosity and kindness as people take care of each other.
- It encourages people to live together in peace and unity.
School Administration
Administrative leaders in school They include:
The headteacher
↓
The deputy head teacher
↓
The senior teacher
↓
Teachers (class teacher)
↓
Children’s government
Duties of administrative leaders in school
- Duties of the head teacher
- Overall in charge of the school
- Links the school to the department of the school
- Admits new learners
- Maintains school records
- Oversees day-to-day running of the school
- Allocates tasks to other members of staff and supervises
- In charge of funds and security of the school
- Overall in charge of discipline.
- Duties of the deputy head teacher
- Assistant to the head teacher
- In charge of discipline
- Secretary to staff meetings
- Prepare the school timetable and routine
- Ensure safety and security of learners
- Teaches learners
- Duties of the senior Teacher
- Assists in administration in the absence of the headteacher and deputy headteacher.
- Helps supervising curriculum development in school
- Guide and counsels learners
- Teaches the learners
- Duties of teachers (class teachers)
- Prepares and maintains class register
- Maintains class discipline
- Provides guidance services to learners
- Resolves conflicts arising in class
- Teaches subjects assigned
- Duties of children’s government
- Acts as a linkage between the students and the school administration
- Acts as a role model to other learners
- Supervises school activities including maintaining cleanliness
- Provides feedback to the school administration concerning student affairs.