
HOME SCIENCE
Paper 2
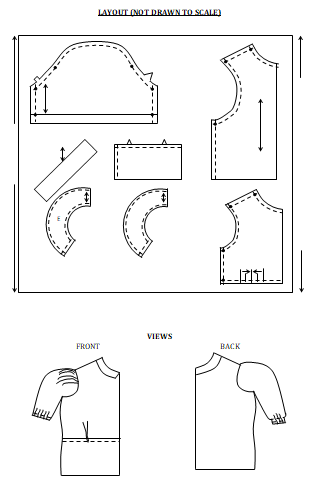
A pattern of a blouse has been provided. You are adviced to study the questions, the patterns Q the layout before you begin the test.
Materials provided;
- Pattern pieces.
A - Front bodice
B - Back bodice
C - Front yoke.
D - Sleeve
E - Collar
F - Grossway strip
- Light weight cotton fabric of 70 by 65 cm.
- Cotton sewing thread to match the fabric.
- Elastic cord 18cm long ½ cm wide.
- Envelop A4.
THE TEST
Using the materials provided, cut out and make the left half of the blouse to show the following;
- Cutting out. (15½ marks)
- Working of the inverted pleat on the front bodice. (3 marks)
- Joining the front bodice to the yoke using an overlaid seam. (10 marks)
- Joining the front bodice to the back bodice at the shoulder using an open seam. (6½marks)
- Working the side seam using double stitched seam. (7½ marks)
- Preparation and attachment of uninterfaced collar using a crossway strip. (16 marks)
- Working of the sleeve to include;
- Control of fullness at the crown. (2 marks)
- Joining of the underarm seam using a French seam. (6½ marks)
- Attachment of the sleeve. (4 marks)
- Working of elastic casing at the lower edge of the sleeve and inserting the elastic cord. Don’t seal the opening used to insert the cord. (10 marks)
- Presentation. (6 marks)

MARKING SCHEME
|
TASKS |
MAX. SCORE |
ACTUAL SCORE |
REMARKS |
||||
|
PRESENTATION |
|||||||
|
1. |
Work well pressed and well folded |
1 |
|||||
|
2. |
Label stitched on a single fabric without concelaing any details. |
1 |
|||||
|
3. |
Clearly written Name, Adm. No., Class |
2 |
|||||
|
4. |
Pins, unnecessaary tacking and hanging threads removed |
1 ½ |
|||||
|
5. |
Made up the right half |
½ |
|||||
|
SUB TOTAL |
6 |
||||||
|
|
CUTTING OUT |
||||||
|
1. |
All the seven pieces cut out. |
3 ½ |
|||||
|
2. |
Smooth cutting of the front bodice and on a straight grain. |
2 |
|||||
|
3. |
Smooth cutting of the front yoke and on straight grain. |
2 |
|||||
|
4. |
Smooth cutting of the back bodice and on straight grain. |
2 |
|||||
|
5. |
Smooth cutting of collar and under collar and on straight grain. |
4 |
|||||
|
6. |
Smooth cutting of the lower edge of front yoke and the back bodice. |
2 |
|||||
|
SUB TOTAL |
15 ½ |
||||||
|
|
INVERTED PLEAT ON FRONT BODICE (If not inverted pleat give zero) |
||||||
|
1. |
Correct size of the pleat – 3 cm. |
1 |
|||||
|
2. |
The folds just meeting without any gap and overlapping. |
1 |
|||||
|
3. |
Pleat well pressed and flat. |
1 |
|||||
|
SUB TOTAL |
3 |
||||||
|
|
|
||||||
|
|
JOINING THE FRONT TO YOKE USING OVERLAID SEAM (If not give zero) |
||||||
|
1. |
Overlay folded to the WS at the stitching line. |
1 ½ |
|||||
|
2. |
Overlay placed on underlay’s stitching line on the R.S. |
1 |
|||||
|
3. |
Seam stitched with straight and firm stitchery and close to the fold on R.S. |
1 ½ |
|||||
|
4. |
Seam turnings trimmed to 1cm and neatened together. |
1 ½ |
|||||
|
5. |
Appropriate neatening stitches used (If not, give zero from e – g) |
½ |
|||||
|
6. |
Evenness and correct tension of the stitches. |
2 |
|||||
|
7. |
Firm and neat stitches. |
2 |
|||||
|
8. |
Stitches fastened on and off. |
2 |
|||||
|
9. |
Seam well pressed and flat. |
1 |
|||||
|
SUB TOTAL |
13 |
|
|||||
|
|
|
|
|||||
|
|
JOINING FRONT TO BACK BODICE AT THE SHOULDER WITH OPEN SEAM. |
||||||
|
1. |
Seam done with firm and straight stitchery. |
1 |
|||||
|
2. |
Seam turnings should be neatened separately and appropriately. |
1 ½ |
|||||
|
3. |
Correct size of the neatened turnings 1cm to within 2mm. |
1 |
|||||
|
4. |
Seam open at the sleeve crown and the neckline. |
2 |
|||||
|
5. |
Evenness of the neatened turnings. |
1 |
|||||
|
SUB TOTAL |
6 ½ |
||||||
|
|
|
||||||
|
SIDE SEAM (Double stitched seam if not give zero) |
|||||||
|
1. |
Straight and firm stitchery of the first line. |
1 |
|||||
|
2. |
Straight and firm stitchery of the second line close to the fold. |
1 ½ |
|||||
|
3. |
Seam neatly tucked in to conceal the raw edges. |
1 |
|||||
|
4. |
Correct width 6mm to within 2mm. |
1 |
|||||
|
5. |
Evenness of the complete seam. |
1 |
|||||
|
6. |
Fell folded to the back. |
1 |
|||||
|
7. |
Seam flat on the R.S & W.S |
1 |
|||||
|
SUB TOTAL |
7 ½ |
||||||
|
|
PREPARATION AND ATTACHMENT OF THE UNINTERFACED COLLAR |
||||||
|
Preparation: |
|||||||
|
1. |
Collar joined with firm and smooth stitchery. |
1 |
|||||
|
2. |
Collar trimmed and snipped. |
2 |
|||||
|
3. |
Well knife edged. |
1 |
|||||
|
Attachment: |
|||||||
|
4. |
Collar joined to the garment with firm and smooth stitchery. |
1 |
|||||
|
5. |
Raw edges trimmed and snipped. |
2 |
|||||
|
6. |
Collar finished using crossway strip. |
1 |
|||||
|
7. |
Held in place using appropriate stitches |
1 |
|||||
|
8. |
Quality of stitches used. |
1 |
|||||
|
9. |
Fastened on and off. |
1 |
|||||
|
10 |
Correct size and shape of the collar |
2 |
|||||
|
11. |
Correct positioning. |
1 |
|||||
|
12. |
Collar flat on the right and wrong wide. |
1 |
|||||
|
13. |
Collar flashing to CB to within 3mm |
1 |
|||||
|
SUB TOTAL |
16 |
||||||
|
|
|
||||||
|
(a) |
UNDERARM SEAM (French seam - If not give zero) |
||||||
|
1. |
Straight and firm stitchery of the first line. |
1 |
|||||
|
2. |
Straight and firm stitchery of the second line. |
1 |
|||||
|
3. |
Raw edge completely concealed. |
½ |
|||||
|
4. |
Seam well-knife edged. |
1 |
|||||
|
5. |
Seam pressed to the back and flat at the casing and armhole. |
1 ½ |
|||||
|
6. |
Correct width of the seam 6mm to within 2mm. |
1 |
|||||
|
7. |
Evenness of the seam. |
½ |
|||||
|
SUB TOTAL |
6 ½ |
||||||
|
(b) |
Attachment |
||||||
|
1. |
Worked gathers at the crown. |
1 |
|||||
|
2. |
Gathers evenly distributed. |
1 |
|||||
|
3. |
Sleeve attached with firm and smooth stitches |
1 |
|||||
|
4. |
Seam allowance not trimmed and not neatened. |
1 |
|||||
|
5. |
Back notches and front notches matching to within 3mm. |
1 |
|||||
|
6. |
Seams matching where they meet at the armhole. |
1 |
|||||
|
|
SUB TOTAL |
6 |
|||||
|
(c) |
Elasticatingat the lower edge of sleeve. |
||||||
|
1. |
A narrow turning made (0.5cm) to conceal the raw edge. |
1 |
|||||
|
2. |
2nd turning made (1.5cm) to make the casing. |
1 |
|||||
|
3. |
Casing held in place using appropriate stitches. |
1 |
|||||
|
4. |
Evenness of the casing. |
1 |
|||||
|
5. |
Elastic inserted. |
1 |
|||||
|
6. |
Ends of elastic joined appropriately (i) Overlapping to 1cm. (ii) Overcasting stitches used. (iii) Quality of stitches used. (iv) Reinforced on and off. |
1 1 1 1 |
|||||
|
7. |
Gap for inserting elastic left open at 2cm from under-arm seam on the side |
1 |
|||||
|
SUB TOTAL |
10 |
||||||
|
SUM TOTAL |
90/2 |
|
|||||
Download HOME SCIENCE PAPER 2 - 2019 MOKASA II MOCK EXAMINATION.
Tap Here to Download for 50/-
Get on WhatsApp for 50/-
Why download?
- ✔ To read offline at any time.
- ✔ To Print at your convenience
- ✔ Share Easily with Friends / Students