

Musya
Montage - Art and Craft CBC Grade 6 Notes
- Pictorial Composition
- Characteristics Of A Montage
- Spacing And Balancing Forms In A Montage Composition
- Creating A Montage Composition
- Montage is a picture composition that is created by cutting and joing images that relate to each other.
Pictorial Composition
Montage Pictorial Composition
- The cut out pictures used to create montage are glued on a surface known as base or mounting surface.
- The base used should be flat.
- A base can be:
- Manila paper
- Cardboard
- Hardboard
- Plywood
- Or any other flat surface.
Characteristics Of A Montage
- in a montage picture are arranged in a manner that they can overlap each other.
- Overlapping means one picture is glued on top of the other.
- Picture used to make a montage can be sourced from old newspapers, old magazines, and calendars, downloaded and printed images from the internet.
- The pictures used are usually related so as to tell the same story or communicate a particular message.
- Cut out text can also be used to help a montage to communicate even better.
Spacing And Balancing Forms In A Montage Composition
- Arranging cut out images on the base before pasting them will help you to achieve balance when creating a montage.
- You can use chose to arrange the picture cut outs side by side. Or overlap them
- In montage overlapping involves putting one picture cuts out on top of another in a way that allows the picture at the back to be partly visible
- When overlapping, let the small picture cuts be glued on top of the big picture cut out.
- Ensure proper use of space by using more than half of the mounting surface.
- Good use of space helps to create balance and center of interest for the montage.
- When balancing objects, arrange them in away they communicate well with each other in order to tell a story or send a message.
Creating A Montage Composition
- Collect the suggested tools and materials.
Base/adhesive/razor/scissors/pictures - Pick the subject matter for your montage
- Cut out the pictures. You need for your montage.
- Arrange the pictures cut outs on the base.
- Mark the position of each picture to avoid disarranging when you will be pasting.
- Apply glue on the back side of each picture cut outs and then paste it to the base.
- Add more details to your montage by making cut outs of other things like grass
- You can trim parts of the cuts outs that are outside the mounting surface.
- Mount your work
Appreciating each other’s work
The Teacher Can Appreciate Pupils Work By
- Displaying of good pieces of work
- Showing personal enthusiasm by the teacher.
- Evident interest in what learners are doing.
- Discussing and judging of good work.
- Personal enthusiasm by other learners.
Painting - Art and Craft CBC Grade 6 Notes
Painting is the skill of creating an image by using paint.
Imaginative Composition
Painting Imaginative Composition
- Materials used in painting are
- Paints
- Painting surface like:
- paper
- cloth
- canvas
- stone
- skin
- wall
- boards
- Tools like
- paintbrush
- sponge
- paint palette
- Spatula
NOTE: Palette is a flat surface on which a painter arranges and mixes paints. It can be made
of wood, plastic or carton paper.
- Tools and materials used for painting can me found or made locally within our environment.
Factors To Consider When Painting
- Depth
- Proportionality
- Centre of interest
- Subject matter
- Every painting is based on a theme or topic also known as the subject matter
- A painting can be about:
- Sports
- Family
- Education
- Celebration among others.
- The part of a painting that attracts your attention is known as centre of interest.
You can create centre of interest in painting by
- Making a particular object bigger than the rest.
- Using colours that contrast (different colours)
- Placing an object at the centre of the painting.
- Painting the actual size and shape of an object compared to another is called proportionality.
- On the painting surface objects that are near you should be placed lower and be bigger in size while objects far from you should be placed higher and smaller in size.
- This helps to create depth and make the painting look real.
Creating Tonal Value In Painting
- In painting an object can be made to look real by varying the lightness and darkness of the colours used.
- The lightness or darkness of colour is also known as the tonal value of the colour.
- Tonal value is created using shading and tinting techniques.
- Shading involves adding black to a colour to make it look dark.
- Tinting involves adding white colour to a colour to make it light.
- The addition of black or white colour creates tonal variation.
- In order to create tonal value effect when painting, identify the direction of light reflecting on the object.
- Apply dark colour paint of the object that you want to be dark and use white colour on areas that you want to be light. Merge the two colours gradually.
Painting an imaginative composition – sporting activity
Drawing - Art and Craft CBC Grade 6 Notes
Introduction
- Picture Making
- Picture making involves the application of various method such as painting, drawing,collage and montage.
- Drawing
- It is making pictures using lines and shades.
- Stippling technique
- Involves using dots to create value and make an object look like solid while on adrawing surface.
Creating Light And Dark Effect Using The Stippling Techniques
- Stripping technique uses dots to create value and make an object look solid while on drawing surface.
- In stippling, areas that are light have a small number of dots and areas that are dark have many dots.
- Tonal value is the darkness and lightness of the colour of an object.
- When stippling the number of dots should gradually change from one area to another.
- Gradually means that the dots should not change suddenly but slowly from one step to the next.
Factors To Consider When Drawing Forms
- Proportion
- Balance
- Space
Creating A Dark Effect On Two Overlapped Forms By Stippling
- When two or more objects are placed or drawn in a way that they appear to be covering or blocking each other’s parts, the objects are said to be overlapping.
- When overlapping objects
- The large objects should be placed at the back –background, while the small objects in front- foreground
- The objects in front should be drawn at a lower position than the ones at the back.
- Objects closer to you are the ones in front and those far from you are the ones at the back.
- Objects in the middle are said to be at the middle ground.
- The objects that overlap are always separated by light and dark effect.
Drawing Three Overlapped Forms Using The Stippling Technique
Pot/gourd/calabash
- Collect the suggested tools and materials
- Follow the suggested steps and draw three overlapped forms using the stippling techniques
- Arrange the pot, gourd and calabash on a flat surface. The pot should be behind, the gourd in the middle and the calabash in front.
- Draw an outline of the three objects. Use dotted lines to show the objects are overlapping.
- Use rubber to erase parts or lines which have overlapped.
- Chose the direction you want to have and the direction you want less light.
- Use many dots to shade area and gradually reduce the dots as you move towards the light area.
Drawing
Imaginative Composition
- Imaginative drawing is a drawing made from an idea that is in your mind not what you see.
Creation of textural effect by stippling technique
- In stippling technique, dots can be used to show the surface quality of an object.
- Texture is the quality of a surface. Texture is used to show how an object would feel when touched.
- The surface with any dots is considered to be rough while the surface with few dots is considered to be smooth.
Creating Visual Balance When Drawing Several Forms
- Balance is the arrangement of objects in a space within a picture composition.
- Balance makes an art more attractive. It makes the artwork more stable and more comfortable to look at.
- When balancing objects, we should place them at the centre of our space and make them large enough to occupy at least more than half of our space.
- We can balance objects or forms using
- Colours
- Lines
- Shape
- Texture
- Tonal value
- There are 3 ways of creating balance
- Placing objects at the centre of the drawing space, so that the left part and the right part of the composition look equal.
- Arranging forms in a way that the left and the right side of your composition are not equal.
- Arranging forms in an imaginative manner.
Drawing An Imaginative Composition Of A Twig With Two Leaves And A Fruit
- Collected the suggested tools and materials. Pencil/pen/rubber/picture of real twig with two leaves and fruit.
- Place a picture of a real twig with two leaves and a fruit on a flat surface.
- Use a ruler to draw the drawing space you will use in your drawing book. Draw an outline shape of the objects. Use dotted line to show where the objects are overlapping.
- Use a rubber to erase parts or lines which have been overlapped. Reduce the darkness of your outline using a rubber.
- Chose the direction you want to have more light and the direction you want less light.
- Apply more dots on the dark areas and fewer dots on the light areas. Let the dots fade gradually.
- Identify the sharp edges, corners and holes on the twig and fill them with more dots to create texture.
Appreciating each other’s work.
Bible Stories - Christian Religious Education CBC Grade 6 Revision Notes
God’s Power
How God’s power helped Samson to defeat his enemies
Judges 15:14-17
- He was the son of Manoah.
- He asked God for strength.
- He married Delilah.
- God’s power enabled Samson to fight and kill his enemies, the philistines
- God is able to empower us when we put our trust in Him.
- Delilah noticed that Samson strength was in his hair and she planned for way to hand over Samson to Philistines.
- The Philistines king met together and celebrated and offered great sacrifices to their god dagon.
- They sang, “our god has given us victory over our enemy Samson”
- Samson said to the boy who was leading him by the hand, “let me touch the pillars that hold up the building. I want to lean on them.
- We had Philistines kings and about 3000men and women under roofmwatching Samson.
- Samson pushed the pillars with all his strength and the buildings went down killing all the people.
- Samson killed more people at his death than he had killed during his life time.
How Christian depend on God’s power to overcome challenges.
Judges 15:14-17
- The story of Samson defeating his enemies teaches us that we should rely on God to help us overcome challenges.
- Whenever we go through a challenge, we should put our trust to help us overcome it.
Faith In God
How Elisha recovered an axe head
2 kings 6:1-7
1 The company of the prophets said to Elisha, “Look, the place where we meet with you is too small for us. 2 Let us go to the Jordan, where each of us can get a pole; and let us build a place there for us to meet.”
2 And he said, “Go.”
3 Then one of them said, “Won’t you please come with your servants?”
“I will,” Elisha replied.
4 And he went with them.
They went to the Jordan and began to cut down trees.
5 As one of them was cutting down a tree, the iron axhead fell into the water. “Oh no, my lord!” he cried out. “It was borrowed!”
6 The man of God asked, “Where did it fall?” When he showed him the place, Elisha cut a stick and threw it there, and made the iron float.
7 “Lift it out,” he said. Then the man reached out his hand and took it.
How Christian apply faith in God in day to day living
- Elisha recovered an axe-head because he had faith in God.
- The story of Elisha recovering the axe-head teaches us to have faith in God when faced with challenges.
- We should have faith in God to experience great things.
- We should also pray when faced with challenges
Determination
Lessons learnt from the story of Jacob wrestling with God
Genesis 32:22-30
22 That night Jacob got up and took his two wives, his two female servants and his eleven sons and crossed the ford of the Jabbok. 23 After he had sent them across the stream, he sent over all his possessions. 24 So Jacob was left alone, and a man wrestled with him till daybreak. 25 When the man saw that he could not overpower him, he touched the socket of Jacob’s hip so that his hip was wrenched as he wrestled with the man. 26 Then the man said, “Let me go, for it is daybreak.”
But Jacob replied, “I will not let you go unless you bless me.”
27 The man asked him, “What is your name?”
“Jacob,” he answered.
28 Then the man said, “Your name will no longer be Jacob, but Israel,[a] because you have struggled with God and with humans and have overcome.”
29 Jacob said, “Please tell me your name.”
But he replied, “Why do you ask my name?” Then he blessed him there.
30 So Jacob called the place Peniel,[b] saying, “It is because I saw God face to face, and yet my life was spared.”
Values learnt from the story of Jacob wrestling with God
- Jacob was so persistent that he got a blessing.
- As Christian, we should be persistent in prayers
- The story of Jacob wrestling with God teaches us to be
- Persistent
- Patient
- Determined
- Humble
- Responsible
- Loyal
The Ten Commandments - Christian Religious Education CBC Grade 6 Revision Notes
- The Ten Commandments and their relationship to Christian living
- Values and skills in the Ten Commandments that enhance Christian living
- Lessons which Christians learn from the Ten Commandments
Exodus 20:3-17
Exodus 20:1-18)
- Worship no other god but me.
- Do not make yourself images/idols.
- Do not use Gods’ name for evil purpose.
- Observe the Sabbath and keep it Holy.
- Respect your father and mother so that you may live long on earth.
- Do not commit murder.
- Do not commit adultery.
- Do not steal
- Do not accuse anyone falsely.
- Do not covet your neighbour’s property.
The Ten Commandments and their relationship to Christian living
Exodus 20:1-18
- The first four commandments explain how we should relate with God.
- The fifth commandment to the tenth teaches how to relate with each other for harmonious living.
Values and skills in the Ten Commandments that enhance Christian living
- The ten commandments teach different values and skills
- Some of the values are
- Respect
- Purity
- Honesty
- Contentment
- Some of skills are
- Decision making
- Conflict resolution
- Conflict thinking
Lessons which Christians learn from the Ten Commandments
- Christian should obey the ten commandments to promote harmonious living among themselves.
Commandment Lesson 1 Worship no other god but me. God is supreme 2 Do not make yourself images/idols. Putting God First 3 Do not use Gods’ name for evil purpose. The name of God is holy 4 Observe the Sabbath and keep it Holy. God worked for 6 days and rested on the seventh.
The Sabbath day is the day of the Lord.
God made the Sabbath holy and blessed it.
We should not work on the Sabbath day5 Respect your father and mother so that you may live long on earth. God commands us to respect our parents
Our parents provide us with basic needs and guidance.
God will bless us with long life if we obey our parents.6 Do not commit murder We should not get angry with other people.
Hating people lead to murder.
We should forgive those who wrong us
We should not revenge7 Do not commit adultery. Adultery is a sexual sin which involves in engaging in sex with a person you are not married to.
Anyone who looks at a woman lustfully has committed adultery in his heart.
Adultery destroys families8 Do not steal Stealing is forbidden by God.
Stealing shows lack of respect for other people’s property.
Stealing causes suffering to people.
We should avoid the temptation to steal
We should be satisfied with what we have9 Do not accuse anyone falsely. The commandment is not to tell lies.
Telling lies shows lack of love for our neighbors.
We should not swear but tell the truth always
We should not accept bribes to condemn anyone falsely10 Do not covet your neighbor’s property. Desiring other peoples’ property is breaking the tenth commandment.
Greed comes from selfishness and lack of concern for others
The Bible - Christian Religious Education CBC Grade 6 Revision Notes
- The Bible As The Inspired Word Of God.
- Reasons That Lead To Translation Of The Bible Into Local Languages
- Advantages Of Translating The Bible Into Various Local Languages
The Bible As The Inspired Word Of God.
2 Timothy 3:16-17
- The Bible is a collection of Holy Book
- The Bible is the inspired word of God.
Why the Bible is the inspired word of God
2 Timothy 3:16-17
- The Bible contains the word of God which is used for
- teaching the truth
- rebuking wrongs
- correcting faults
- giving instructions for right living
- It is divided into 2 testaments, Old Testament and New Testament.
- Testament means covenant or agreement.
- There are 66 books in the Bible.
- Old Testament has 39 books while the New Testament has 27 books.
- The Bible was written by people who were inspired by God.
The Authors Who Were Inspired To Write The Old And The New Testaments
- The Bible was written by different authors.
- The authors were inspired by the Holy Spirit.
- Genesis
- Exodus
- Leviticus
- Numbers
- Deuteronomy
- They were written by Moses
- Genesis means origin or beginning
- Exodus means coming out or departure
- Numbers means census
- Leviticus explains rules and regulation of priests
| OLD TESTAMENT | |
| Book | Writer |
| Joshua | Joshua |
| Judges | Samuel |
| Ruth | Samuel |
| 1 Samuel | Samuel, Gad, Nathan |
| 2 Samuel | Gad and Nathan |
| 1 kings | Jeremiah |
| 2 kings | Jeremiah |
| 1 Chronicles | Ezra |
| 2 Chronicles | Ezra |
| Ezra | Ezra |
| Nehemiah | Nehemiah |
| Esther | Mordecai |
| Job | Moses |
| Psalms | David |
| Proverbs | Solomon |
| Ecclesiastes | Solomon |
| Song of Solomon | Solomon |
| Isaiah | Isaiah |
| Jeremiah | Jeremiah |
| Lamentation | Jeremiah |
| Ezekiel | Ezekiel |
| Daniel | Daniel |
| Hosea | Hosea |
| Joel | Joel |
| Amos | Amos |
| Obadiah | Obadiah |
| Jonah | Jonah |
| Micah | Micah |
| Nahum | Nahum |
| Habakkuk | Habakkuk |
| Zephaniah | Zephaniah |
| Haggai | Haggai |
| Zechariah | Zechariah |
| Malachi | Malachi |
| NEW TESTAMENT | |
| Book | Writer |
| Matthew | Matthew |
| Mark | Mark |
| Luke | Luke |
| John | John |
| Acts of apostle | Luke. |
| Romans, 1 Corinthians, 2 Corinthians ,Galatians Ephesians, Philippians ,Colossians, 1 Thessalonians , 2 Thessalonians , 1 timothy , 2 Timothy , Titus Philemon |
Paul |
| Hebrews | Unknown |
| 1 Peter, 2 Peter | Peter |
| James | James, the brother of Jesus |
| 1 John, 2 John, 3 John | John |
| Jude | Jude, the brother of Jesus |
- Revelation is the last book of the Bible and the New Testament.
- It was written by John after having a vision on Patmos Island.
Reasons That Lead To Translation Of The Bible Into Local Languages
- Old Testament, It was originally written in Hebrew.
- It was written before Jesus Christ came to exist physically.
- It was later translated to Greek and other languages
- New Testament, It was originally written in Greek.
- Written after Christ
- The Bible was translated into local languages to help the missionaries spread the word of God easily.
Advantages Of Translating The Bible Into Various Local Languages
- Bible translation enabled the missionaries to put the word into languages which the local people could understand.
- The translation of the Bible enabled the missionaries to learn local languages
- The gospel reached more people because the language of communication was familiar.
- More Africans learnt to read and write hence they were able to read the Bible for themselves
- Education was promoted, by the good work of translation of the Bible.
Creation - Christian Religious Education CBC Grade 6 Revision Notes
Using God Given Talents And Abilities
Exodus 31:3, Romans 12:4
Talents
- They are special gift that God has given us
- Is a natural ability to do something
- One can be talented in music, art, athletics
Abilities
- Abilities are skills that enables us to do things well.
- Ability is the power to use a certain skill or power to do something
- Ability can be learnt in school or from other people eg painting
The Teaching of the Bible on the use of talents and abilities
Exodus 31:3, Romans 12:4
- We should appreciate God given talents and abilities and use them well
- Learners should use talents and abilities to serve God and others.
- Learners should seek advice on how to use their talents.
- Learners should also pray to god to help them use their talents and abilities responsibly.
Values learners can use to nature talents and abilities
Exodus 31:3, Romans 12:4
- Learners can use the following values to nature their talents
- Love
- Respect
- Responsibility
- Unity
- Integrity
- Social justice
- Hard work
- Peace
- Learners can nature their talents and abilities by serving others and practising daily.
- Learners can also nature their talents by praying for God’s guidance, being committed and working hard.
Marriage And Family
Biblical teaching on marriage as an example of Christian living
Genesis 2:20-24
- Marriage is a legally recognized union between a man and a woman.
- Marriage is an institution that was ordained by God.
- God created a woman out of man’s rib and brought her to him.
- He created a woman to be a companion and helper
- Christians should respect the institution of marriage.
- A Christian marriage is highly valued.
- The marriage unit forms the foundation of a strong nation
- Among the Christian teachings on marriage are:-
- Marriage was established by God
- Courtship should be pure and mature
- Fornication is not allowed
- Procreation should be within marriage
- Love and fitfulness are the cornerstones of marriage.
- The wife should submit to the husband.
- The bible teaches that God ordained marriage from the very beginning.
- Celibacy is a gift from God but it is not for all people.
- Apostle taught that marriage partners should honour their roles towards each other.
- Widows and widowers can remarry to avoid temptations
Types of marriage
There are 3 types of marriage
- Christian marriage
- Conducted by a priest or a pastor in charge of a place of worship.
- African customary marriage
- Conducted in accordance with the customs of the community of either one or both of the parties.
- Civil marriage
- Conducted in the office of the register of marriages, deputy count commissioner or assistant county commissioner.
Reasons for discouraging early marriages in the society
- We should discourage early marriages
- All children have a right to education, health and protection.
- Early marriages affect the children’s development
- They also violate rights of a child.
God’s Rest
Leisure
- Leisure is the time when we are free from work or studies
The teaching of the Bible on God’s rest as a form of leisure
Genesis 2:1-3 and 1Timothy 5:13
- God rested on the seventh day because all that he had created was good and His work was finished.
- He also wanted to teach us that we too should rest.
- Christian rest on the Sabbath day so as to follow God’s example
- The bible teaches that God sanctioned rest when he made the Sabbath.
- The Sabbath is sanctified as a holy day of rest.
- Christians should observe the Sabbath and keep it holy
The teaching of the Bible on the use of leisure time
Genesis 2:1-3 and 1Timothy 5:13
- the bible teaches that leisure is a gift from God.
- It should be used properly
- It provides us the opportunity to worship God
- Christians should use their leisure to serve God and others.
- There are two types of leisure
- Active leisure
- Active leisure involves physical activities .
- Such activities include:-
- Sports and games.
- Dancing
- Passive leisure
- Passive leisure has minimal or no physical activity.
- It includes watching television, reading, listening to music or sleeping
- Active leisure
- Christians’ can use their leisure time to visit the needy such as the sick, the aged
- They can also use their leisure by participating in church activities
Values which help Christians to use leisure time properly
- Love
- Respect
- Responsibility
- Unity
- Integrity
- Social justice
- Hard work
- Peace
Inappropriate ways of using time in society
- Some inappropriate ways of using leisure are
- Spending too much time on passive leisure activities
- Spending leisure in idle talk
- Spending leisure taking drugs and other substances
- Leisure can be used to engage in immoral activities.
- This may be caused by
- Peer pressure
- Curiosity
- Idleness
- Lack of guidance
- Having too much money.
- Activities that misuse leisure include;
- Pre-marital sex
- Abusing drugs
- Idling and gossiping
- Over-indulging in the same activities.
- Getting into bad company.
- Misuse of leisure makes life miserable
Volleyball - Physical Health Education CBC Grade 6 Revision Notes
Volleyball
Skill In Volleyball
- Dig pass
- Single hand dig pass
- Two handed dig pass
Purpose of dig pass- Receive a serve ball or spike ball
- Set the ball for spiking/boasting
- Pass the ball to opponents
- covering
- Service – it is an art of putting the ball into play
- Over arm service
- Underarm service
- Jump service
Single Hand Dig Pass
- Is where a player uses one hand to receive or pas the ball.
- It is used when the ball cannot be reached with both hands
Safety Instructions
- Ensure you warm up before any exercise
- Ensure the space is cleared of any hazards and risks such as rocks, sticks and items that can hurt you when playing
Warm Up Activities
- High knee
- Hug lift your right knee to the chest and hug it tight as you take a step switch to the left knee.
- Players shuffle from the left to the right and back.
- Knee raisers
- From a standing position raise your right and left knees in turns.
- Half squats
- From a standing position, hands raised upwards, make a half squat maintaining upright posture
Cool Down Activity
- Walk at a moderate speed swinging hands round
- From a standing position, hands raised up, stretch the body upwards breathing deeply.
Learning points when performing single hand dig in volleyball
- Position yourself facing the direction of the oncoming ball
- Reach out to the ball and make contact with the forearm
- Follow through by ensuring the ball is directed to the intended receiver.
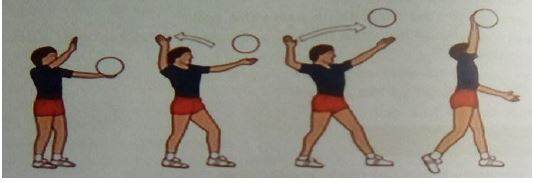
Over Arm Serve
- This is where the player tosses the ball with one hand and strikes it in the air above their head with the other hand so that it crosses the net and lands into the opponents side.
Safety Instructions
- Perform thorough warm up before the activities
- Avoid congestion by maintain a safe distance from your peers.
- Follow instruction from your teacher and your peers.
Warm Up Activity
- Arm swings
- Swing arms clockwise for 0 seconds start slohly as you increase pace
- Arm Swing antclockwise fo 0 seconds. Start slohly as you increase pace
- Imaginary over arm serve. Preten' you are hol'ing act tossing it up and down and hitng it hith open arm
Cool Down Activity
- Walk at a moderate speed swinging hands round
- From a standing position, hands raised up, stretch the body upwards breathing deeply.
Minor Games And Basic Rules
- Minor games are small side games that help you practise skills learnt in volleyball while applying the rules of the game.
Safety Instructions
- never fist hit the ball. You could hit someone in the face and cause injury.
- Do not throw the ball over the net, roll it under the net
- Do not swing on the post
- Do not go under the nets, always walk around the net.
Types of volleyball
- Beach volleyball
- Sitting volleyball
- Field volleyball
Equipments
- Ball, net, posts 2.5m, antennae, and player’s jersey
Soccer - Physical Health Education CBC Grade 6 Revision Notes
Soccer
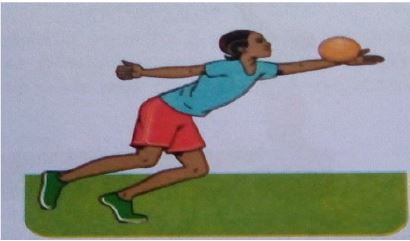
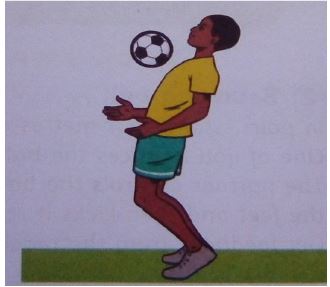
Trapping - using the thigh
- Trapping involves receiving and controlling the ball in a soccer game
- The thigh trap is where a player controls the ball with the upper part of the leg between the knee and the hips; this part is called the thigh.
- The thigh trap is applied when the ball is below the chest level but high that it cannot be controlled using the foot.
Safety Instructions
- Avoid pushing and kicking one another while playing.
- Wear appropriate attire while playing.
- Warm up before and cool down the body after the activities
Warm Up Activity
- Jog around the marked area with moderate arm action and moderate knee lift.
- Chase and tag partners within the marked area.
- Knee raiser; from a standing raise your right and left knees in turns. Perform the activity for 20 seconds continuously
Cool Down Activity.
- Walk at a moderate speed swinging arms up and down.
- From a standing position, arms are raised up, stretching the body upwards breathing in deeply.
Learning points when performing the thigh trap
- Stand feet shoulder width apart.
- Face the direction of the oncoming ball.
- Elbows should be away from your body for balance.
- Lift the thigh so that it is horizontal to the balance leg.
- As the ball makes contact with the thigh drop the thigh to cushion the ball to the feet.
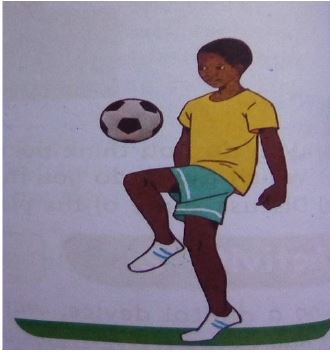
Trapping – using the chest
- Chest trap involves controlling, stopping or bringing the ball under control using thechest.
- This may do to a flight or to a bouncing ball.
Safety Instructions
- Avoid pushing and kicking one another while playing.
- Wear appropriate attire while playing.
- Use protective equipment like shin guards and chest protectors.
- Follow the instruction given by your teacher
- Maintain self discipline
- Warm up before and cool down the body after the activities
Warm Up Activities
- Jog on the spot
- Start the activity slowly and increase the speed gradually.
- Rhythmical jumps
- Make jumps landing on the balls of the feet
- Start with jumping a low height and later a higher height
- The hands should contact the knees while jumping
- Trunk rotation
- Start with the feet shoulder width apart and hands akimbo
- Rotate the upper part of the body by leaning backwards, leaning to the right side forward and then to the left side.
- Half squats
- From a standing position, hands raised upwards, make a half squat maintaining upright posture.
Cool Down Activity
- Walk at a moderate speed swinging hands round.
- From a standing position, hands raised up, stretch the body upwards breathing upright posture.
Learning points when performing chest trap to a ball in flight
- Stand feet shoulder width apart.
- Face the direction of the oncoming ball.
- Arms extended forward with an open chest
- Lean slightly backwards to cushion the ball on moment of contact
- Recover to normal upright position after trapping the ball.
OR - Stand feet shoulder width apart facing the oncoming ball
- The body should be positioned behind the flight of the ball.
- The knees should be slightly be bent
- Elbows should be held away from the body and hands clear of the chest.
- Bend at the waist and lean forward over the rising ball.
- Withdraw the chest immediately after the ball is touched to cushion it back down yourfeet.
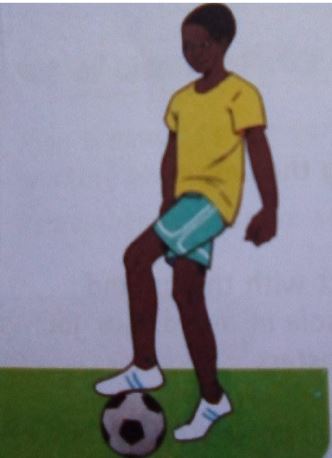
Trapping – using the sole
- Trapping using the sole involves placing the foot on top of the ball while the ball is in play to prevent it from bouncing off or rolling away.
Safety Instructions
- Avoid pushing and kicking one another while playing.
- Wear appropriate attire while playing.
- Follow the instruction given by your teacher
- Maintain self discipline
- Warm up before and cool down the body after the activities
Warm Up Activities
- Jumping jacks
- While jumping in feet apart and feet together rhythm, raise the hands up and sideways as feet open and close
- Walking knee hugs
- While walking hold one of your knees with both hands bringing it close to the chest
- Leg swings
- In a standing position and hands akimbo, swing one leg backwards and forward repeatedly.
Cool Down Activities
- Seated forward bends
- Start from a seating position and with the feet together
- Bend forward slowly to hold your toes with your hands
- Recover to a normal seating position.
- Body shakes
- Gently shake your right arm, then your left arm, and then both arms at the same time.
- Then shake your right leg, then your left leg.
- Next shake your head, your hips, and your whole body.
Learning points when performing trapping the ball with the sole
- Focus on the oncoming ball
- Hands should be slightly outwards for balance.
- The knee of the trapping foot should be slightly bend and the foot off the ground.
- As the ball makes contact with the ground, apply slight pressure on the ball with the sole to control it.
Rope Work - Physical Health Education CBC Grade 6 Revision Notes
Rope Work
Wounded Duck
- Is a technique which involves rope skipping with toes touching and heels apart, then heels touching and toes apart.
Safety Instructions
- Wear comfortable shoes
- Use correct grip and rope size
- Skip the rope on a fat and smooth surface
- Keep a safe distance from other skippers
- Use the correct skipping technique and maintain the correct posture
- Warm up before and cool down afer skipping
- Land with the balls of the feet
- Jump .5cm of the ground.
- Make sure you have enough space
- Generate the jump rope rotaton using the hrists. Do not throh arms hide
Warm Up Activities
- Tagging a partners
- Look for a partner. Run with your partner within a marked areas youtry to tag each other.
- Leg swing
- Start from a standing positon. Keep the left leg statonary on the ground.
- Slowly swing the right leg forward and backward hhile keeping it straight.
- Then change and swing the left leg
- Beckoning
- Stand with both feet comfortably apart.
- Stretch both arms forward
- Open and close the fingers contnuously
- Then stretch the arms sideways and then upwards
Cool Down Activities
- Light walking
- Walk Slowly around the marked area.
- Arm swing
- Stand with feet comfortably apart.
- Bend the body forward and swing arms Slowly to the left and to the right
Learning points to perform wounded duck technique
- Jump over the rope and land with your toes and knees inwards and your heels apart.
- Jump over the rope and land with your toes and knees outward and your heels touching.
- Alternate toes touching toes in) and heels touching (toes out). Keep on alternatng toes in toes out to create rhythm.
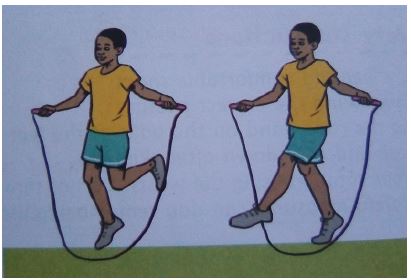
Swing Kick
- Is a technique which involves swinging the foot backwards and then kicking it forward as you skip with a rope
Safety Instructions
- Ensure you are wearing comfortable shoes
- Skip while maintaining the correct posture
- When skipping the rope, land on the balls of the feet.
- Warm up before and cool down after skipping
- Generate the rope rotation using the wrists. Do not throw your arms wide.
Warm Up Activities
- Tagging a partners
- Look for a partner. Run with your partner within a marked areas you try to tag each other
- Leg swing
- Start from a standing position. Keep the left leg stationary on the ground.
- Slowly swing the right leg forward and backward while keeping it straight. Then change and swing the left leg.
- Arm circles
- Put your arms out straight out to the side
- Start by making small circles with your arms, then slowly progress to larger circles.
Cool Down Activities
- Light walking
- Walk slowly and leisurely around the marked area
- Arms and legs shake
- Gently shake your right arm, then your left arm
- Then shake both arms at the same time. Then shake your right leg and then left leg.
Learning points when performing the swing kick technique
- Jump over the rope, landing on your right foot and swing your left foot back.
- Jump over the rope, landing on your right foot again and kick your left foot forward.
- Jump over the rope, landing on your left foot and swing your right foot back
- Jump over the rope, landing on your left foot again, and kick your foot forward.
- Maintain the rhythm of back-kick-back-kick with the feet.
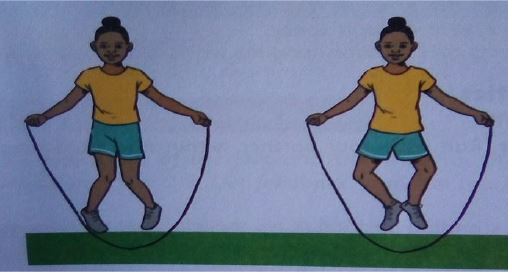
Partner Work
- Partner work in rope skipping involves skipping the rope with partner.
- The partners face the same direction or different direction as they skip the rope together.
- One partner may hold the rope or both may hold as they skip
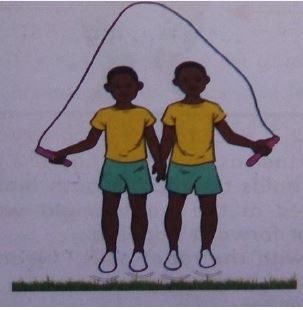
- Face to face technique
- Involves partners facing each other as they skip the rope
- Back to back technique
- Involves partners standing back to back as they skip the rope
- Side by side technique
- Involves partners standing side by side as they skip the rope
- Face to face technique
Warm Up Activities
- Partner tag
- In pairs stand one metre away from each other
- On the command go, one partner tries to tag the other one
- Keep changing roles
- Star jump
- Start in a crouching position, hands by your ankles.
- Leap into the air throwing your arms and legs out, in a star shape.
- As you land, return the hands and the feet to the starting position
- Repeat the exercise three times
- Back and side stretch
- Stand upright facing forward
- Raise your hands up towards the sky. Join your fingers and keep the elbow straight
- Bend back as far as possible, then slowly to one side. Hold the stretch for a few seconds
- Go back to starting position and change side.
Safety Instructions
- Chose an appropriate rope
- Make sure you are skipping in an open, flat and safe space
- Maintain correct rope skipping technique
- Generate the rope rotation using the wrist. do not throw your arms wide
NOTE: During partner work
- Use a skipping rope that is slightly longer than your usual single rope.
- The partner with the rope during the face to face and back to back techniques should make larger arm circles than usual to include the other jumper.
- Remember to maintain the correct distance
- Try to keep the same rhythm and speed with your partner.
- Communicate with your partner.
Learning points when performing face to face technique
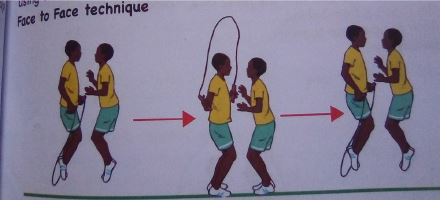
- Stand facing your partner
- One partner to hold the rope in both hands
- Arms should be placed at the waist height with the rope behind the turners feet, ready for forward skipping.
- The turner (the one with the rope) calls, ready, set, go and swings the rope up from behind.
- Both of you jump together
- Switch roles
Learning points when performing back to back technique
- Stand with your partner back to back
- One partner holds the rope in both hands
- The turner (the one with the rope) call READY, SET, GO and swings the rope up from behind
- Both of you jump together
- Switch roles
Learning points when performing side by side technique
- Stand side by side facing forward with your partner
- Each of you holds the rope with the outside hand.
- One partner calls READY, SET, GO
- Both of you turn the rope from behind and jump together.